
This ‘How To’ goes through the steps of building a simple workflow using the new workflow designer in K2 Five.
K2 Five is a complete redesign of the web based workflow designer and it also forces the developers to rethink how they develop their workflows. The new designer is not just aimed at citizen developers like the previous version of the web based designer found in K2 Blackpearl, but now at professional developers as well.
K2 Five Workflow designer has all the power of K2 Studio, but with the benefit of being all web based, so there is no need to install client tools on a developers PC or having to install Silverlight plugin on a compatible browser as it is all now HTML 5.
Case Study
GreenEggs Studio needs a simple annual leave request solution to replace their existing paper based system. They have decided to use K2 to build the solution because of it’s rapid development and low / no code proposition. As it is their first application in K2 they are going to keep the process small and simple. They also want it to get the leave request out into the business as quick as possible so they are taking an agile MVP approach so they can iterate or add features based on user feedback instead of assumptions.
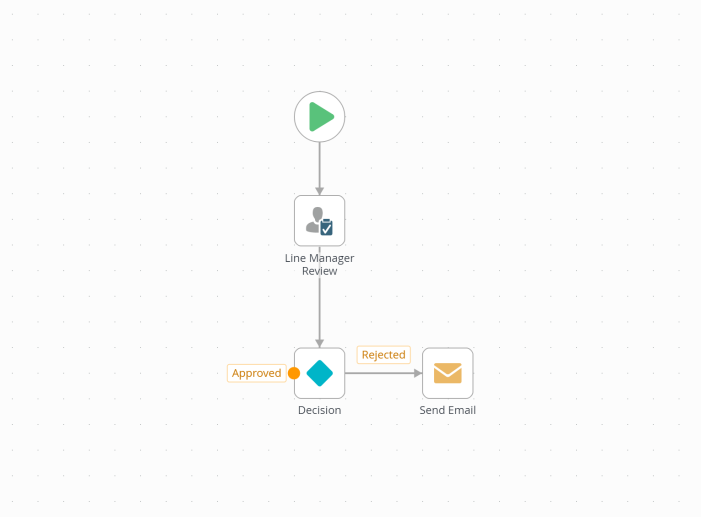
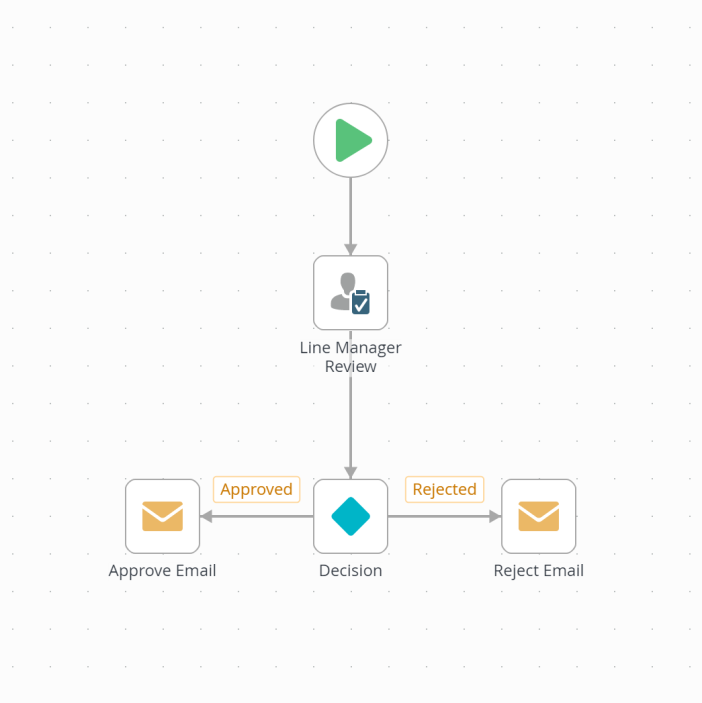
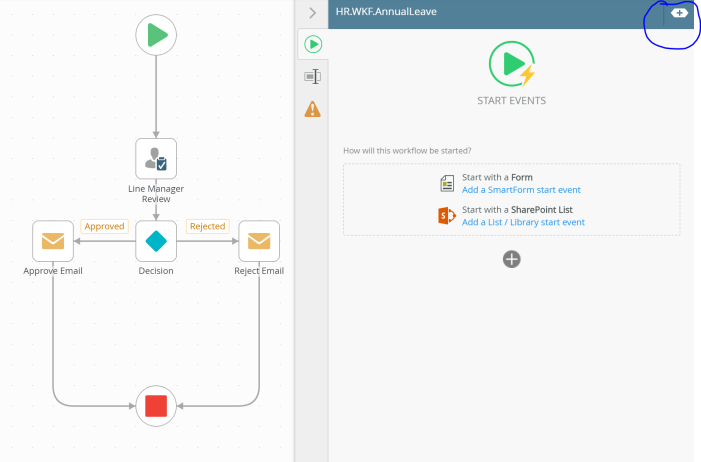
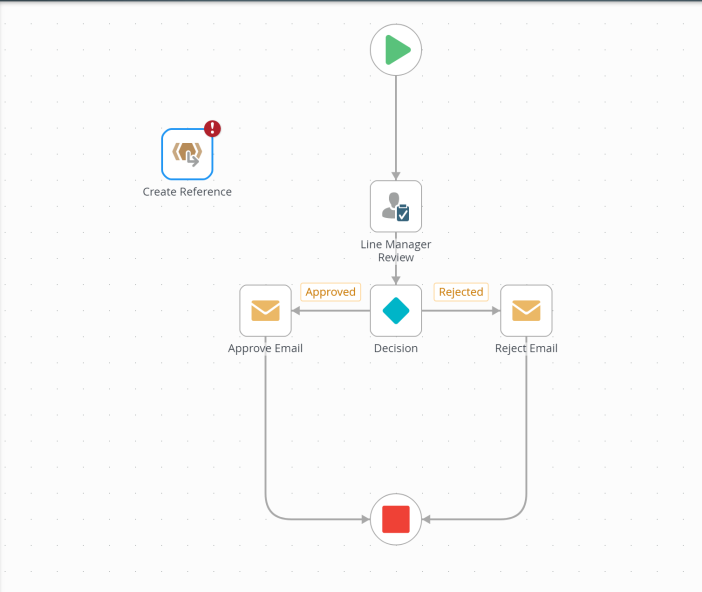
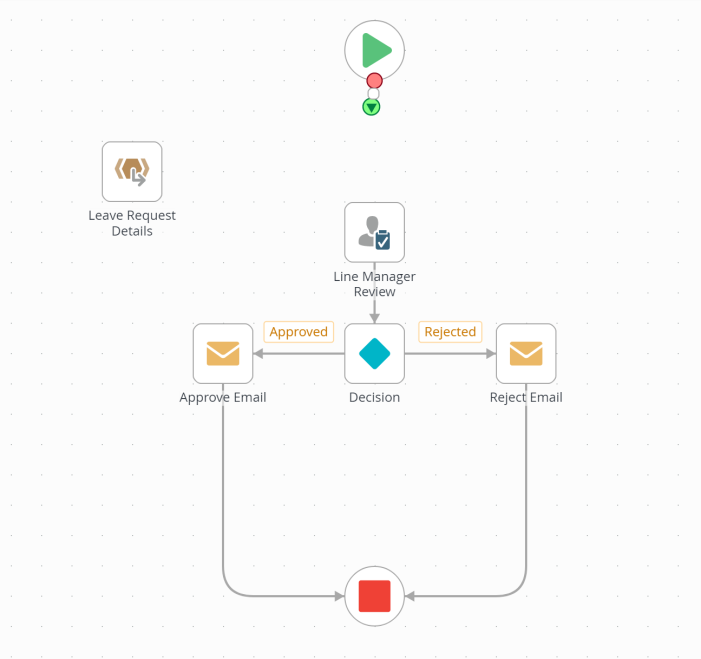
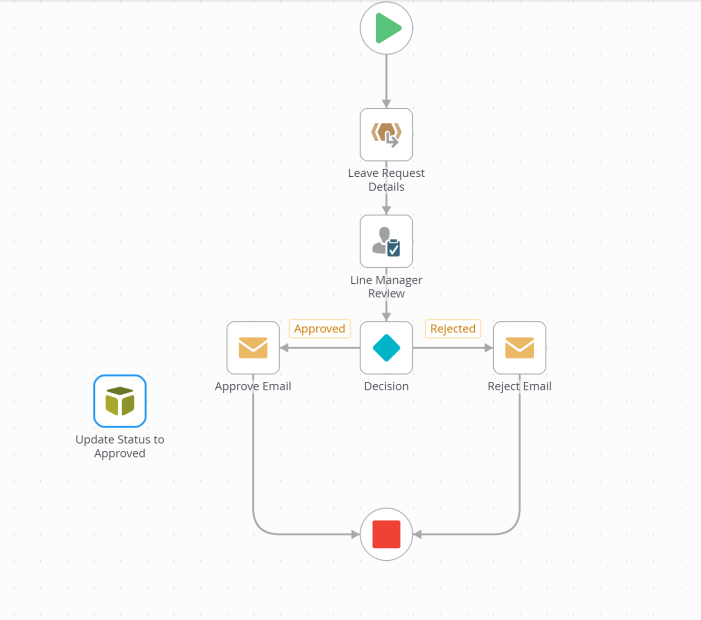
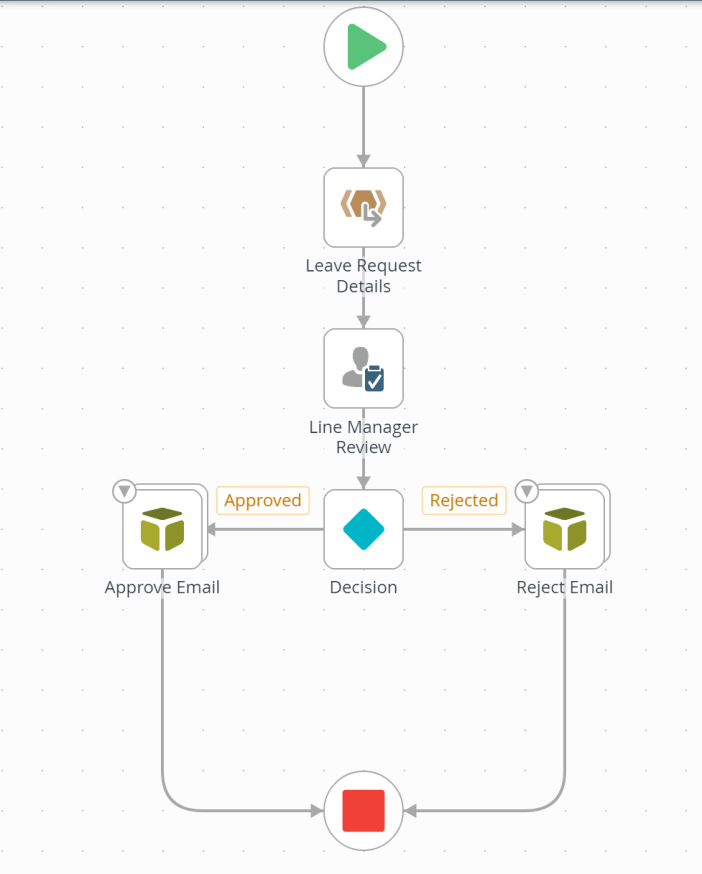
The process map looks like this
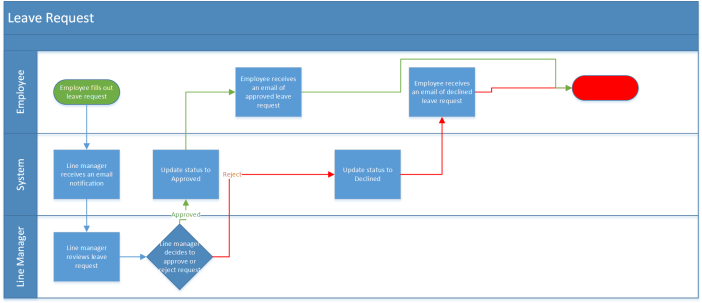
As you can see it’s a very simple process.
- An employee fills out and submits the annual leave form.
- Their line manager receives an email asking them to review the request
- If the line manager declines the request, the employee receives an email saying it has been declined and the status is updated
- If the line manager approves it, the employee receives an email saying it has been approved and the status is updated
Getting Started
Simple workflow
So lets get started with designing a workflow with K2 Five. We are going to build a simple workflow to create annual leave requests. The Smartforms and SmartObjects have already been built.
- Go to the K2 Five Designer

- Click on ‘Workflow’
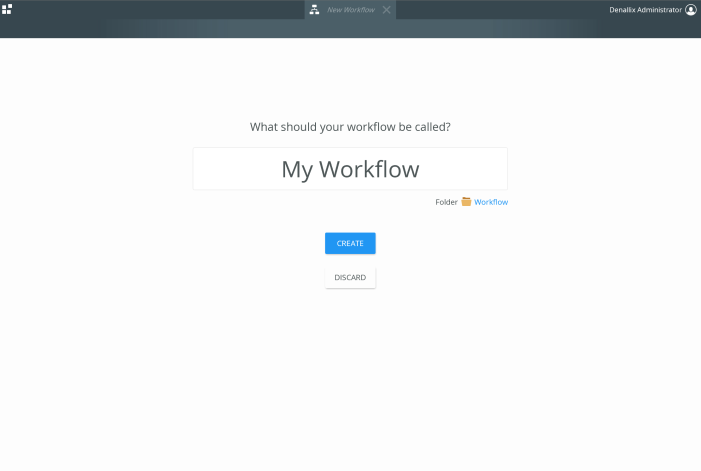
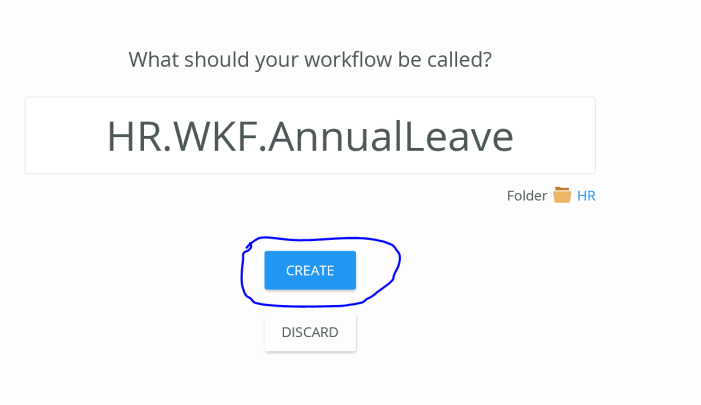
- The workflow design wizard will load up and ask to enter in a name and the location of where you want the workflow to be saved to.
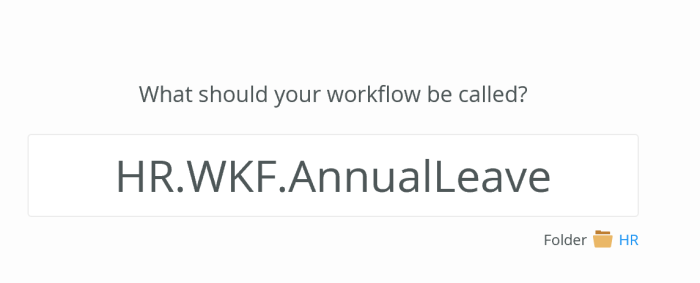
- Lets give the workflow a name like ‘HR.WKF.AnnualLeave’, the way I have named the workflow is that so we can identify what solution the workflow belongs to. In this case the ‘HR’ solution.

- Now lets choose the location, click on the blue ‘workflow’ link underneath the workflow name. A window will popup showing a list of folders.
- Select the ‘HR’ folder’ and click on ‘Ok’. If there is not a folder there already then click on ‘Create Folder’ and enter in the name ‘HR’.
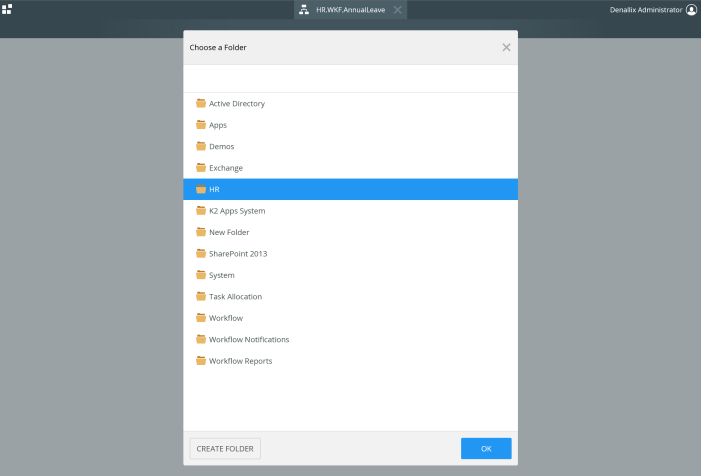
- On ‘Ok’, the folder window will close and the folder location under the name will say ‘HR’
- Now click on ‘Create’ button, this will now take us into the new design canvas.
- When the canvas loads up, we are presented with a smart assist helper to give us a brief introduction into the new workflow designer. You can click on the left and right arrows to view the helpful clips and then click on close after you have finished.
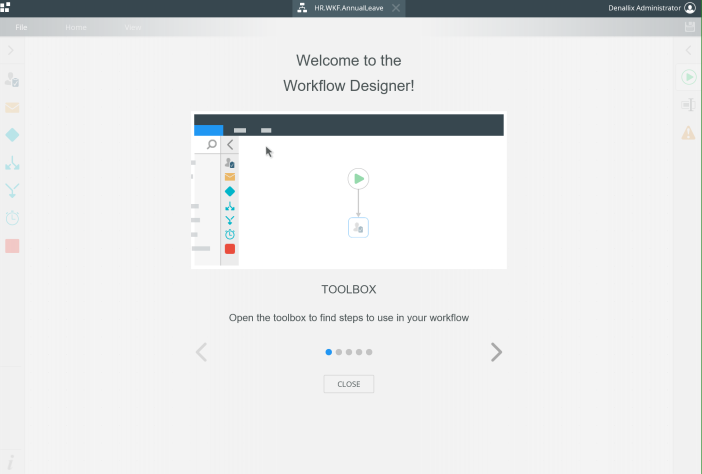
- Welcome to the new K2 Five workflow Designer 🙂
- The Smart Assist is always present within the new designer and when you are new to the designer it will suggest what to do next. You can either just click ‘x’ and it will close the smart assist for this workflow or you can click ‘Got It’ and it will assume you know what you are doing. In this case I am going to just going to click on ‘x’ to close it.
- Once the smart assist is closed the first thing you will notice is now simple the designer now looks. There are a couple of things that are very different if you have used K2’s previous workflow designers both web and studio. Activities, steps and events are gone and now replaced with ‘Shapes’ So throughout the rest of this guide you will notice I will be using term ‘Shape’ instead of event. So for example ‘I am going to drag the ’email shape’ onto the canvas instead of the email event’
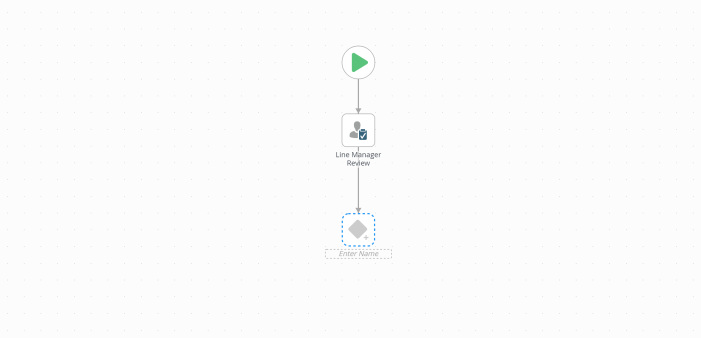
- So on the canvas we start with the ‘Start shape’ and you can see it has put a maker where we can place the next shape.
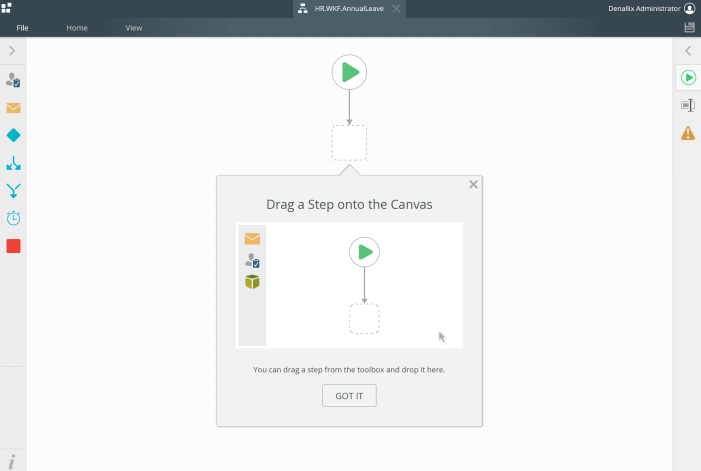
- So now that we have a canvas to build the annual leave process on. On the lefthand side of the canvas we have a toolbox of all the shapes that the workflow can carry out like creating a task, sending an email etc.. To view the shapes click on ‘>’ to expand the toolbox.

Click to expand 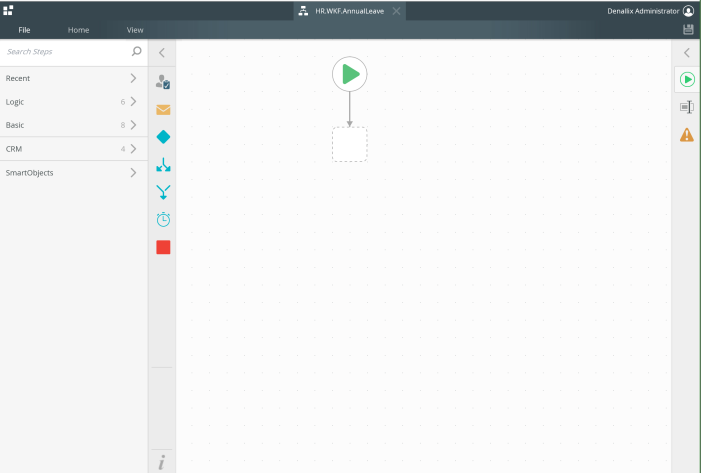
Expanded Toolbox - The first shape we are going to drag onto the canvas is a Task. Drag the task shape
 into the placeholder on the canvas. The canvas should look like the image below. A ‘!’ explanation mark will be displayed against the task shape, don’t worry about that, K2 is just letting us know it’s not yet configured.
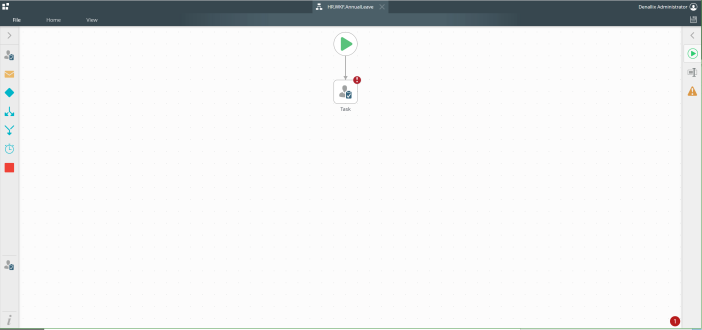
- Now Click on the Task shape on the canvas and now the righthand side configuration panel icons will change to show the task configurable options.
- Click on ‘<‘ on the configuration panel to expand the options.
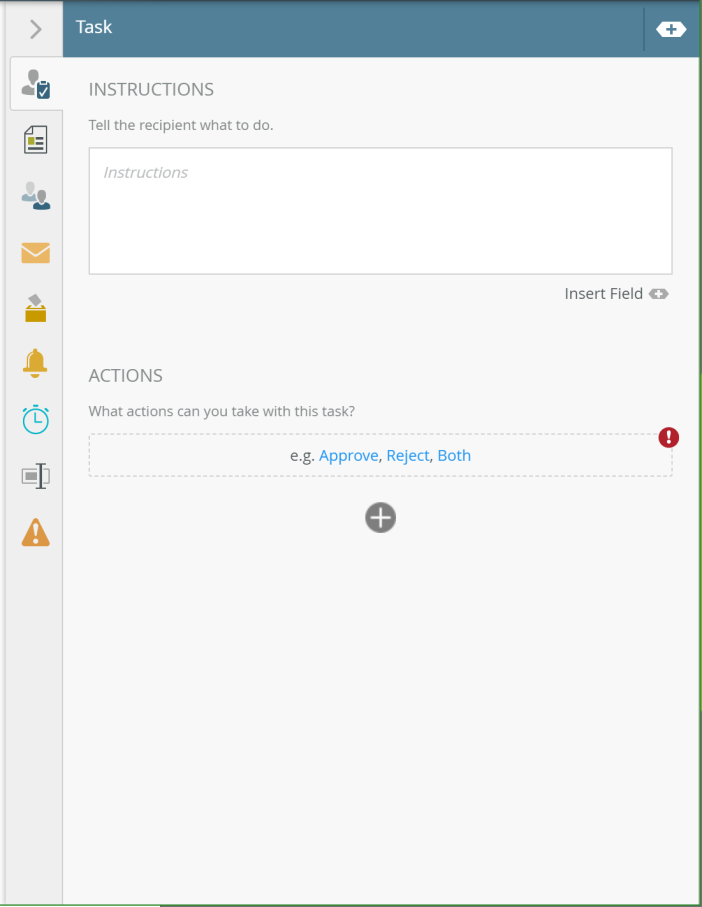
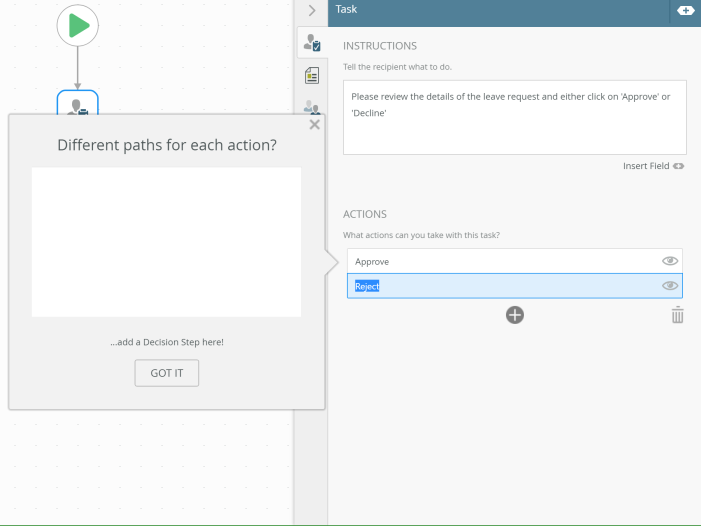
- The first tab in the task configuration options is where we can give some instructions to the person(s) receiving the task about what the task is about. It is also where we can say what actions the person(s) interacting with the task can perform.
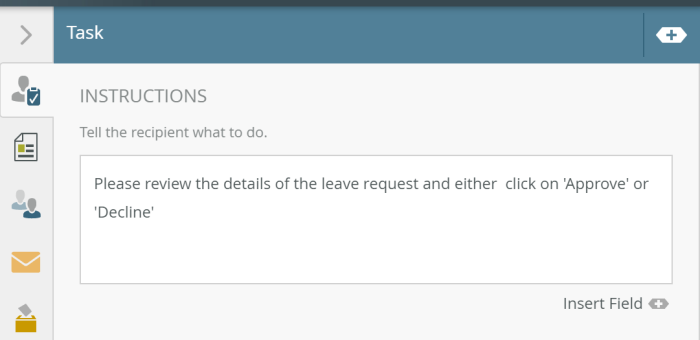
- So lets add some basic instructions “Please review the details of the leave request and either click on ‘Approve’ or ‘Decline’ “
- Next we are going to add the actions for the task. For the standard actions like ‘Approve and ‘Reject’, K2 have made it easy for us by giving us them the default options which we can just click on to create the actions.

- So lets just click on ‘Both’, the actions will appear and K2 Smart Assist will appear showing how to create action paths. Click on ‘x’ close to close the Smart Assist.
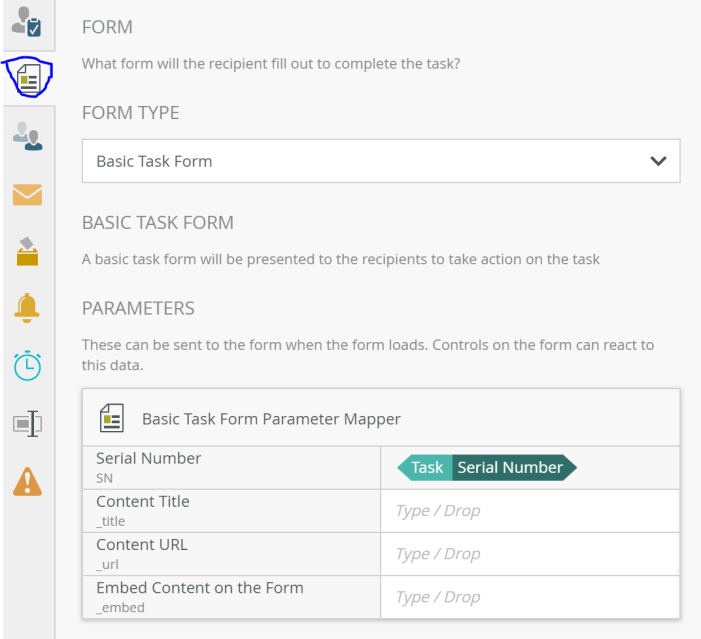
- Now click on the next tab in the configuration options, here we can choose which form will be used for the task. We can choose from the following types
- Basic Task Form, K2 autogenerates a form which is presented to the user to choose a specific action
- Smartform, we can select an existing Smartform to use from the library
- Custom, we can enter in a custom form by putting in the URL of the form we are going to use.
- No form, it is possible to have a task that has no form for the user to go to.
- For now we are going to use ‘Basic Task Form’, we will go back later and change it to a specific form.
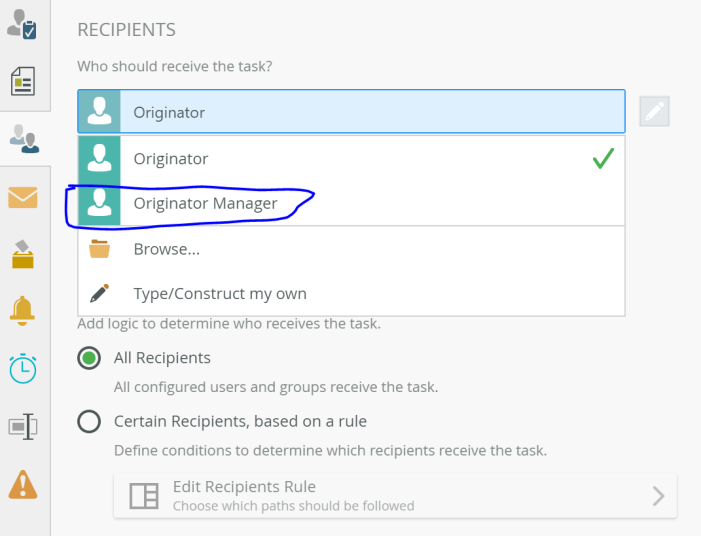
- Next we choose who will receive the task, so we need to click on the next tab to choose the recipient.
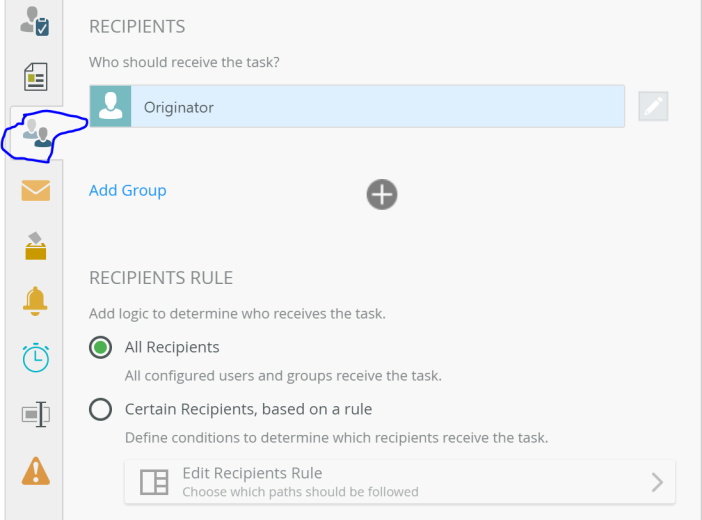
- By default the task will goto the person who submits the leave request. So we need to change this to be their line manager. Click on ‘Originator’ and select ‘Originator Manager’ from the list. Now the task when generated will go the manager of the person who submitted the leave request.
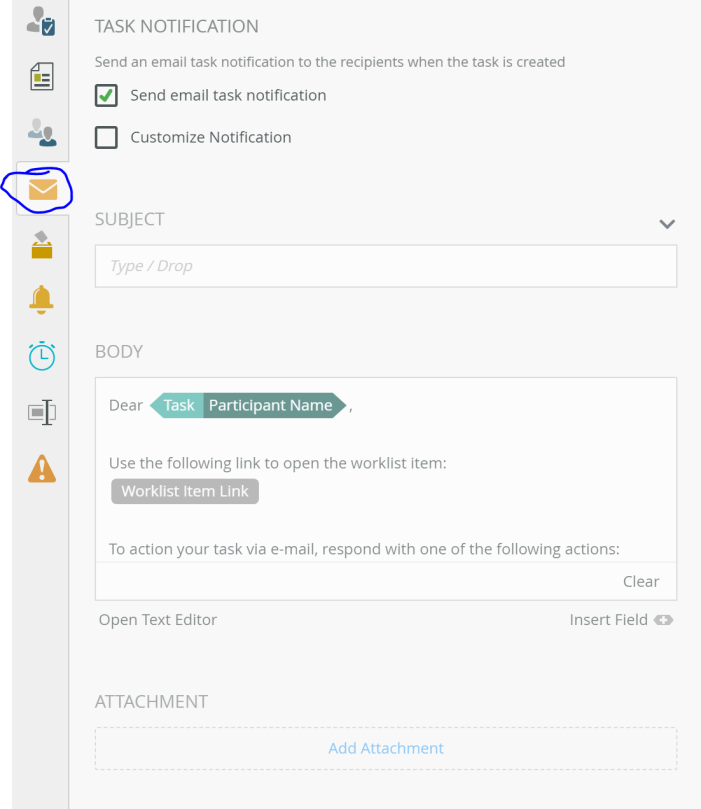
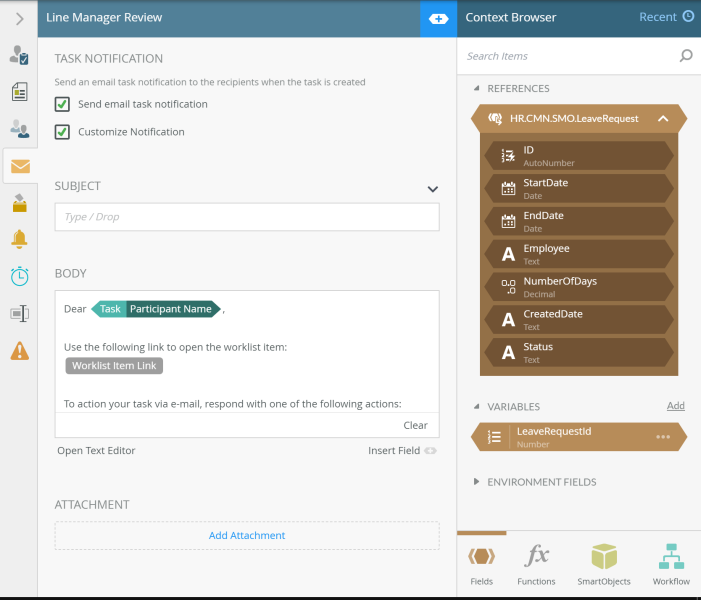
- Looking at the process map, the line manager also needs to receive an email notification to say that they have a leave request to complete. Click on the next tab down with letter icon. Here we can decide if the line manger will get an email notification. We can either use the standard notification email or we click on ‘Customise Notification’ and create a custom notification email which can include actual business data that is relevant to the task. For now we are just going to use the standard notification.
- For this walkthrough we will leave the other options for another time. We have now configured a basic task for the line manager to receive once a member of their team submits a leave request.
- Double click on the word ‘Task’ replace the text with ‘Line Manger Review’

- Now to create the decision branches on the workflow, left click and drag from the bottom of the task shape to create a new line and placeholder.
- Now drag the blue diamond shape (decision shape)
 into the placeholder. K2 will then pick up we have two actions from the previous shape and will automatically create the decision outcomes based on those actions.
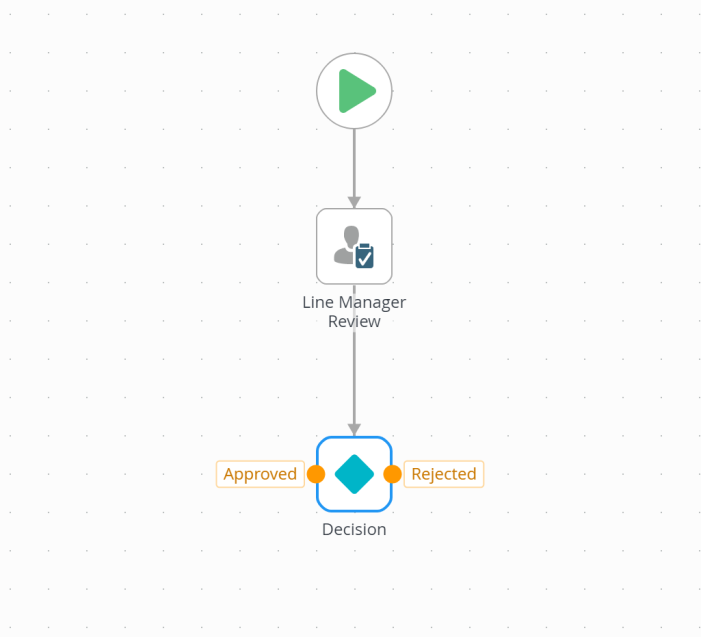
- Now lets deal with the ‘Rejected’ decision branch.
- In the process map, when a leave request has been rejected, we need to send an email to the employee who submitted the leave request. In the toolbox on the left hand side drag the email shape
 on to the canvas. Your canvas should look the below image
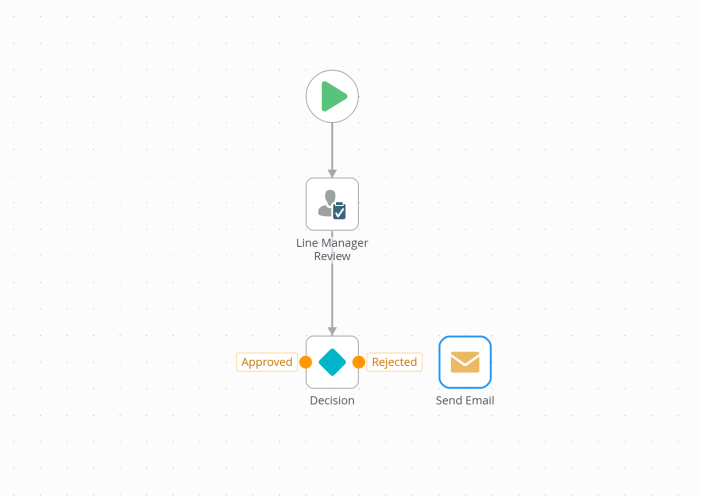
- Now left click on the orange dot next to ‘Rejected’ and drag it on to email shape we just dragged onto the canvas.
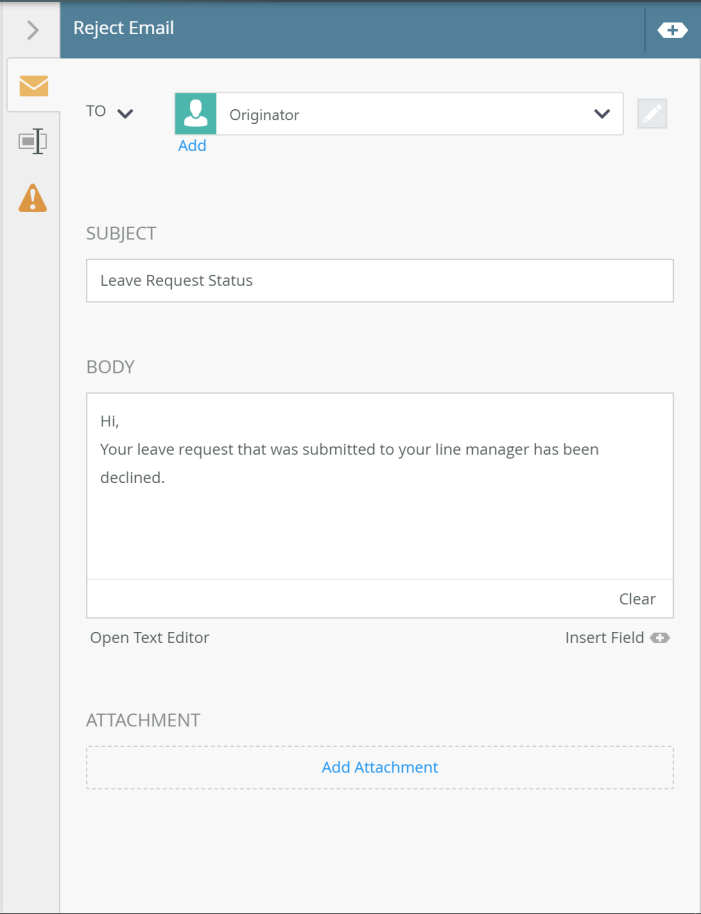
- Now lets configure the email, first of double click on the ‘Send Email’ text and enter in ‘Reject Email’
- Click on the email shape again and expand the configuration panel on the righthand side.
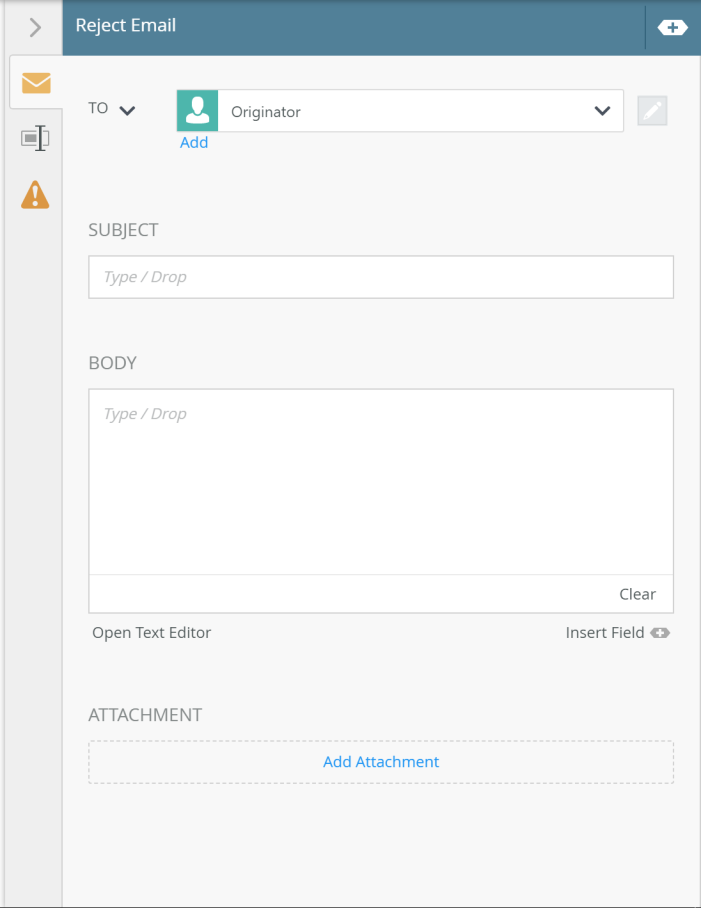
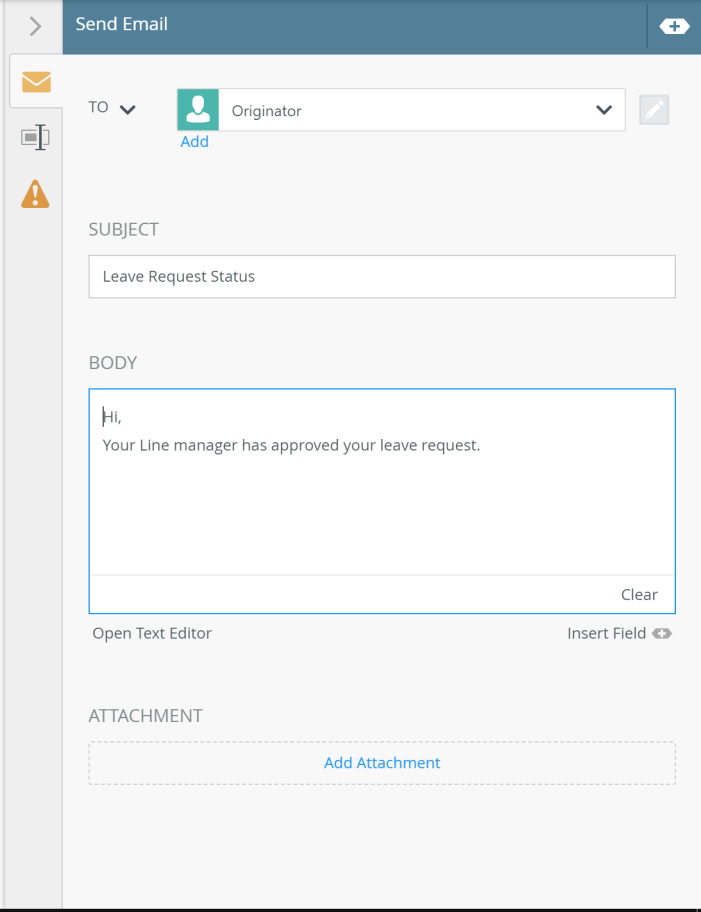
- We don’t need to change ‘To’ as it is already set to ‘Originator’ which is the person who submitted the leave request form.
- In the Subject enter in the text ‘Leave Request Status’
- In the Body section for now just enter the following text ‘Hi, Your Leave request that was submitted to your line manager has been declined.’ We will come back to this later on and enter in some business data that relates to the actual leave request. But for phase 1 we will keep it very simple.
- Now lets do the ‘Approved’ decision branch, like with the rejected branch drag another email shape from the toolbox onto the canvas.
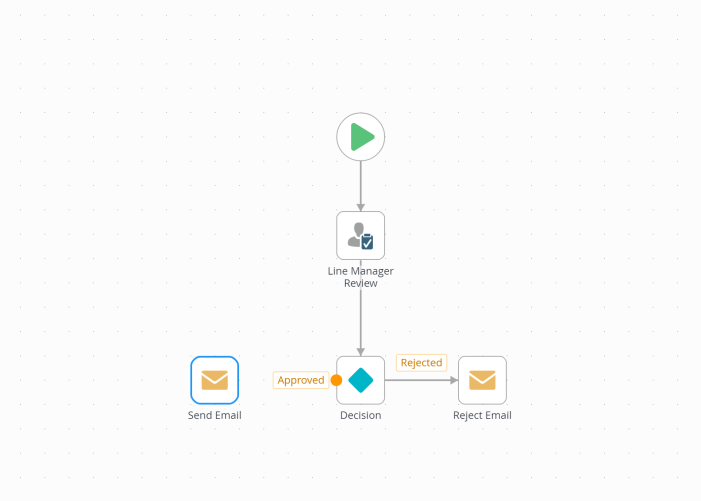
- Now drag the orange ‘Approved’ dot
 to the email the email shape.
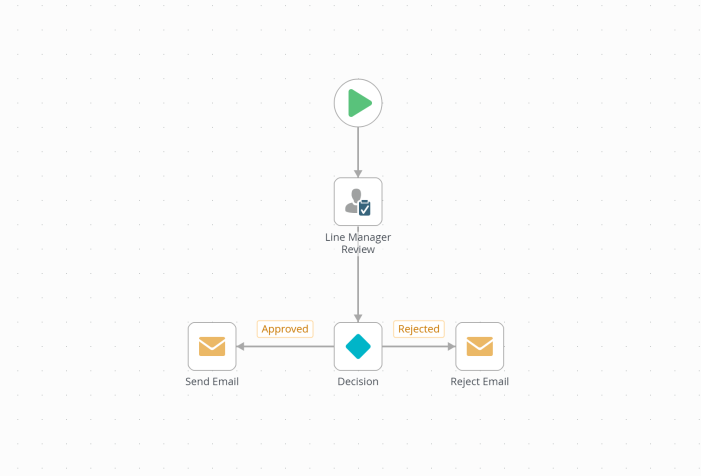
- Click on the email shape we just dragged onto the canvas and then expand the email configuration panel on the righthand side of the canvas.

- In the Subject enter ‘Leave Request Status’ and in the Body section enter in the following ‘Hi, your line manager has approved your leave request’
- Now click on the next tab in the email configuration panel, here we can change the name of the email shape from ‘Send Email’ to ‘Approve Email’. We can also use this section to enter in additional notes about the email shape.
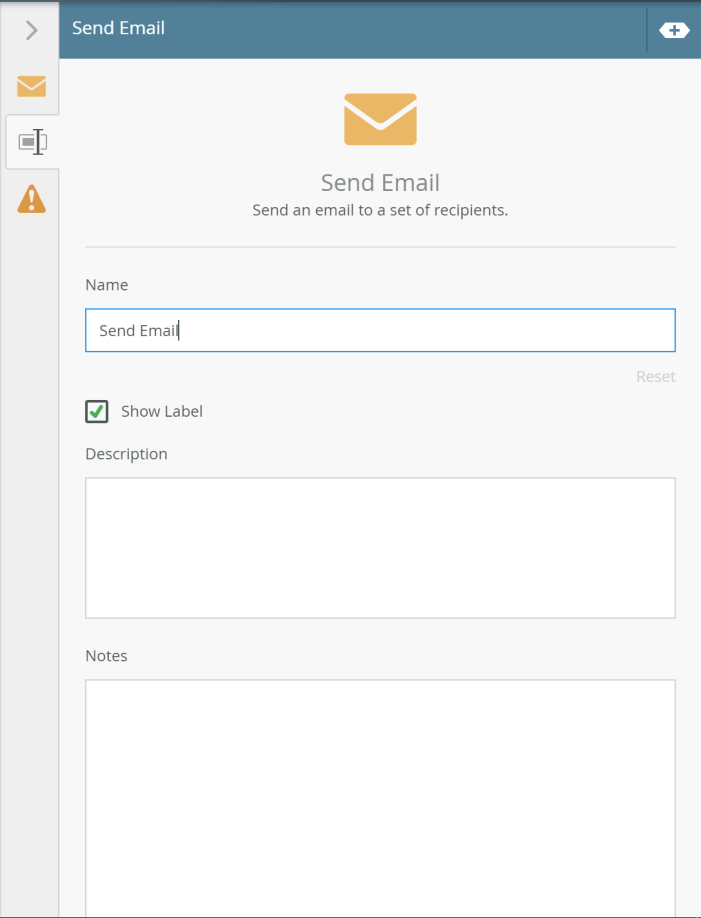
- In the name section, remove the text ‘Send Email’ and change it to ‘Approve Email’
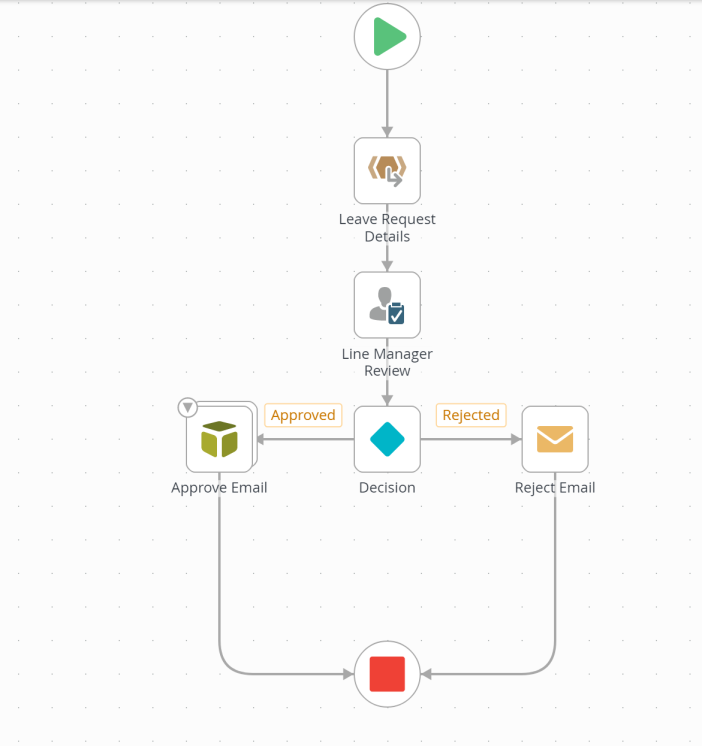
- We have now configured the email for when the leave request has been approved by the line manager. The canvas should now look like the image below.
- Now to finish off the workflow we now need to add a ‘End’ shape. In the toolbox of shapes it is the Red Square
 . Drag this on to the canvas underneath the other shapes. It should look like the image below.
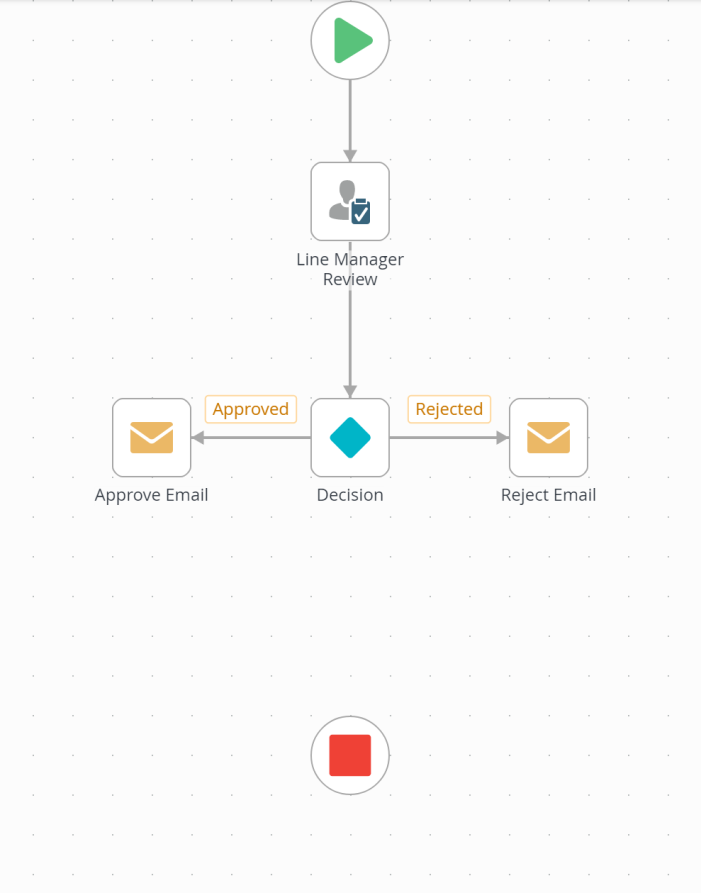
- Now we can connect the ‘Approve Email’ and ‘Reject Email’ shapes to the end. Like when connecting the decision branch to the email shape. Just left click and drag from the bottom of the email shape to the end shape. Your canvas should now look like this.
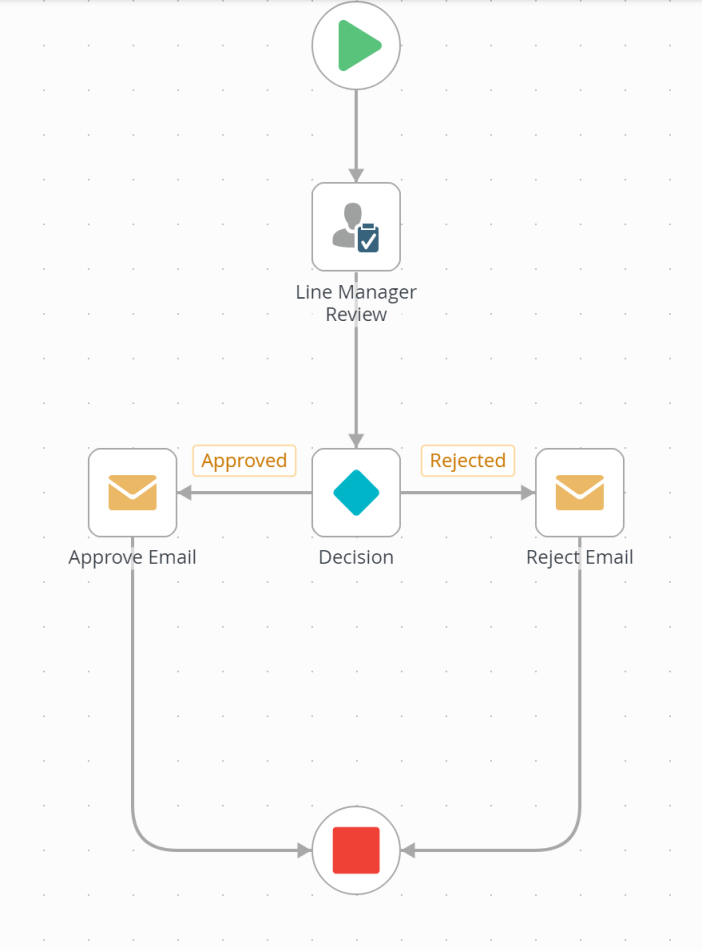
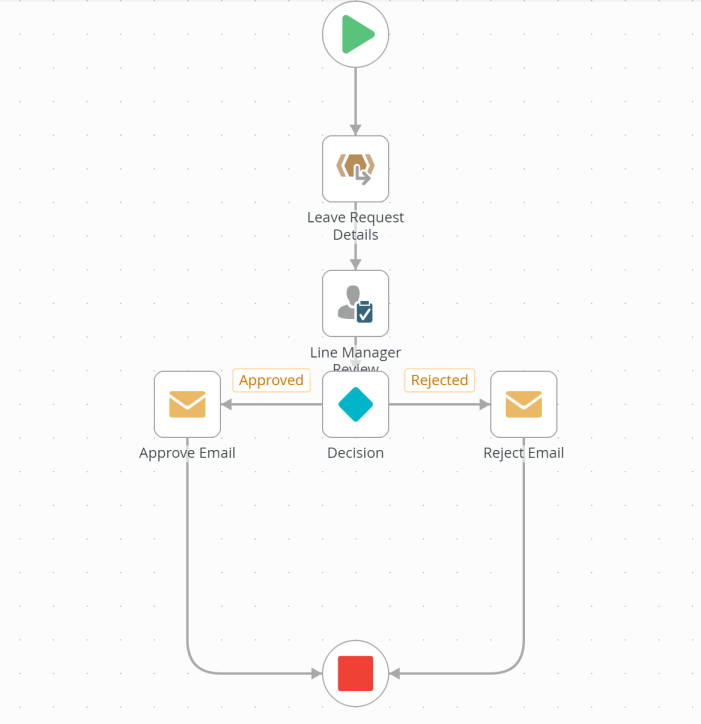
- Now we have completed a very a simple version of the leave request. The leave request gets submitted. The line manager of user who submitted the leave request then receives an email asking them to approve or reject the leave request. The user who submitted the leave request then will get an email telling them of the decision that was made by their line manager.
Using SmartObjects inside the leave request workflow
- The leave request has a SmartObject,
- HR.CMN.SMO.LeaveRequest, this holds the leave request details like leave dates, number of days, status, who created it and when.
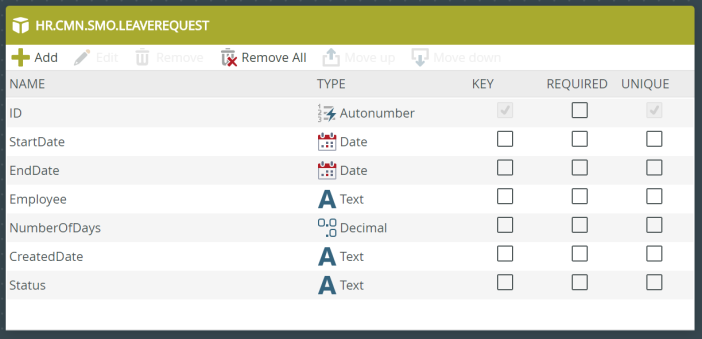
- HR.CMN.SMO.LeaveRequest, this holds the leave request details like leave dates, number of days, status, who created it and when.
- So now lets edit the workflow we created earlier to use the data from the SmartObject HR.CMN.SMO.LeaveRequest. To do this we need to add a variable to hold the LeaveRequest number. This is so the workflow can find the correct leave request details.
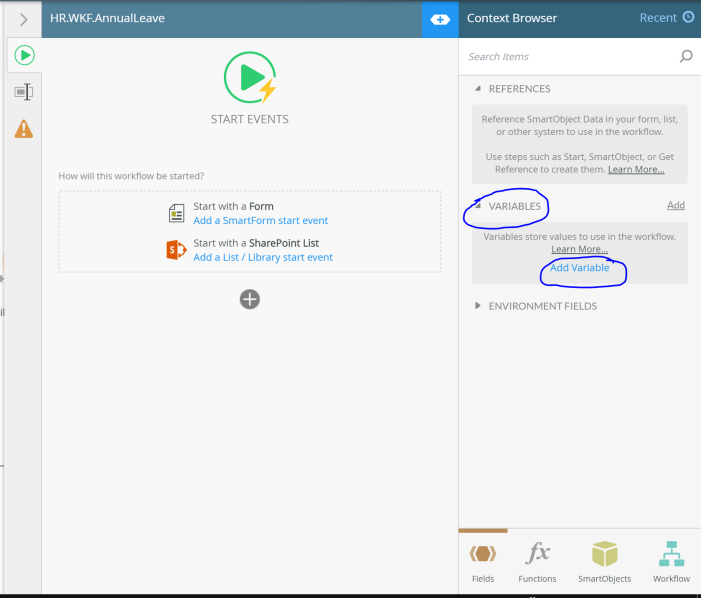
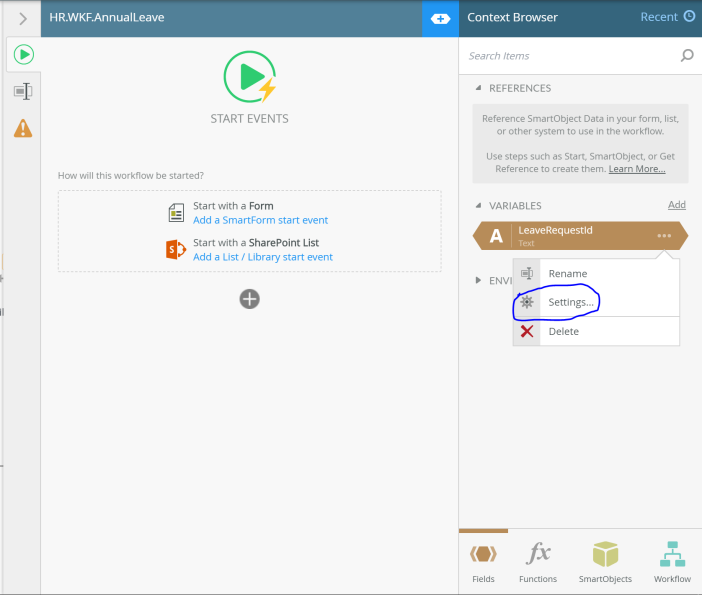
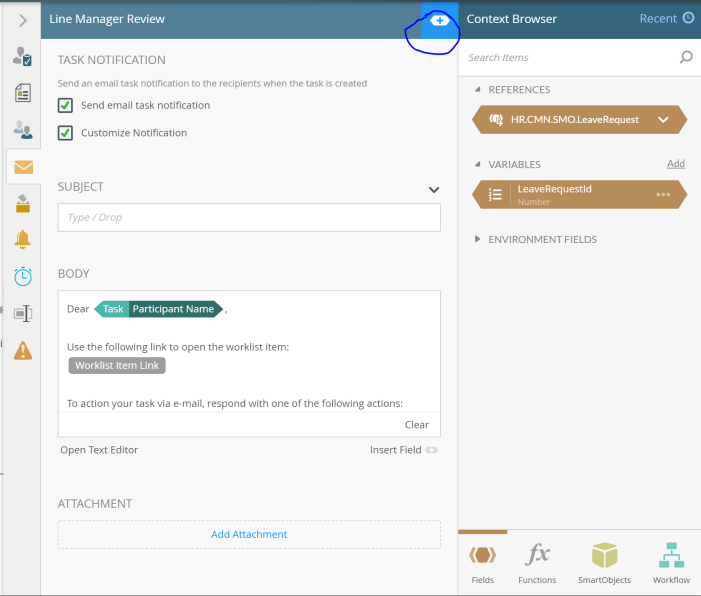
- Click on ‘Start’ shape and then click on the configuration panel on the righthand side of the canvas. Then click on ‘<+>’ symbol in the top right corner as circled in the image below.
- This will expand the ‘Context Browser’ for the canvas. The context browser will show any references, variables and environment fields that are currently being used in the workflow. It also gives you access to workflow details and workflow functions.
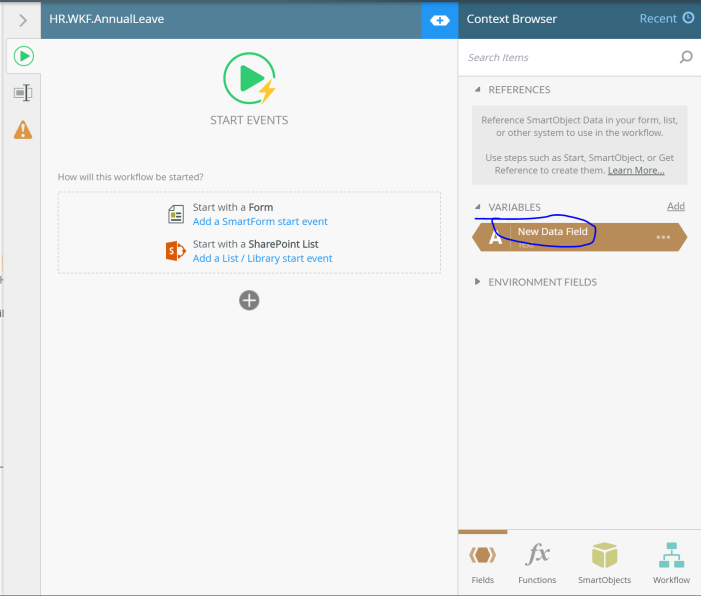
- As this is the first time we have used the context browser in this workflow. We just a brief description of what references and variables are. Under Variables click on ‘Add Variable’.
- A new variable called ‘New Data Field’ is created. Click on the text ‘New Data Field’ and delete the text and replace it with the following text ‘LeaveRequestId’.
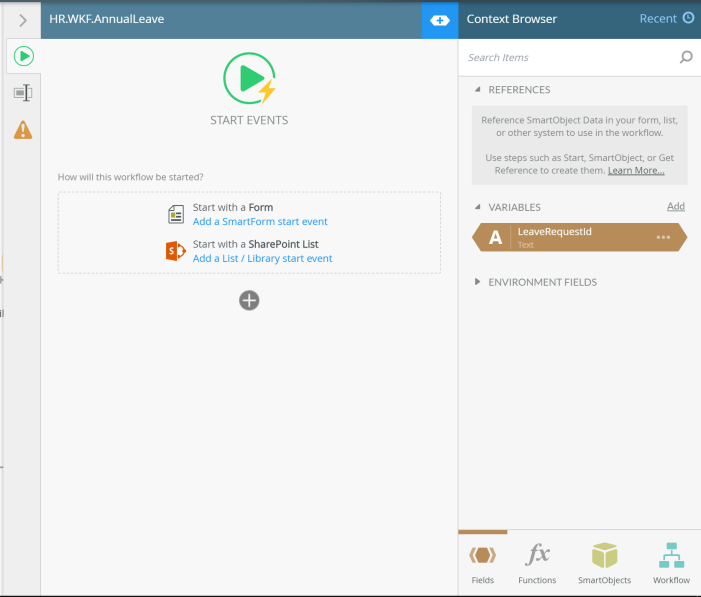
- The next thing we need to do is change the data type of this variable. At the moment it is set to ‘Text’ as we need the variable to store a number click on ‘…’ and click on ‘Settings’.
- We are now in the settings for the variable, under ‘Data Type’ you will notice it says ‘Text’.
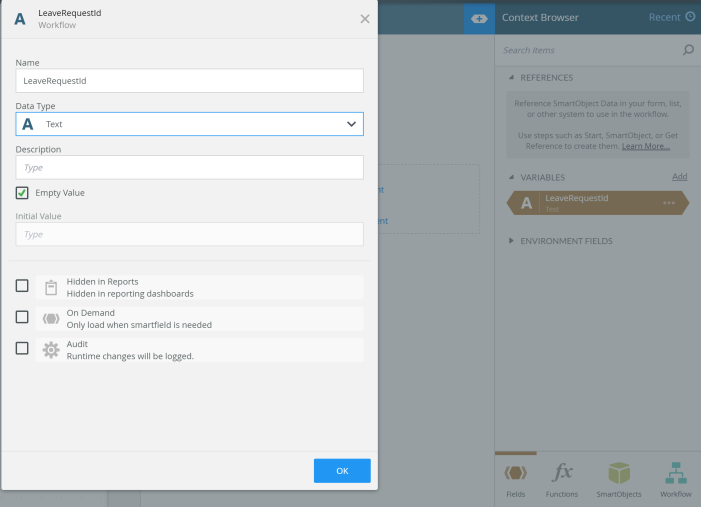
- Click on the drop down list that says ‘Text’ under ‘Data Type’ and choose ‘Number’ and click on ‘Ok’.
- We have now created and configured a variable to hold the related Leave Request Number. We now need to tell the workflow which data to retrieve. To do this we need to create a short cut to the SmartObject ‘HR.CMN.SMO.LeaveRequest‘.
- Expand the shape toolbar on the lefthand side of the canvas and click on ‘Basic’.
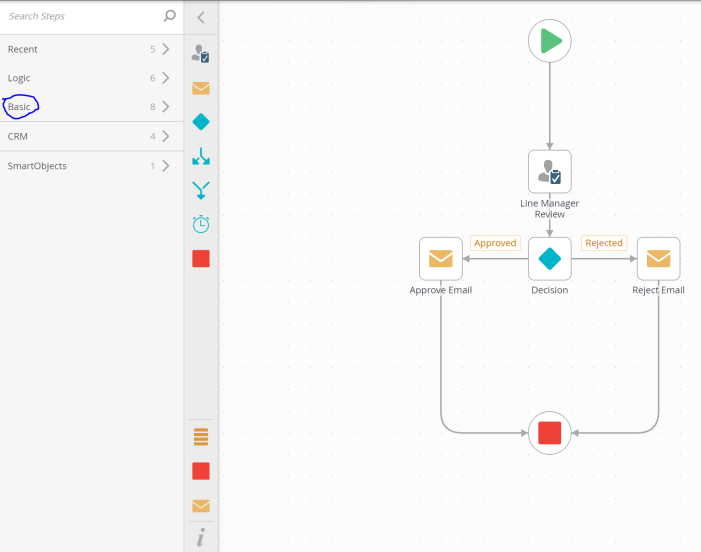
- We will now see all the shapes under the ‘Basic’ category. The shape we want is called ‘Create Reference’.
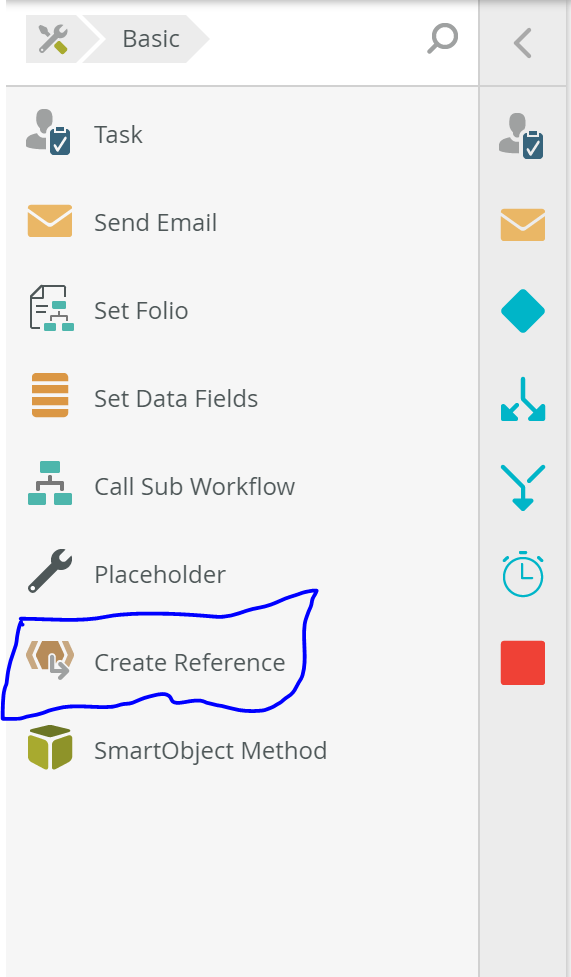
- Click and drag it on to the canvas.
- Click on the ‘Create Reference’ shape and then expand the configuration panel on the righthand side of the canvas. The first thing you will notice that we have to do is select a SmartObject.
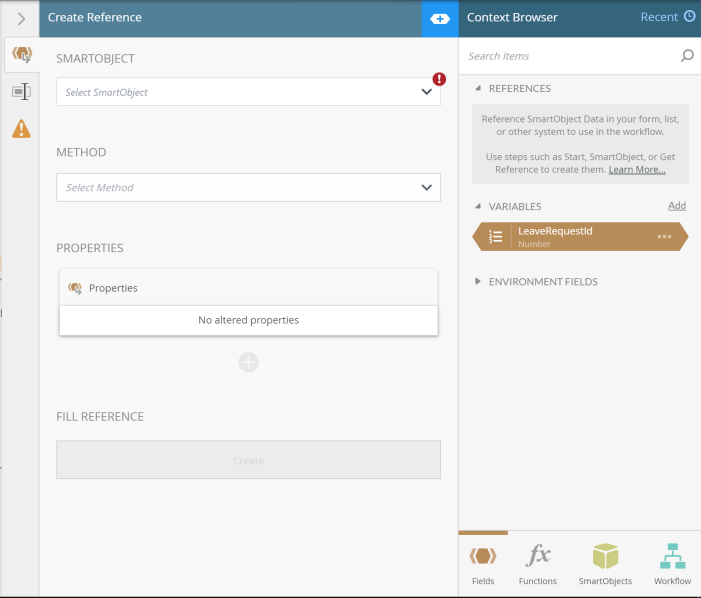
- Click on ‘Select SmartObject’, this will bring up a window to select a category where the SmartObject is stored.
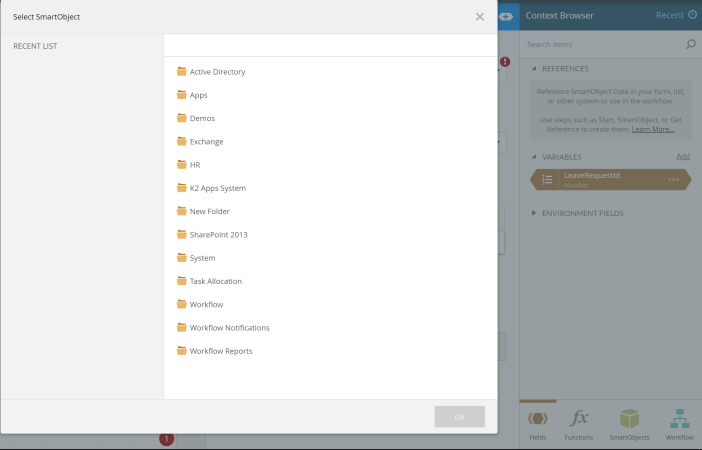
- The SmartObject we want is under ‘HR’ – ‘SmartObjects’. Click on ‘HR’ , then click on ‘SmartObjects’ and then select the SmartObject ‘HR.CMN.SMO.LeaveRequest’ and click on ‘OK’.

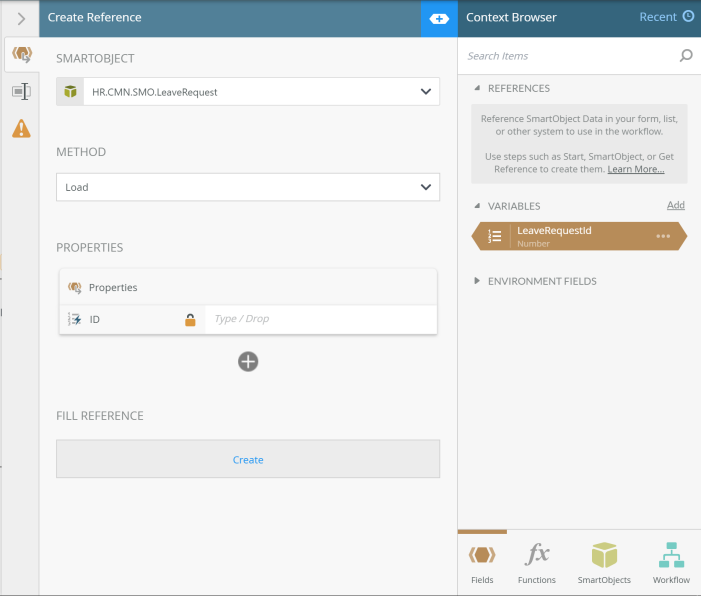
- Now that we have selected the SmartObject, we now need to select which method the reference will use to get the correct data. Click on ‘Select Method’ and select ‘Load’.
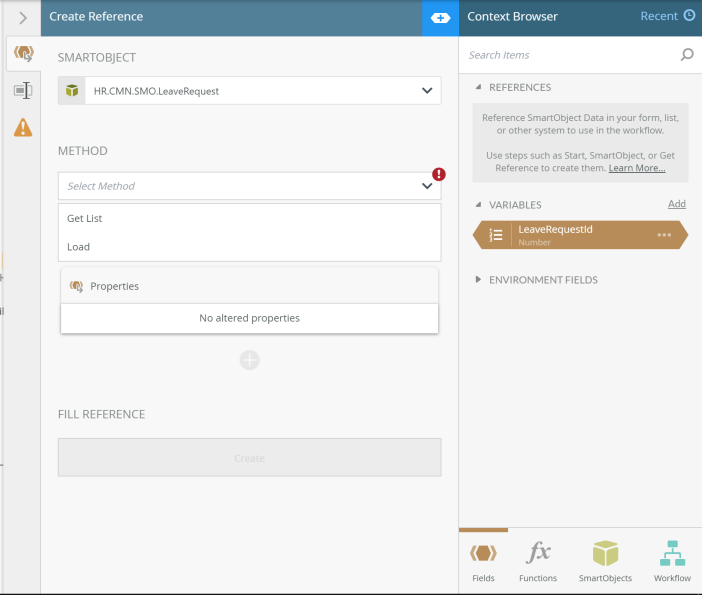
- Because we have selected the ‘Load’ method, it requires some input data to retrieve the correct row of data. In this case the load method requires that a value is passed in the property named ‘Id’.
- If the ‘Context Browser’ is not expanded click on ‘<+>’ symbol in the top right corner of the panel. We will now see the variable we created earlier, now drag that into the box labeled ‘Type / Drop’ next to the property labelled ‘ID’. It should look like the image below.
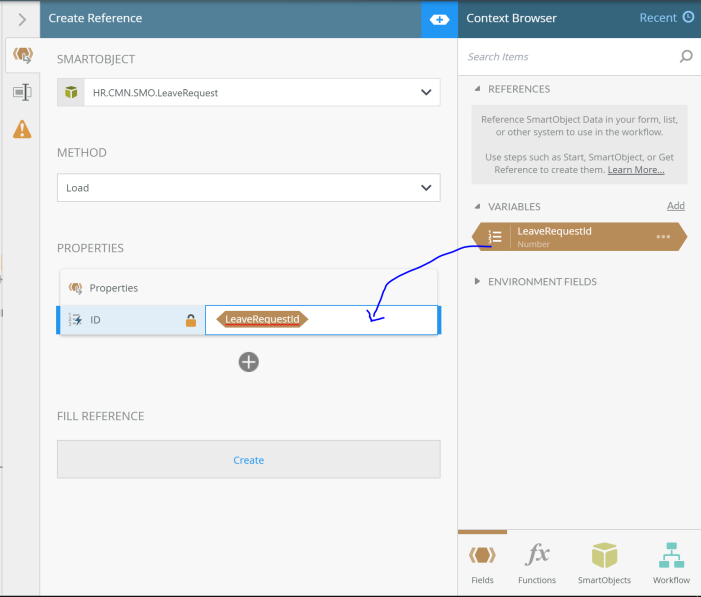
- Now that we have configured the reference, to retrieve data where the value of the property ‘ID’ is the same as the value of the variable named ‘LeaveRequestId’. If you you know SQL we are essentially doing this ‘Select * from HR.CMN.SMO.LeaveRequest where ID = @LeaveRequestId‘.
- Click on the next tab in the configuration panel and under ‘Name’ replace the text ‘Create Reference’ with ‘Leave Request Details ‘.

- Click on ‘>’ to close the configuration panel’, we have now created a short cut to the leave request data. We now need to link the reference into the workflow so the workflow will retrieve the correct data before the task for the Line Manager is created.
- On the canvas, disconnect the line going from the ‘Start’ shape to the ‘Line Manager Review’ shape. As shown in the image below.
- Now drag the reference shape named ‘Leave Request Details’ in between the shapes ‘Start’ and ‘Line Manager Review’. Then connect the line from the ‘Start’ shape to the ‘Leave Request Details’. Then left click and drag a line down from the bottom of the ‘Leave Request Details’ shape to the top pf the ‘Line Manager Review’ shape. Your canvas should now look like the image below.
- Now that the workflow has access to the leave request details that was entered in the submitted leave request form we can now give some context to the emails that are sent out as part of the workflow.
- Lets start with the email notification to the line manager of the person who submitted the leave request. Click on the task shape labeled ‘Line Manager Review’. Expand the shape’s configuration panel and click on the notification tab (4th tab down). It should look like this.
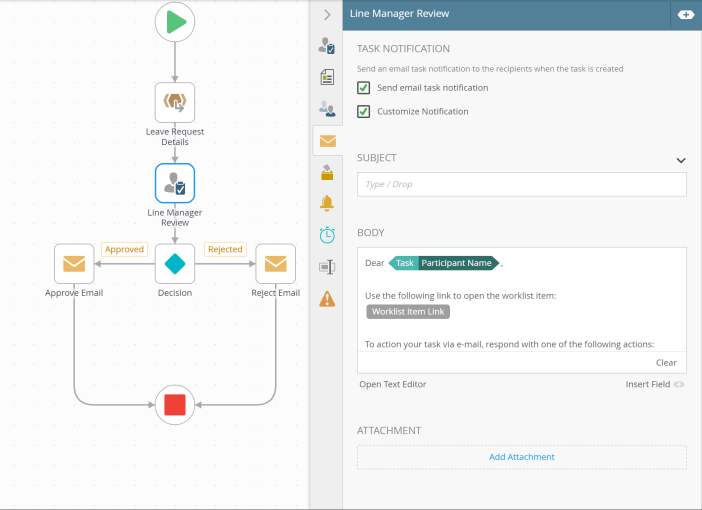
- To edit the notification click on ‘Customise Notification’.
- Now we can configure what information the email notification will contain. Click on the context browser icon ‘<+>’.
- Now under ‘References’ we will see the reference we created earlier. Under the reference section click on ‘HR.CMN.SMO.LeaveRequest’. This will expand the reference and we will now see all the properties.
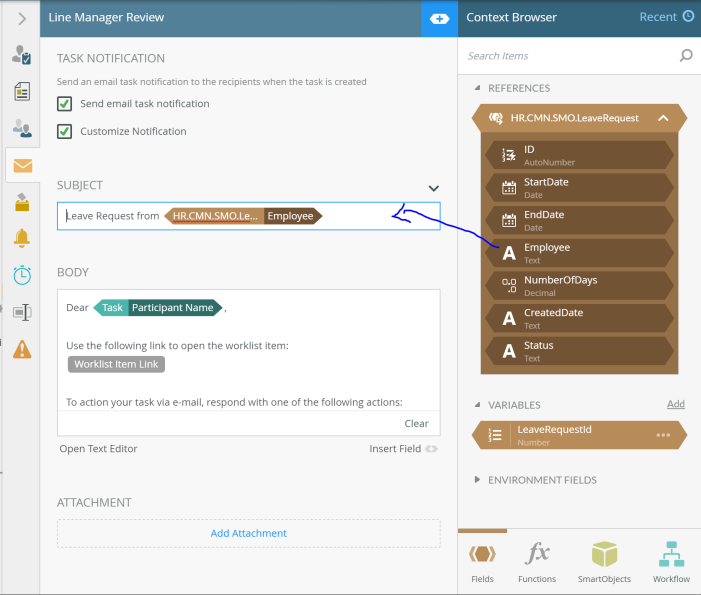
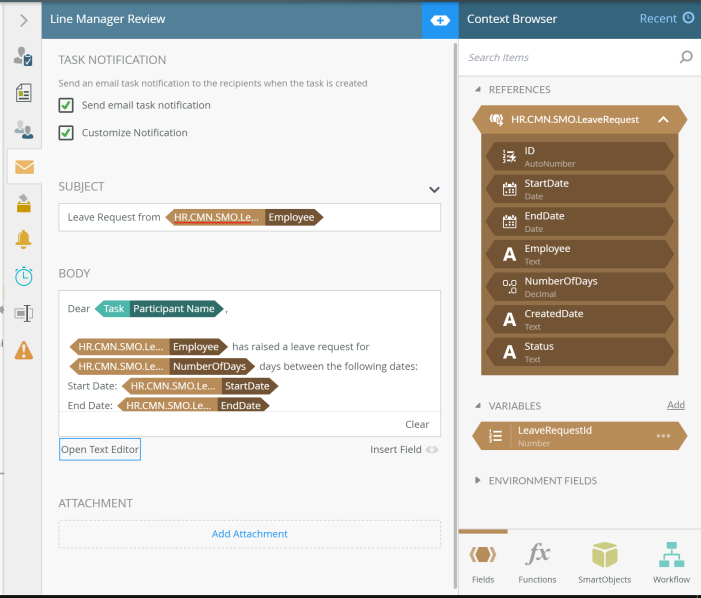
- All these properties can be used in the email notification. Lets start with the ‘Subject’ for the email. In the box under ‘Subject’ enter the following text ‘Leave Request from ‘ and then from the list of properties, drag employee into the box so it’s after ‘Leave Request from ‘. As shown in the image below.
- Now that we have done the ‘Subject’, we can now edit the body of the email.
- We can just drag in the properties that you want to be shown in the email. In this example I have added the following properties to the body
- Employee
- Start Date
- End Date
- Number of Days
- I haven’t deleted any of the information that was already in the email. The body of the email should look like the below image.
- If you want to expand the editor for the body of email click on ‘Open Text Editor’. This will you a full on text editor to edit the email body.
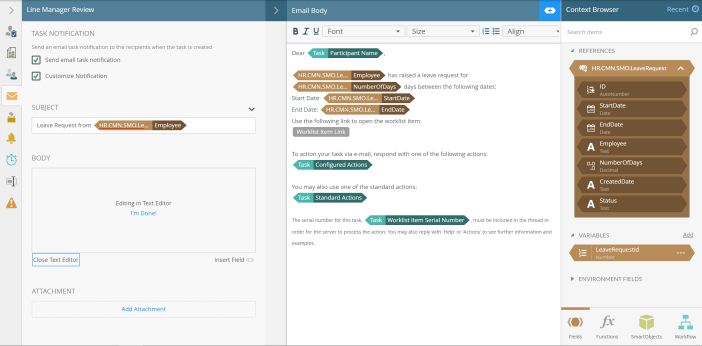
- Click on ‘Close Text editor’ to close the editor, once finished. We have now configured the notification email to contain data from the leave request. To help the line manager make their decision on whether to approve the leave request.
- We can also do the same for the ‘Approve’ and ‘Reject’ Email. Click on the ‘Reject’ email shape and expand the configuration panel and then drag across any of the reference properties into the email Subject and Body.
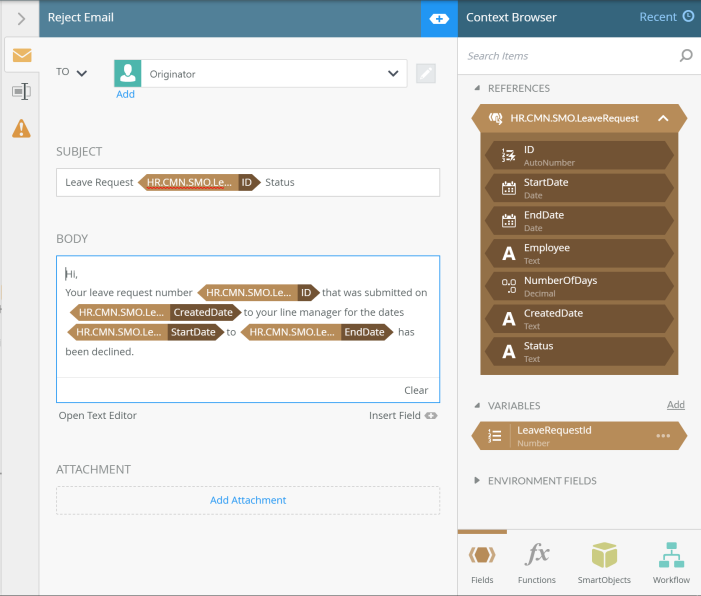
- Do the same for the ‘Approve’ email shape.
- Now we have configured all the email notifications to contain relevant data about the leave request.
- The next thing we need to do is update the status of the Leave Request, once the line manager has approved or rejected the request so it can be recorded against the request.
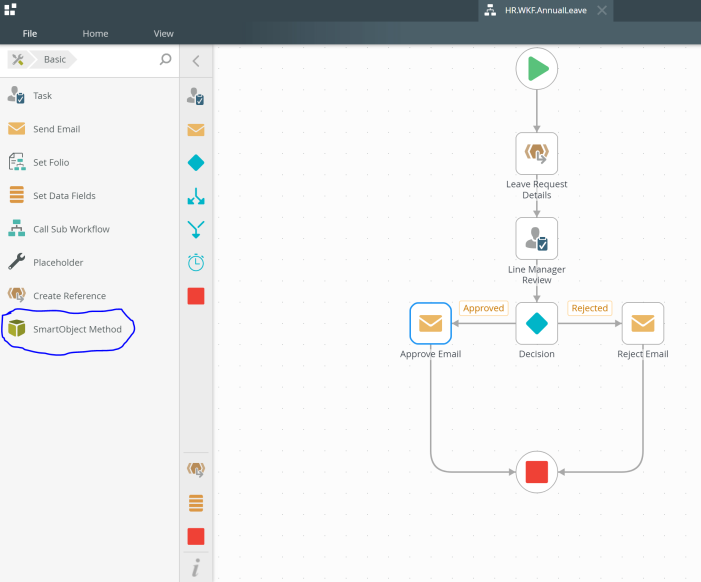
- To do the update, expand the shape panel and click on ‘Basic’ and then drag the ‘SmartObject Method’ shape on to the canvas.
- Click on the ‘SmartObject Method’ shape and then expand the configuration panel on the righthand side of the canvas.

- Like in setting up the reference, we need to select the ‘SmartObject’ that the shape is going to call. Because we have already used the SmartObject ‘HR.CMN.SMO.LeaveRequest’ will appear already in the list when you click on ‘Select SmartObject’.
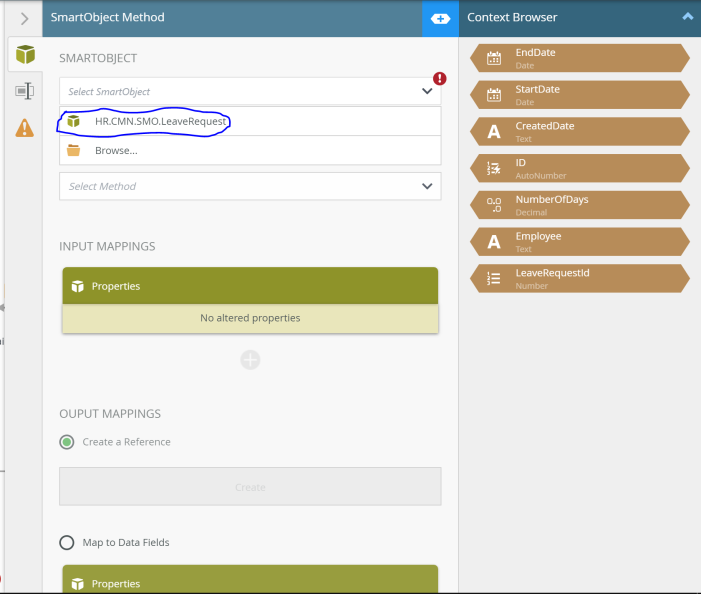
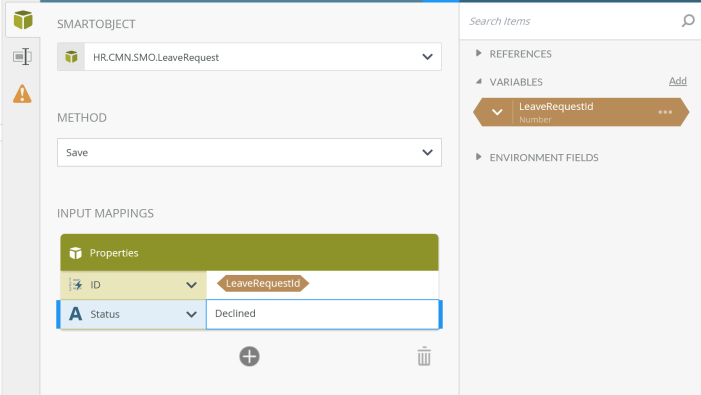
- Now that we have selected which SmartObject we are going to use, we now need to select the correct method. Click on ‘Select Method’, this will show us a list of methods that we can call from the SmartObject. Because we are doing an update we will need to select the ‘Save’ method.
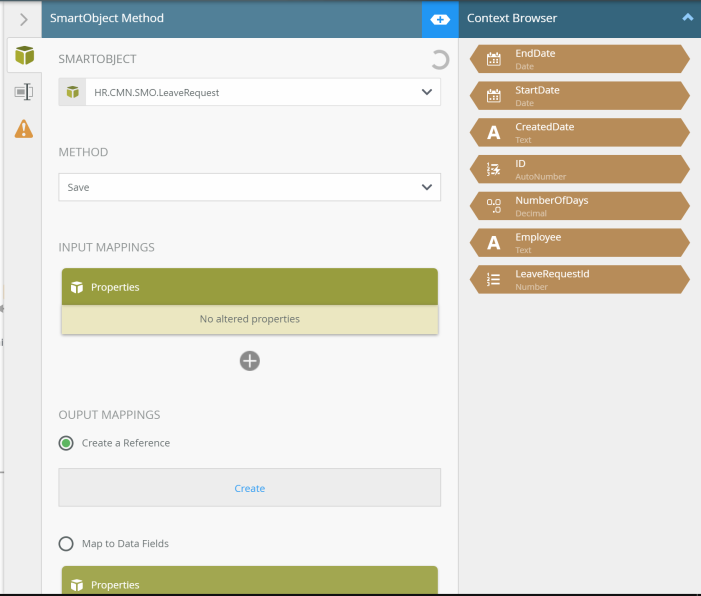
- Now we need to select which properties we are going to update. Under properties click on ‘+’ and click on the ‘ID’ and ‘Status’ checkboxes in the list.
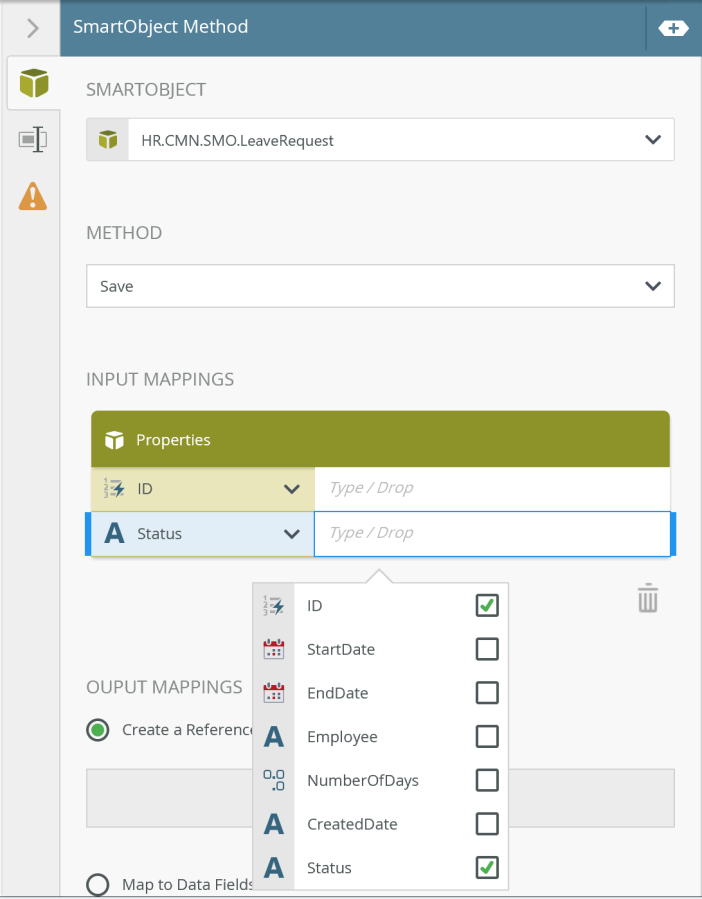
- In the box next to ‘Status’ enter in the text ‘Approved’ and drag the variable ‘LeaveRequestId’ into box next to ‘ID’.
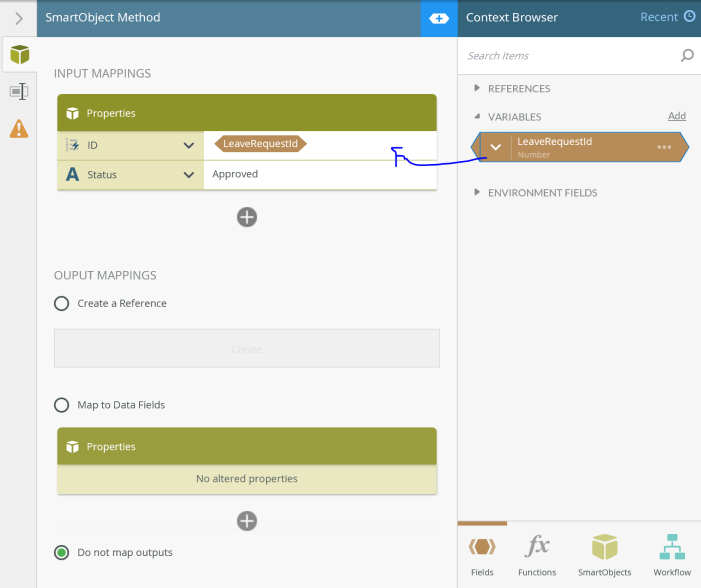
- As we don’t need to map any return properties from the SmartObject click on ‘Do not map outputs’ under ‘Output Mappings’.
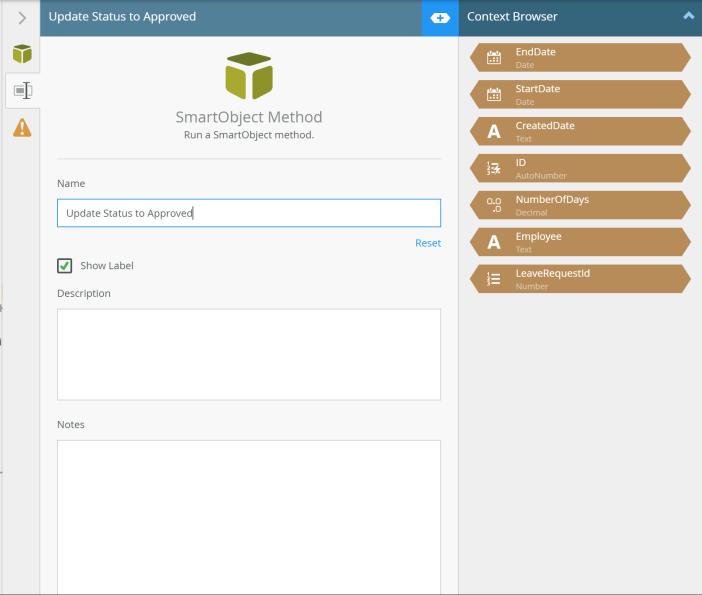
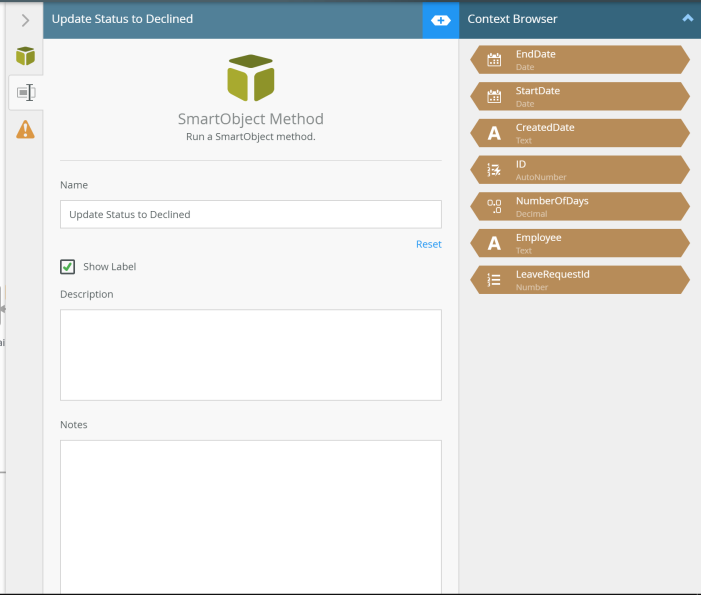
- Click on the 2nd tab in the configuration panel and replace the text ‘SmartObject Method’ under Name with ‘Update Status To Approved’
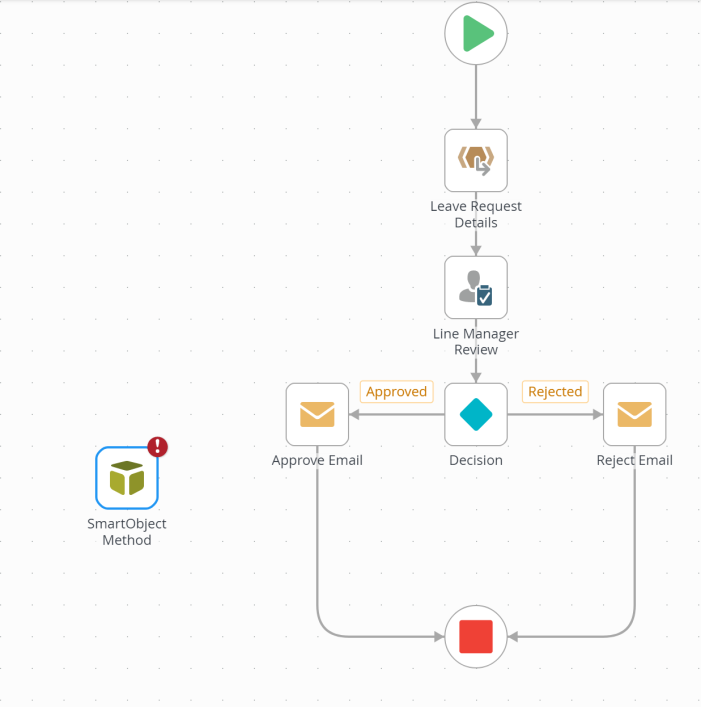
- Click on ‘>’ to close the configuration panel and your canvas should look like the below image.
- We need to link this SmartObject shape into the workflow ‘Approved’ path. To do that just drag it on top of the ‘Approve Email’ shape.
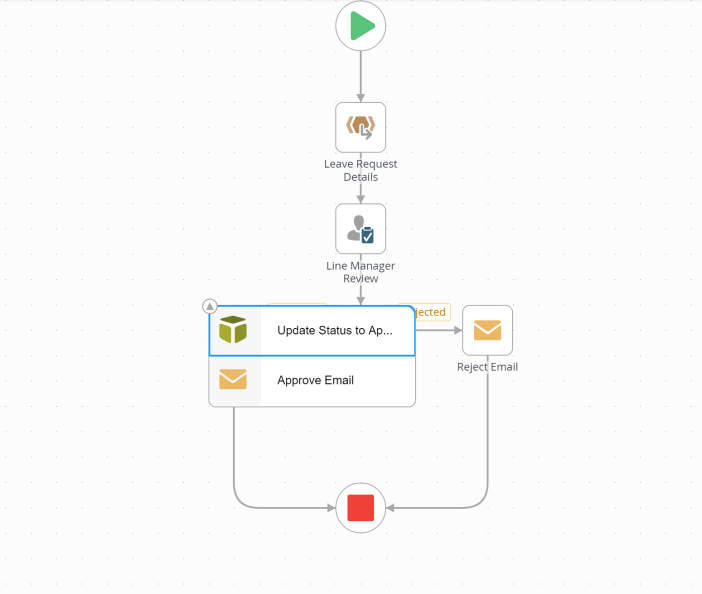
- You can then choose which order the shapes are stacked by moving them up down the list. The shape at the top of the stack will execute first and then once it has finished, it will then move on to the next shape in stack.
- Once you are happy with order of the shapes, your canvas should look like this.
- Repeat steps 40 – 51 and instead of ‘Approved’ in the status box, enter in ‘Declined’
- Change the name of the shape to ‘Update Status To Declined’
- Drag the shape onto the ‘Reject Email’ shape.
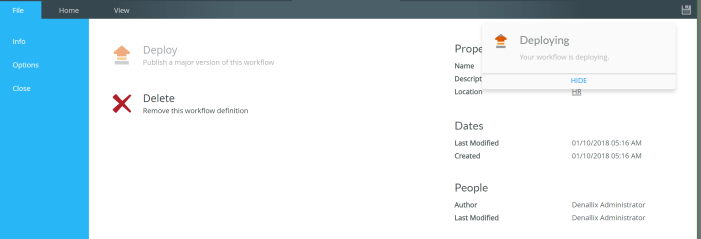
- Now we can deploy, to do that click on ‘File’ and then click on ‘Deploy’.
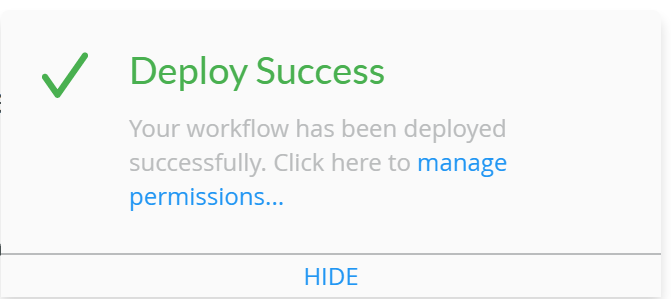
- You will know it has been deployed Successfully as you will get a message saying it has been successful.
Linking the Smartforms to the workflow
Now that we have got business data inside the workflow, we just need to link the Leave Request form to start the workflow and the Line Manager Review Task to action the task and take the workflow down a specific decision path.
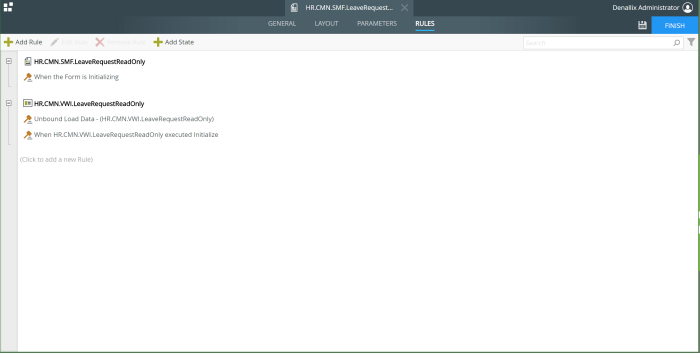
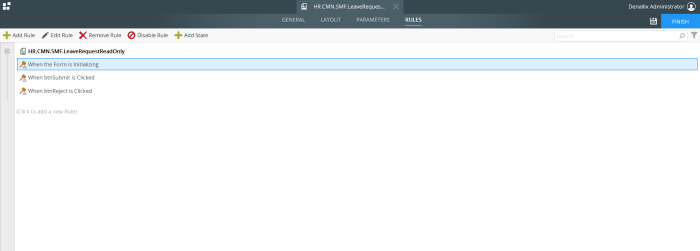
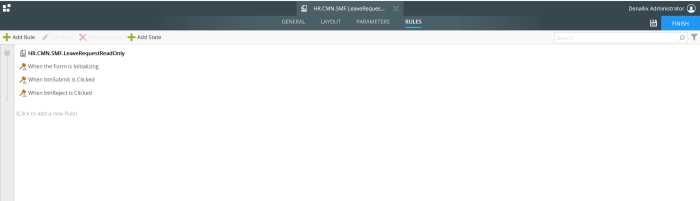
- Edit Smartform ‘HR.CMN.SMF.LeaveRequest’ and click on the ‘Rules’ tab.
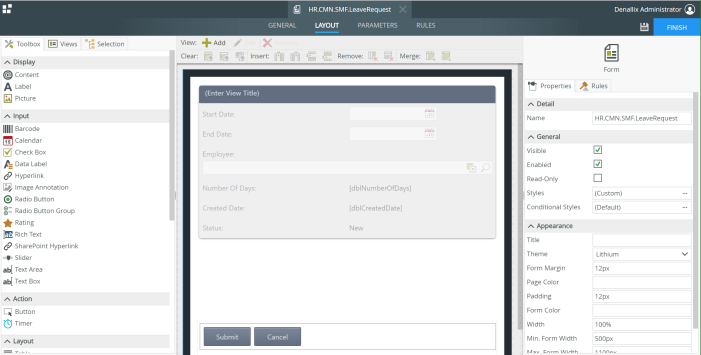
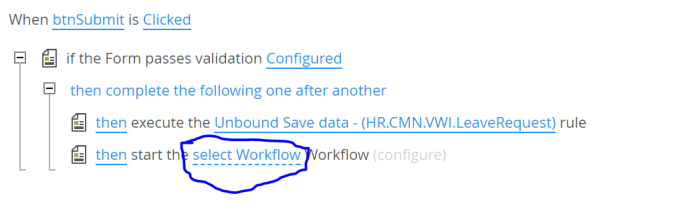
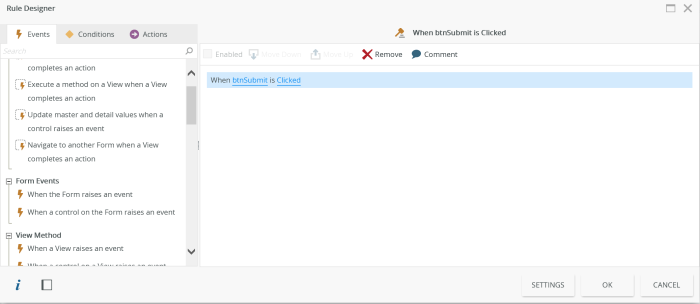
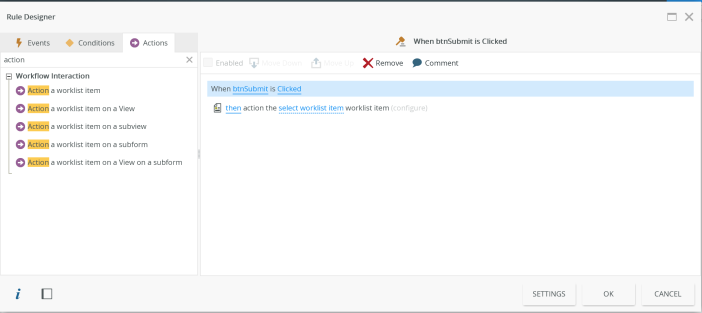
- Now in the rules tab, click on the rule ‘When btnSubmit is clicked’ and click on ‘Edit’
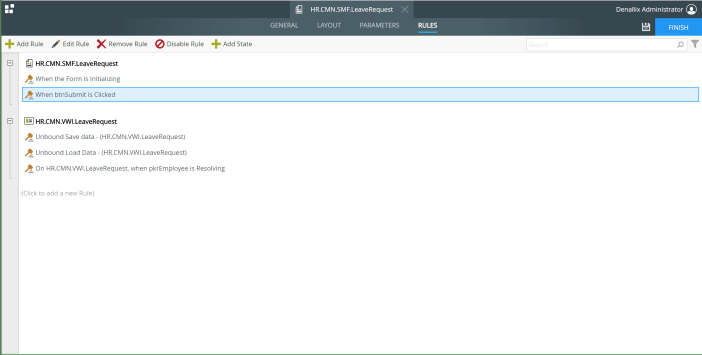
- We now need to add a rule to start the workflow when the submit button is clicked.
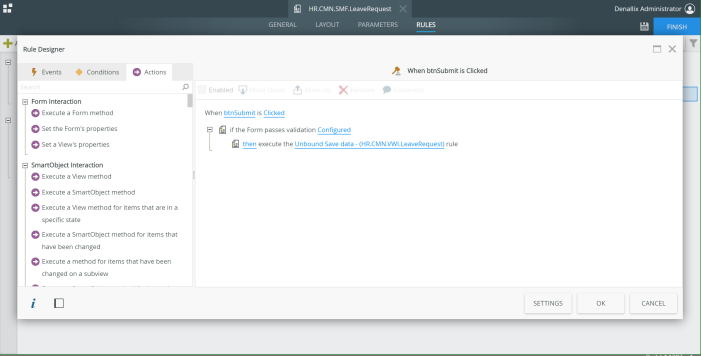
- Click on the ‘Actions’ tab and in the search box enter ‘Start’
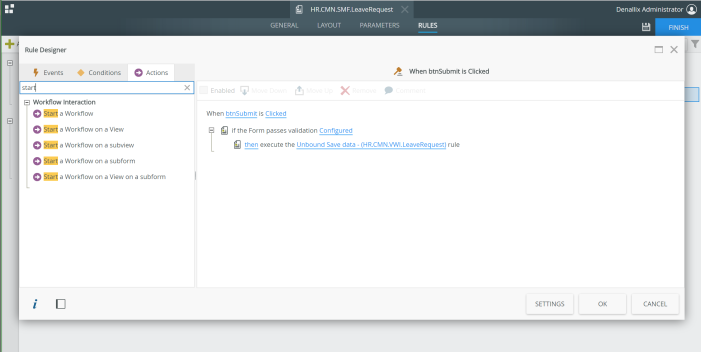
- Click on the action named ‘Start a Workflow’ it will then appear in the rule execution panel.
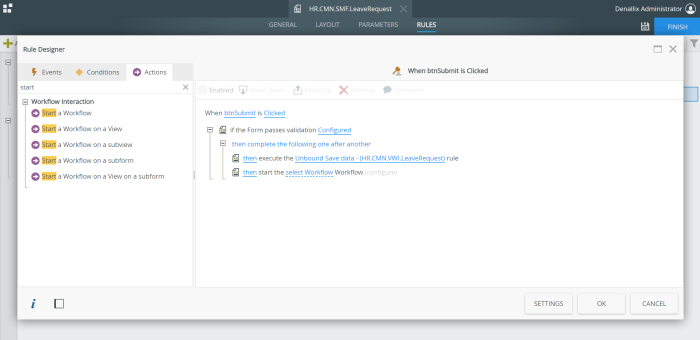
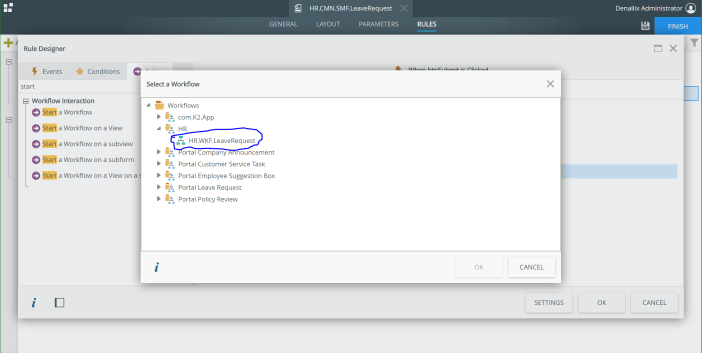
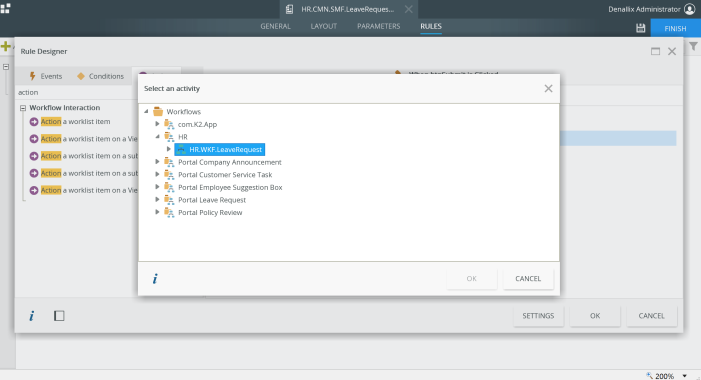
- Now click on ‘select Workflow’ link
- A list of workflows on the environment will be listed, expand the folder ‘HR’ and then select the workflow we have created ‘HR.WKF.LeaveRequest’ and then click on ‘Ok’.
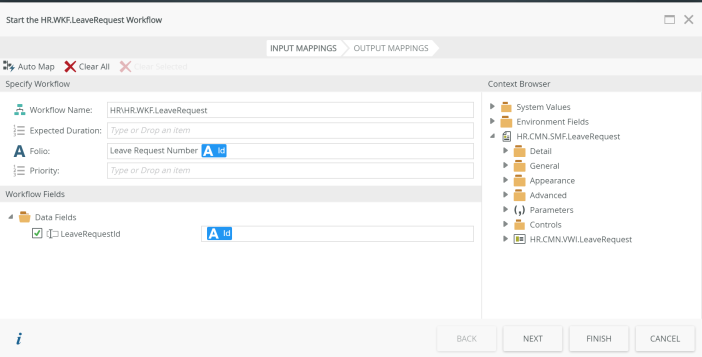
- Now back in the editor and then click on ‘Configure’. In the new the window we can configure what data contains in the workflow, such as the leave request Id.
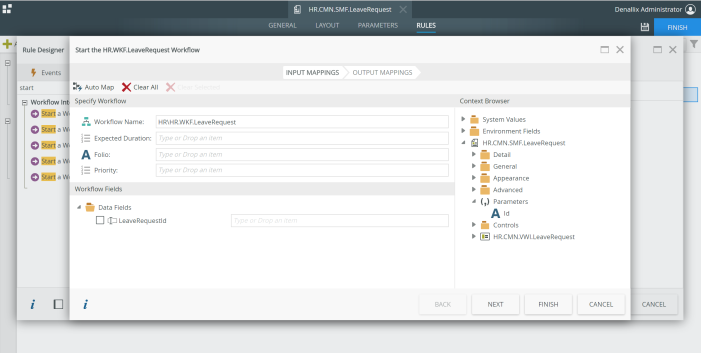
- In the context browser expand ‘Parameters’ and drag the parameter ‘Id’ into the box labelled ‘LeaveRequestId’.
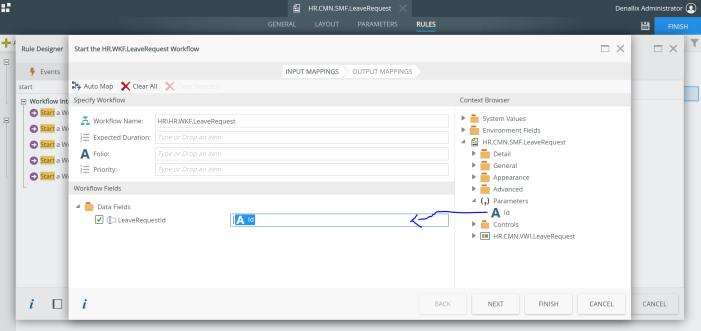
- In the box labelled ‘Folio’ enter in the following text ‘Leave Request Number ‘ and then drag the parameter ‘Id’ into the same box. So it should look like this.
- Click on ‘Next’ and then ‘Finish’ and then ‘Ok’. Click on ‘Finish’ in the top left hand corner to save the form. We have now setup the Leave Request form to start the approval workflow.
- Now we need to edit the task form to pick up the Line Manager Review actions. This will be the form that the Line Manager opens up to review the leave request details. The line manager will then either click on the ‘Approve’ button to approve the leave request or the line manager will click on ‘Reject’ to reject the leave request.
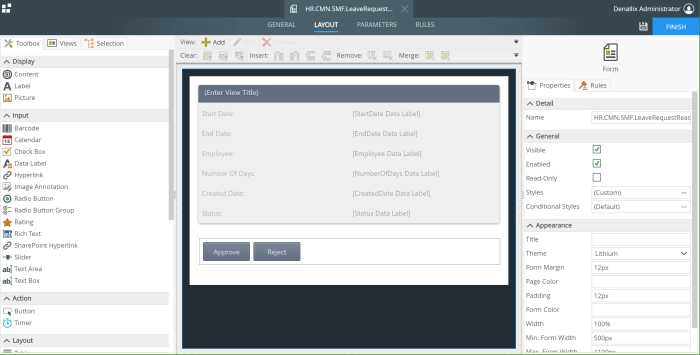
- In the designer, expand ‘HR’ and then expand ‘Smartforms’ and click on the form named ‘HR.CMN.SMF.LeaveRequestReadOnly’.
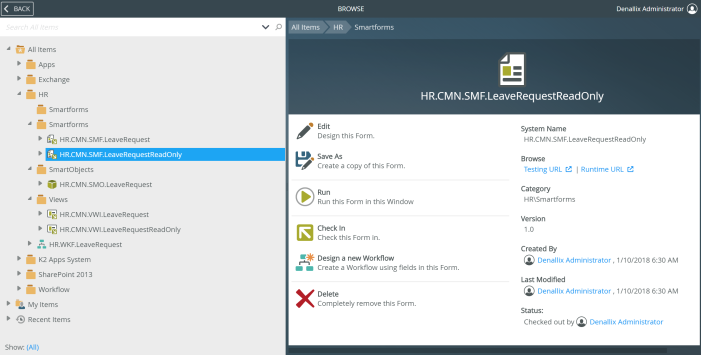
- Click on ‘Edit’.
- We are now in the Smartform editor, you will notice that the form has two buttons
- Approve
- Reject
- We are going to link these buttons up to the actions/decisions on the workflow.
- Click on the ‘Rules’ tab
- Click on ‘Add Rule’
- In the events tab click on the event ‘When a control on the form raises an event’
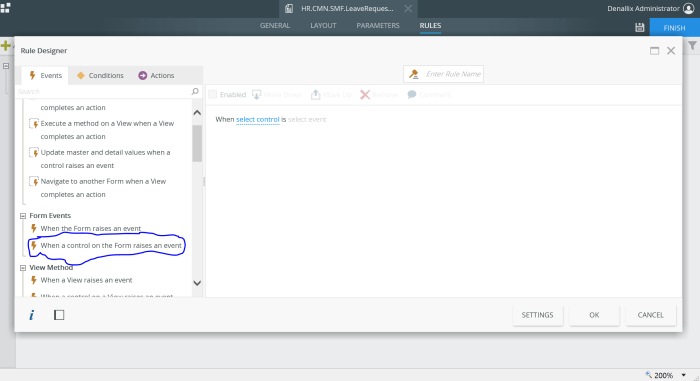
- In the rule designer click on the blue ‘select control’, from the list select ‘btnSubmit’.
- Now click on the ‘Actions’ tab, in the search box enter the word ‘action’ and select the action ‘action worklist item’.
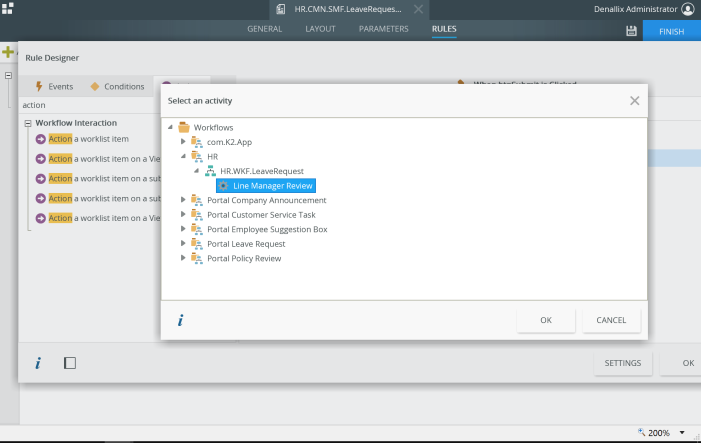
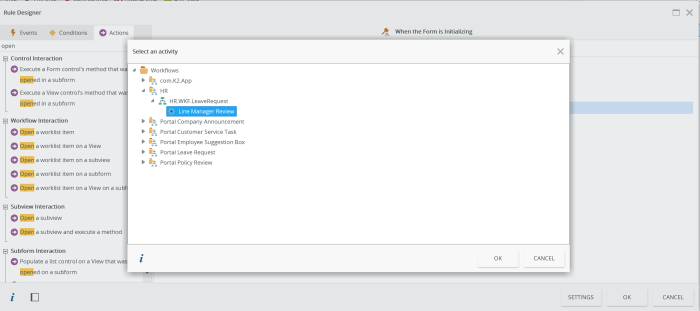
- Now click on ‘Select a worklist item’, in the pop up window expand ‘HR’ and the select the workflow we deployed earlier on in this example.
- Expand the workflow and then click on ‘Line Manager Review’ and click on ‘OK’
- Now, that we have selected the task, we can now configure what happens when the task is actioned. Click on ‘Configure’
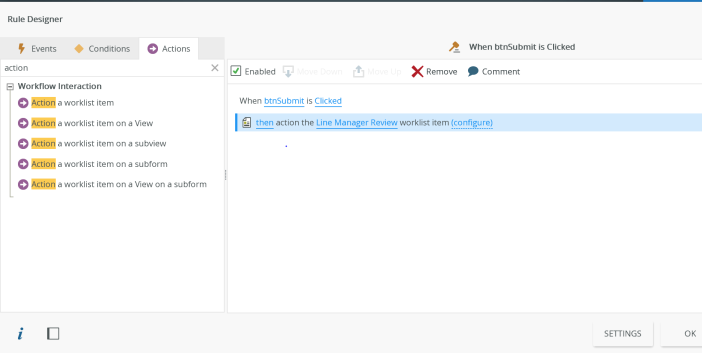
- In the context browser ‘expand’ parameters and drag the parameter ‘SN’ into the SN box and in the ‘Action Name’ enter the text ‘Approve’ as this button is dealing with the ‘Approve’ Action. Click on ‘OK’.
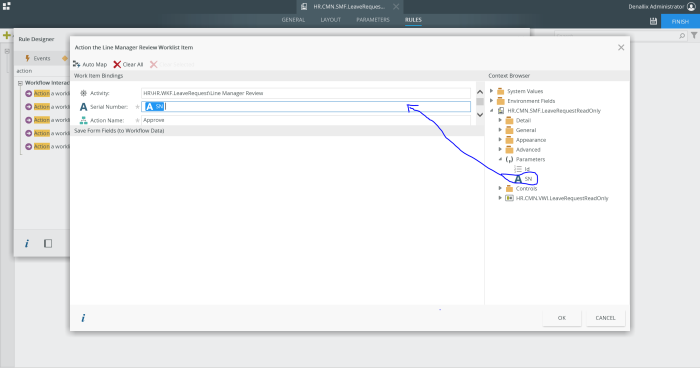
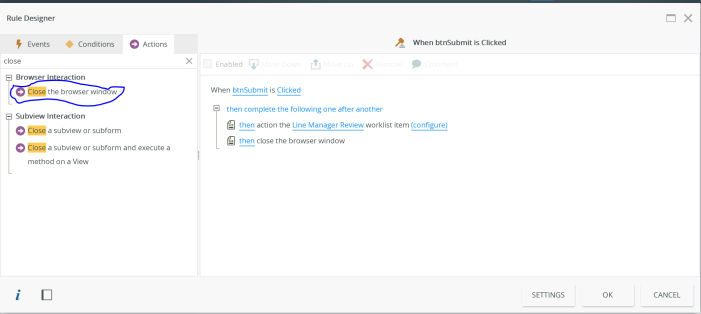
- In the actions tab, in the search box enter ‘Close’ and click on ‘Close the browser window’ and click on ‘Ok’.
- Now when the ‘Approve’ button is clicked it will tell the workflow to go down the ‘Approve’ decision line and to close the form.
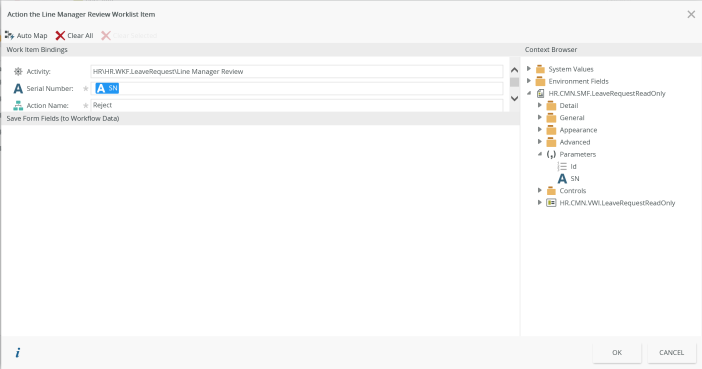
- We now need to do the same for the Reject button, select control ‘btnReject’ and repeat steps 19 – 27. Enter in the text ‘Reject’ into the Action Name box.
- We have now told the form to handle the response of the buttons to take the workflow down a certain path.
- Now we to handle what happens to the task, when form is opened.
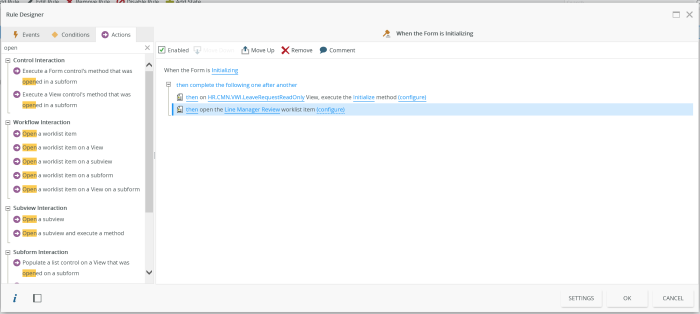
- In the rule editor click on the rule ‘When the Form is Initializing ‘ and click on ‘Edit Rule’
- In the actions tab enter in the word ‘Open’ in the search box and then select the action ‘Open a worklist item’.
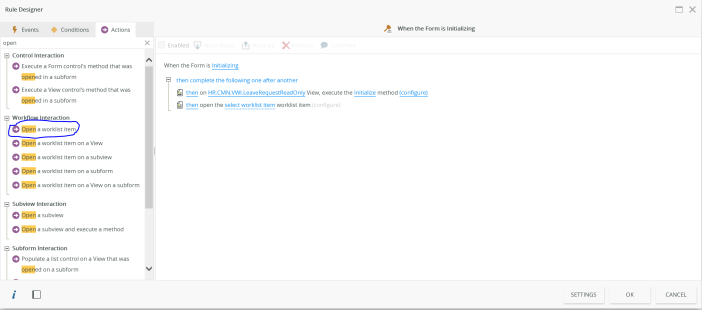
- Click on open worklist item and select the ‘Line Manager Review’ task, like we did in step 23.
- Click on ‘Ok’ and now click on ‘Configure’
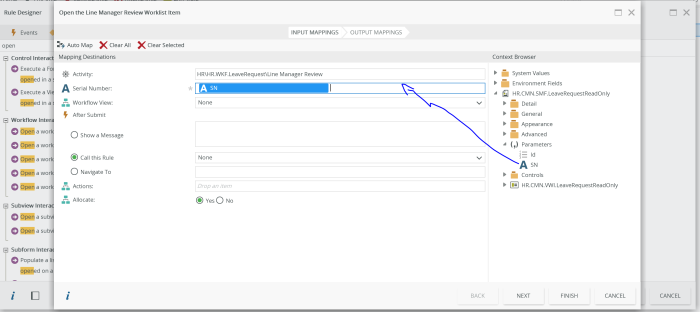
- Expand Parameters and drag the parameter ‘SN’ to the ‘SN’ box. Click on ‘Next’ and then ‘Finish’ and then click on ‘Ok’.
- Click on ‘Finish’ and now we have completed setting up the task form, to interact with the workflow.
- All we need to do now is tell the workflow to use the task form and not automatically generated form it will create when the ‘Line Manager Review’ task is activated.
- Copy the form url, by clicking on ‘Runtime url’ and then copy the url from the address bar.


- Now edit the workflow ‘HR.WKF.LeaveRequest’ and click on the shape ‘Line Manager Review’.
- Expand the configuration panel for the ‘Line Manager Review’ and click on the 2nd tab.
- Under form type select ‘Custom’ and in the URL box copy in the URL we copied from the step 38.
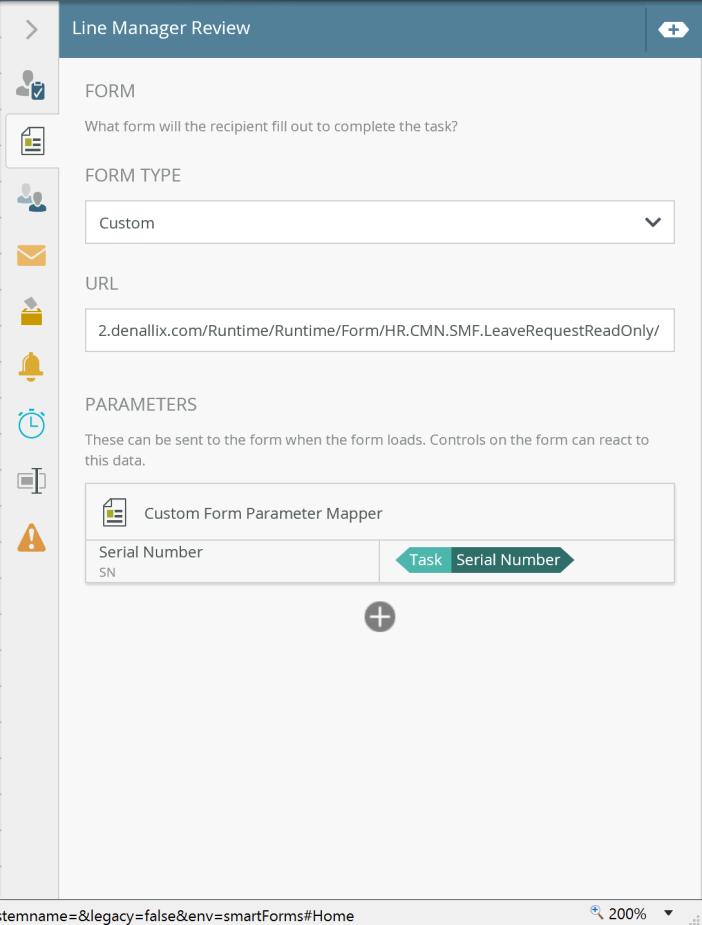
- Under Parameters click on ‘+’ , as we need to add an additional parameter, so the task form knows which leave request data to load.
- Under ‘Serial Number’ enter in the text ‘Id’
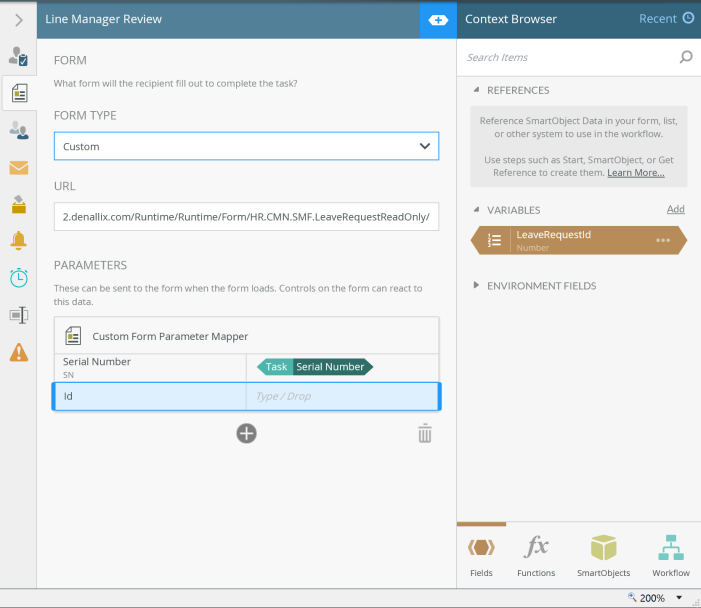
- Now expand the context browser, if not already expanded and drag the variable into the box next to ‘Id’ and underneath ‘Task Serial Number’ like in the image below.
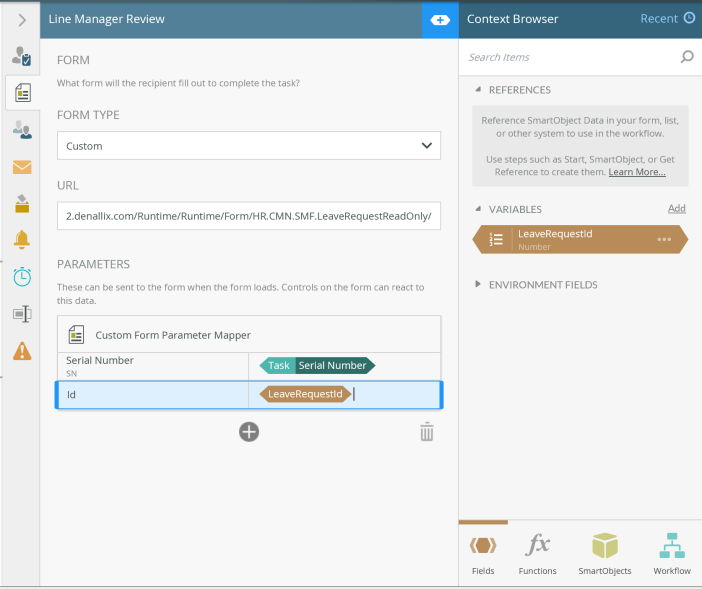
- Now when the task form is opened, the form will retrieve the workflow task information and also retrieves the leave request details.
- Click on ‘Save’ and then click on ‘Deploy’
- We have now completed and finished building our first app with K2 Five.
