I haven’t posted anything in a while as I have been working on another project, which I am hoping to unveil sometime very soon. In the meantime though I wanted to talk about K2 and Exchange. Now we all know that K2 can talk to exchange and send emails and receive replies back in the form of SmartActions out of the box.
But what if we wanted to keep track of the emails sent from a K2 app then this gets a bit tricky. We could save the message in a database using a SmartObject Event and then use the email Event to send the email. Which is an ok approach, but I think something could be done better, where we don’t need to have this two step/event approach.
So lets have a think about about what i want the assembly to do?
- Send an email
- View the mailbox
- View an email
We could modify the existing email event to do what I am suggesting below, but that would be a pain as we would need to do it every time we use the email event and would also require the person building the workflow to be able to write code. With the approach I am going to go through, it will allow anyone to be able to build a workflow where it would track what emails are being sent without having to write code and more importantly every app will be able to see it’s own emails it has sent out.
We are going to create a Email Endpoint Assembly that will allow a workflow to send an email and reference a primary key , SN, Process Instance Id or application type (see framework) and view it’s mailbox by same type of information.
Getting Started
We will need the following
- Visual Studio 2015+
- Microsoft exchange web service (EWS URL)
- Exchange version
- UserAccount specifically setup just to be used for K2 mailbox (I normally create a service account, that just has a mailbox)
- User Account Email Address
- Microsoft.Exchange.Webservices.dll
To do this i need use the assembly Microsoft.Exchange.Webservices.dll which you can get from here .
Once we have the above we can start building the new email endpoint assembly.
EWS Code
To setup the connection to exchange server, it is important to identify which version of exchange we are talking too.
ExchangeService service = new ExchangeService(ExchangeVersion.Exchange2010_SP2);
When we have created an instance of the exchange service, we then give the instance the exchange web service url.
service.Url = new Uri(“Web service”);
ExchangeService service = new ExchangeService(ExchangeVersion.Exchange2010_SP2);
service.Credentials = new WebCredentials("Username", "Password");

service.Url = new Uri("Web service");
service.ImpersonatedUserId = new ImpersonatedUserId(ConnectingIdType.SmtpAddress, "Email Address");
We have now got a connection to exchange server via it’s web service and we can do a number of different things such as
- Send Email
- View mailbox contents , such as the inbox or sent items
- View an email
- We can also do things such as create meeting requests
We will look at the basic code for sending an email
Sending an Email
To send an email we need to create an instance of the EmailMessage object and pass in the Exchange Service Object.
EmailMessage email = new EmailMessage(service);
Once we have done that we can access the properties and methods of EmailMessage object.
So we can give are email a subject email.Subject = “Subject”;
We can also give the email body and decide whether we want to send a plain text or a HTML message.
email.Body = new MessageBody(BodyType.HTML, Body);
EmailMessage email = new EmailMessage(service);
email.Subject = "Subject";
email.Body = new MessageBody(BodyType.HTML, Body);
To add recipients (To, Cc, Bcc) we just need to add the following code
- email.ToRecipients.Add(“address”);
- email.CcRecipients.Add(“address”);
- email.BccRecipients.Add(“address”);
If you have more than one email address for ‘To’ or ‘Cc’ or the ‘Bcc’ then we can simply loop through the correct address method parameter. Like in the example below.
 if (To.Contains(";"))
 {
 String[] to = To.Split(';');
 foreach (var address in to)
 {
 email.ToRecipients.Add(address);
 }
 }
 else
 {
 email.ToRecipients.Add(To);
 }
To send the email we simply use .Send(); method
email.SendAndSaveCopy();
Now we can send a basic email. So let us have a look how we can now extend this email so it can contain some additional properties that relate to the workflow it is being sent from.
The EmailMessage object allows us to add properties called extend properties and they are really simple to create. The only thing you need to remember is that the GUID used to identify the property must be the same every time we an email is sent and needs to be the same for when when we retrieve the mailbox.
So in this example i am going to bind the process instance id to the email message. We will then be able to search the sent items mailbox and retrieve all the messages that relates to that process instance id.
Creating extend properties.
This is the most important part , extend properties is what allows the ability to be able to group emails by the process Instance I’d, business key etc..
Create a Guid called ‘ProcessInstanceId’ and assign it a GUID.
Guid ProcessInstanceId_PropertySetId = Guid.Parse("fc0a27be-f463-472e-bea8-648e62d1d7dc")
We then have to define the extend property by giving the property a name in this case the property is called ‘ProcessInstanceId’ and we define the data type of the property as a ‘String’.
ExtendedPropertyDefinition ProcessInstanceId_ExtendedPropertyDefinition = new ExtendedPropertyDefinition(ProcessInstanceId_PropertySetId, "ProcessInstanceId", MapiPropertyType.String);
Now that we have defined the property , we can now populate the email with the process instance id. In code example below I am checking to see if the ‘ProcessInstanceId’ is greater than 0 or is not null and if true it will assign the property the value of the ‘ProcessInstanceId’ and if it is false it will assign the property a 0.
email.SetExtendedProperty(ProcessInstanceId_ExtendedPropertyDefinition, (ProcessInstanceId > 0 | ProcessInstanceId != null ? ProcessInstanceId : 0));
Now every time we send an email, it will now contain the process instance id. In the complete code example of the ‘Send Emall’ method below I have also added some additional properties to contain the following
- Primary Key of the main business data
- ProcessTypeId (framework see here)
- Foilo of the process instance
- MessageId, so we can identify each email
public static string SendEmail(string Subject,string Body, string To, string Cc,string Bcc,int importance, string sn,string Folio, int? ProcessInstanceId, string ProcessTypeId, string BusinessKey)
 {
 string result = string.Empty;
 ExchangeService service = ConnectToExchange();
 try
 {
 if (To != null || To.Length != 0)
 {
 EmailMessage email = new EmailMessage(service);
 email.Subject = Subject;
 email.Body = new MessageBody(BodyType.HTML, Body);

Guid SN_PropertySetId = Guid.Parse("fc0a27be-f463-472e-bea8-648e62d1d7dc");
 ExtendedPropertyDefinition SN_ExtendedPropertyDefinition = new ExtendedPropertyDefinition(SN_PropertySetId, "SN", MapiPropertyType.String);
 email.SetExtendedProperty(SN_ExtendedPropertyDefinition, (!String.IsNullOrEmpty(sn) ? sn : "0_0"));

Guid Folio_PropertySetId = Guid.Parse("fc0a27be-f463-472e-bea8-648e62d1d7dc");
ExtendedPropertyDefinition Folio_ExtendedPropertyDefinition = new ExtendedPropertyDefinition(Folio_PropertySetId, "Folio", MapiPropertyType.String);
 email.SetExtendedProperty(Folio_ExtendedPropertyDefinition, (!String.IsNullOrEmpty(Folio) ? Folio : "Email Message"));

Guid ProcessInstanceId_PropertySetId = Guid.Parse("fc0a27be-f463-472e-bea8-648e62d1d7dc");
 ExtendedPropertyDefinition ProcessInstanceId_ExtendedPropertyDefinition = new ExtendedPropertyDefinition(ProcessInstanceId_PropertySetId, "ProcessInstanceId", MapiPropertyType.String);
 email.SetExtendedProperty(ProcessInstanceId_ExtendedPropertyDefinition, (ProcessInstanceId > 0 | ProcessInstanceId != null ? ProcessInstanceId : 0));

Guid BusinessKey_PropertySetId = Guid.Parse("fc0a27be-f463-472e-bea8-648e62d1d7dc");
 ExtendedPropertyDefinition BusinessKey_ExtendedPropertyDefinition = new ExtendedPropertyDefinition(BusinessKey_PropertySetId, "BusinessKey", MapiPropertyType.String);
 email.SetExtendedProperty(BusinessKey_ExtendedPropertyDefinition, (!String.IsNullOrEmpty(BusinessKey) ? BusinessKey : "0"));

Guid ProcessTypeId_PropertySetId = Guid.Parse("d6520129-3c59-4191-b9d7-4f5160329e4f");ExtendedPropertyDefinition ProcessTypeId_ExtendedPropertyDefinition = new ExtendedPropertyDefinition(ProcessTypeId_PropertySetId, "ProcessTypeId", MapiPropertyType.String);
 email.SetExtendedProperty(ProcessTypeId_ExtendedPropertyDefinition, (!String.IsNullOrEmpty(ProcessTypeId) ? ProcessTypeId : "00000000-0000-0000-0000-000000000000"));

Guid MessageId_PropertySetId = Guid.Parse("6e997d14-d9b3-4516-8d14-0a10b0aa74aa");
 string MessageId = Guid.NewGuid().ToString();
 ExtendedPropertyDefinition MessageId_ExtendedPropertyDefinition = new ExtendedPropertyDefinition(MessageId_PropertySetId, "ProcessTypeId", MapiPropertyType.String);
 email.SetExtendedProperty(MessageId_ExtendedPropertyDefinition, MessageId);


if (To.Contains(";"))
 {
 String[] to = To.Split(';');
 foreach (var address in to)
 {
 email.ToRecipients.Add(address);
 }
 }
 else
 {
 email.ToRecipients.Add(To);
 }


if (!string.IsNullOrEmpty(Cc))
 {
 if (Cc.Contains(";"))
 {
 String[] to = Cc.Split(';');
 foreach( var address in to)
 {
 email.CcRecipients.Add(address);
 }
 }
 else
 {
 email.CcRecipients.Add(Cc);

}
 }

if (!string.IsNullOrEmpty(Bcc))
 {
 if (Bcc.Contains(";"))
 {
 String[] to = Bcc.Split(';');
 foreach (var address in to)
 {
 email.BccRecipients.Add(address);
 }
 }
 else
 {
 email.BccRecipients.Add(Cc);

}
 }

if (importance > 0)
 {
 email.Importance = (importance == 1 ? Microsoft.Exchange.WebServices.Data.Importance.Normal : Importance.High);
 }

email.SendAndSaveCopy();

result = email.Id.ToString();
 }
 }
 catch(Exception ex)
 {
 result = "Error: " + ex.Message.ToString();
 }
 finally
 {

}
 return result;
 }
Retrieving an Exchange Mailbox
Now that we can send emails with K2 related data we now need to be able to retrieve those emails. So we can then view them in a SmartForm.
The first thing we need
public static List<EmailBox> GetMailBox(string MailBoxType,int PageSize)
 {
 ItemView view = new ItemView(PageSize);
 List<EmailBox> list = new List<EmailBox>();

Guid SN_PropertySetId = Guid.Parse("fc0a27be-f463-472e-bea8-648e62d1d7dc");
 ExtendedPropertyDefinition SN_ExtendedPropertyDefinition = new ExtendedPropertyDefinition(SN_PropertySetId, "SN", MapiPropertyType.String);

Guid Folio_PropertySetId = Guid.Parse("fc0a27be-f463-472e-bea8-648e62d1d7dc");
 ExtendedPropertyDefinition Folio_ExtendedPropertyDefinition = new ExtendedPropertyDefinition(Folio_PropertySetId, "Folio", MapiPropertyType.String);

Guid ProcessInstanceId_PropertySetId = Guid.Parse("fc0a27be-f463-472e-bea8-648e62d1d7dc");
 ExtendedPropertyDefinition ProcessInstanceId_ExtendedPropertyDefinition = new ExtendedPropertyDefinition(ProcessInstanceId_PropertySetId, "ProcessInstanceId", MapiPropertyType.String);

Guid BusinessKey_PropertySetId = Guid.Parse("fc0a27be-f463-472e-bea8-648e62d1d7dc");
 ExtendedPropertyDefinition BusinessKey_ExtendedPropertyDefinition = new ExtendedPropertyDefinition(BusinessKey_PropertySetId, "BusinessKey", MapiPropertyType.String);

Guid ProcessTypeId_PropertySetId = Guid.Parse("d6520129-3c59-4191-b9d7-4f5160329e4f");
 ExtendedPropertyDefinition ProcessTypeId_ExtendedPropertyDefinition = new ExtendedPropertyDefinition(ProcessTypeId_PropertySetId, "ProcessTypeId", MapiPropertyType.String);

Guid MessageId_PropertySetId = Guid.Parse("6e997d14-d9b3-4516-8d14-0a10b0aa74aa");
 ExtendedPropertyDefinition MessageId_ExtendedPropertyDefinition = new ExtendedPropertyDefinition(MessageId_PropertySetId, "ProcessTypeId", MapiPropertyType.String);

ExchangeService service = ConnectToExchange();
 view.PropertySet = new PropertySet(BasePropertySet.IdOnly, ItemSchema.Subject, SN_ExtendedPropertyDefinition, Folio_ExtendedPropertyDefinition, ProcessInstanceId_ExtendedPropertyDefinition, BusinessKey_ExtendedPropertyDefinition, ProcessTypeId_ExtendedPropertyDefinition, MessageId_ExtendedPropertyDefinition);

FindItemsResults<Item> findResults = service.FindItems((MailBoxType == "Sent" ? WellKnownFolderName.SentItems : WellKnownFolderName.Inbox), view);
 foreach(Item email in findResults.Items)
 {
 Item mail = Item.Bind(service, email.Id);
 list.Add(new EmailBox
 {
 MailBoxType = MailBoxType,
 Subject = mail.Subject,
 Body = mail.Body,
 Importance = mail.Importance.ToString(),
 Id = mail.Id.ToString(),
 Categories = mail.Categories.ToString(),
 DateTimeCreated = mail.DateTimeCreated,
 DateTimeReceived = mail.DateTimeReceived,
 DateTimeSent = mail.DateTimeSent,
 Cc = mail.DisplayCc,
 To = mail.DisplayTo,
 SN = (email.ExtendedProperties.Count > 0 ? email.ExtendedProperties[0].Value.ToString():string.Empty),
 Folio = (email.ExtendedProperties.Count > 0 ? email.ExtendedProperties[1].Value.ToString(): string.Empty),
 ProcessInstanceId = (email.ExtendedProperties.Count > 0 ? email.ExtendedProperties[2].Value.ToString(): string.Empty),
 BusinessKey = (email.ExtendedProperties.Count > 0 ? email.ExtendedProperties[3].Value.ToString(): string.Empty),
 ProcessTypeId = (email.ExtendedProperties.Count > 0 ? email.ExtendedProperties[4].Value.ToString(): string.Empty),
 MessageId = (email.ExtendedProperties.Count > 0 ? email.ExtendedProperties[5].Value.ToString(): string.Empty)

});

}
 return list;

}
d
de
Retrieve an Email
Now that we can retrieve a list of emails from a mailbox we now need to be able to retrieve a single email.
We can do this.ww
public static EmailBox GetEmail(string Id)
 {
 EmailBox email = new EmailBox();
 ExchangeService service = ConnectToExchange();

try
 {
 Item mail = Item.Bind(service, (ItemId)Id);
 {
 email.Subject = mail.Subject;
 email.Body = mail.Body;
 email.Importance = mail.Importance.ToString();
 email.Id = mail.Id.ToString();
 email.Categories = mail.Categories.ToString() ;
 email.DateTimeCreated = mail.DateTimeCreated;
 email.DateTimeReceived = mail.DateTimeReceived;
 email.DateTimeSent = mail.DateTimeSent;
 email.Cc = mail.DisplayCc;
 email.To = mail.DisplayTo;
 email.SN = (mail.ExtendedProperties.Count > 0 ? mail.ExtendedProperties[0].Value.ToString(): string.Empty);
 email.Folio = (mail.ExtendedProperties.Count > 0 ? mail.ExtendedProperties[1].Value.ToString(): string.Empty);
 email.ProcessInstanceId = (mail.ExtendedProperties.Count > 0 ? mail.ExtendedProperties[2].Value.ToString(): string.Empty);
 email.BusinessKey = (mail.ExtendedProperties.Count > 0 ? mail.ExtendedProperties[3].Value.ToString(): string.Empty);
 email.ProcessTypeId = (mail.ExtendedProperties.Count > 0 ? mail.ExtendedProperties[4].Value.ToString(): string.Empty);
 email.MessageId = (mail.ExtendedProperties.Count > 0 ? mail.ExtendedProperties[5].Value.ToString(): string.Empty);
}
}
 catch(Exception ex)
 { }
 finally
 {

}
 return email;
 }
Now that we have these methods to send an email, retrieve a mailbox and to retrieve an email. We can now register the library as an endpoint assembly.
We could extend this to be able to add attachments and we could also look at the calendar meeting requests and doing the same with those and extend their properties
We can then build a SmartObject around it and then we can use it within are workflows and Smartforms. To make it even easier for people to use the new email SmartObject, we could wrap a SmartWizard around the methods.
The full solution can be downloaded from here


 2. Click on the green button ‘Add incoming Webhook integration’
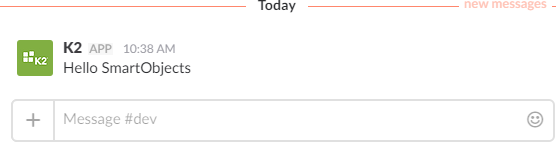
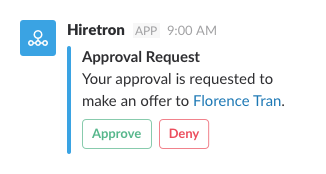
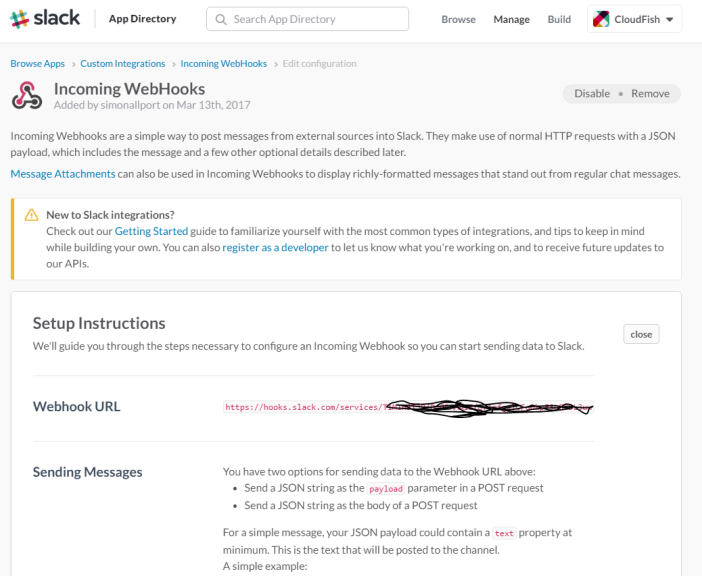 4. Further down you can also customize the actual message. I have opted for a K2 look.
 5. Click on ‘Save’, we have now created are web hook for incoming messaging.