Building a Workflow with K2 Five

This ‘How To’ goes through the steps of building a simple workflow using the new workflow designer in K2 Five.

K2 Five is a complete redesign of the web based workflow designer and it also forces the developers to rethink how they develop their workflows.  The new designer is not just aimed at citizen developers like the previous version of the web based designer found in K2 Blackpearl, but  now at  professional developers as well.

K2 Five Workflow designer has all the power of K2 Studio, but with the benefit of being all web based, so there is no need to install client tools on a developers PC or having to install Silverlight plugin  on a compatible browser as it is all now HTML 5.


Case Study

GreenEggs Studio needs a simple annual leave request solution to replace their existing paper based system. They have decided to use K2 to build the solution because of it’s rapid development and low / no code proposition. As it is their first application in K2 they are going to keep the process small and simple.  They also want it to get the leave request out into the business as quick as possible so they are taking an agile MVP approach so they can iterate or add features based on user feedback instead of assumptions.

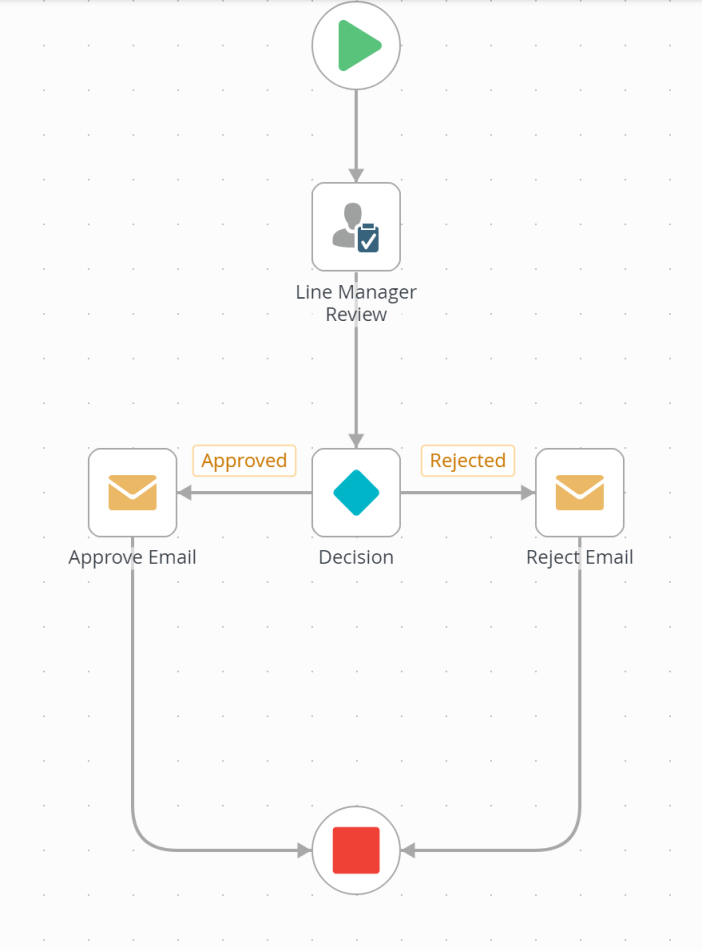
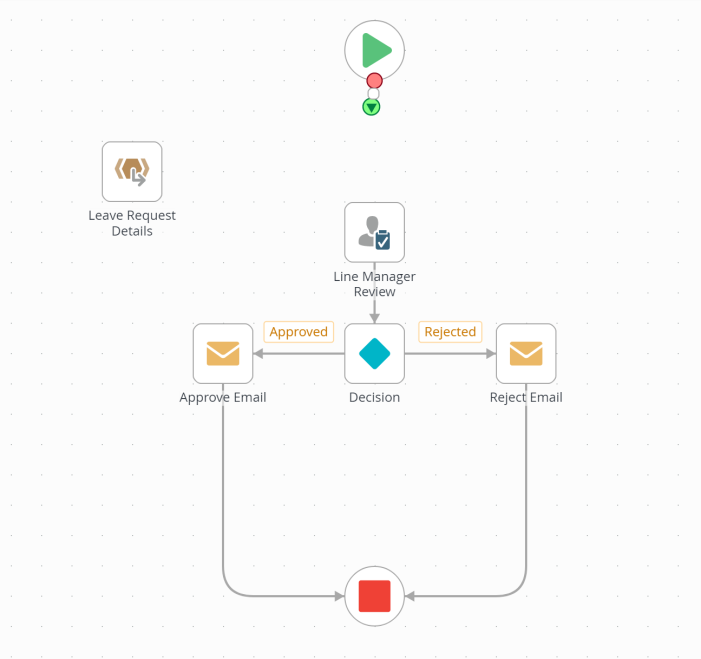
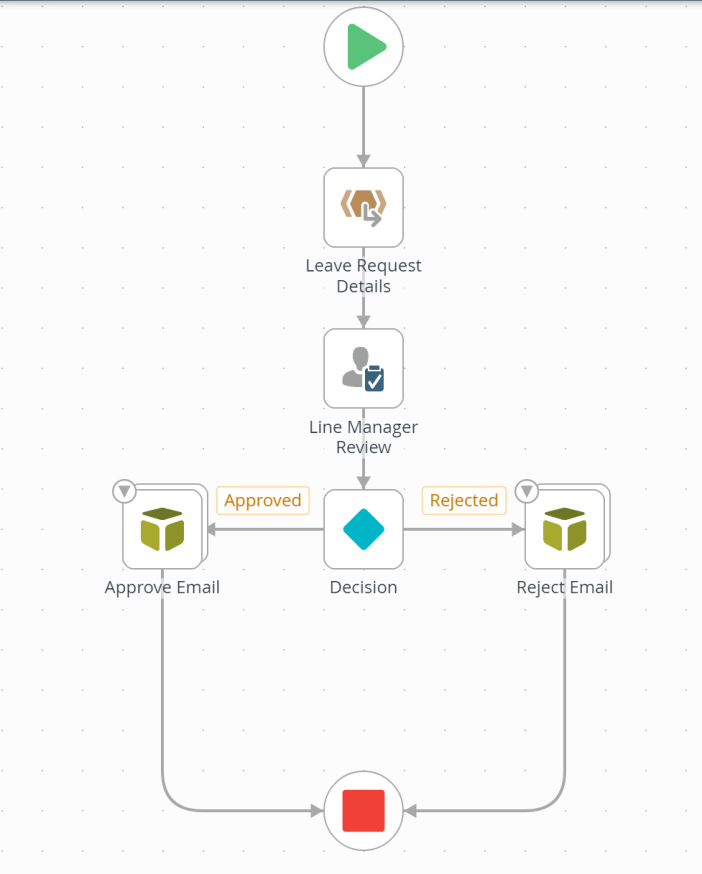
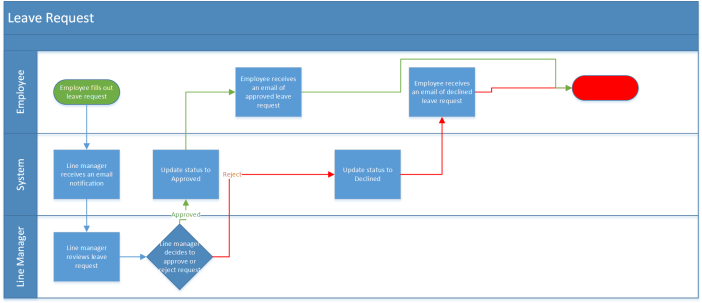
The process map looks like this
Leave Request

As you can see it’s a very simple process.

  1. An employee fills out and submits the annual leave form.
  2. Their line manager receives an email asking them to review the request
  3. If the line manager declines the request, the employee receives an email saying it has been declined and the status is updated
  4. If the line manager approves it, the employee receives an email saying it has been approved and the status is updated


Getting Started

Simple workflow

So lets get started with designing a workflow with K2 Five.  We are going to build a simple workflow to create annual leave requests.  The Smartforms and SmartObjects have already been built.

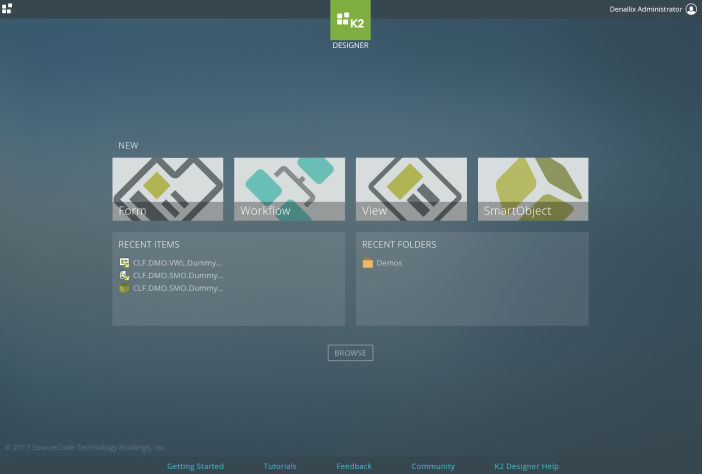
  1. Go to the K2 Five DesignerDashboard
  2. Click on ‘Workflow’
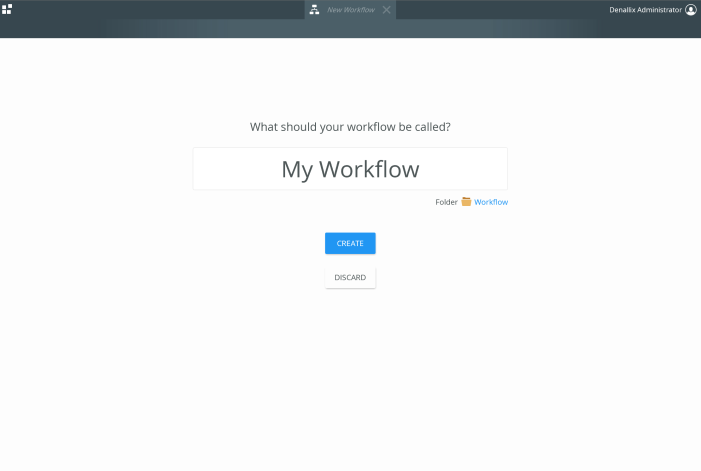
  3. The workflow design wizard will load up and ask to enter in a name and the location of where you want the workflow to be saved to.workflowwizard
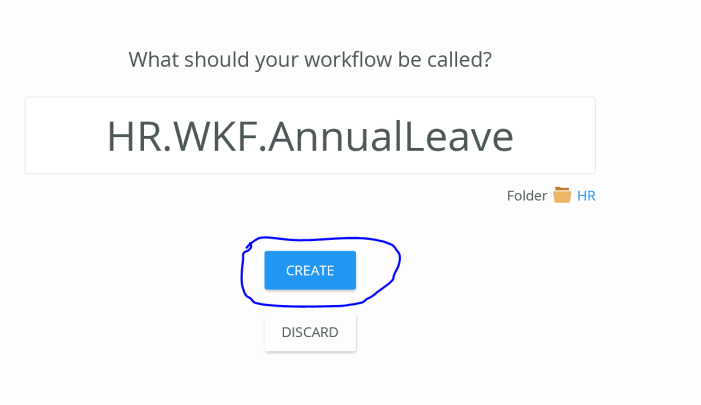
  4. Lets give the workflow a name like ‘HR.WKF.AnnualLeave’, the way I have named the workflow  is that so we can identify what solution the workflow belongs to. In this case the ‘HR’ solution.workflowname
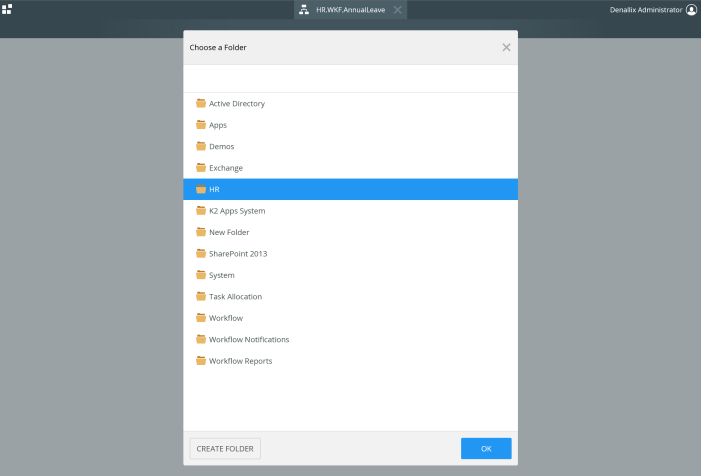
  5. Now lets choose the location, click on the blue ‘workflow’ link underneath the workflow name. A window will popup showing a list of folders.
  6. Select the ‘HR’ folder’ and click on ‘Ok’. If there is not a folder there already then click on ‘Create Folder’ and enter in the name ‘HR’.folder
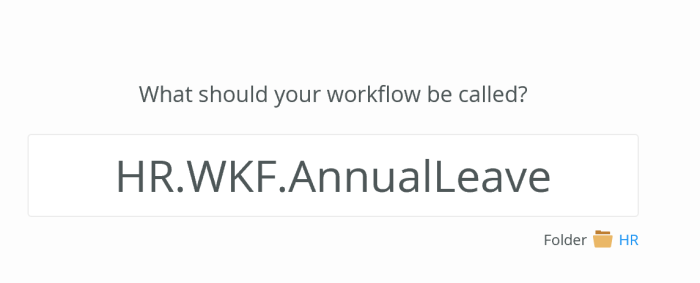
  7. On ‘Ok’, the folder window will close and the folder location under the name will say ‘HR’folderchange
  8. Now click on ‘Create’ button, this will now take us into the new design canvas.create
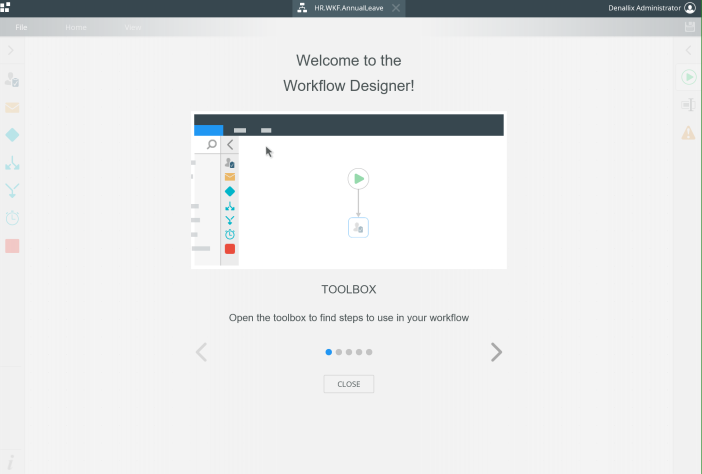
  9. When the canvas loads up, we are presented with a smart assist helper to give us a brief introduction into the new workflow designer. You can click on the left and right arrows to view the helpful clips and then click on close after you have finished.welcome
  10. Welcome to the new K2 Five workflow Designer 🙂 welcome1
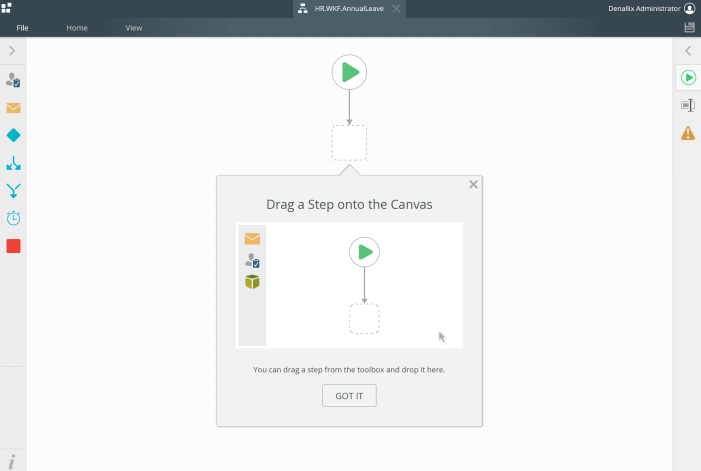
  11. The Smart Assist is always present within the new designer and when you are new to the designer it will suggest what to do next. You can either just click ‘x’ and it will close the smart assist for this workflow or you can click ‘Got It’ and it will assume you know what you are doing. In this case I am going to just going to click on ‘x’ to close it.
  12. Once the smart assist is closed the first thing you will notice is now simple the designer now looks.  There are a couple of things that are very different if you have used K2’s previous workflow designers both web and studio.  Activities, steps and events are gone and now replaced with ‘Shapes’ So throughout the rest of this guide you will notice I will be using  term ‘Shape’ instead of event. So for example ‘I am going to drag the ’email shape’ onto the canvas instead of the email event’
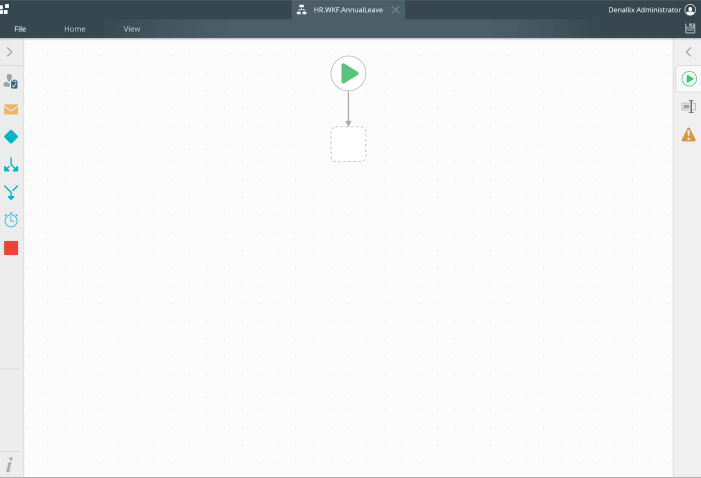
  13. So on the canvas we start with the ‘Start shape’ and you can see it has put a maker where we can place the next shape.start
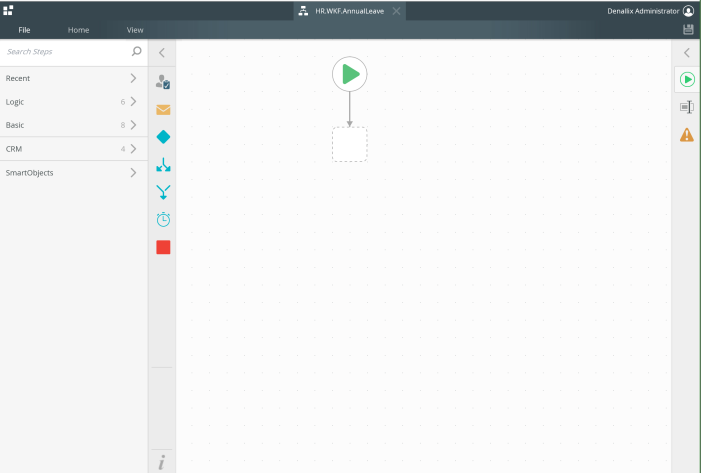
  14. So now that we have a canvas to build the annual leave process on. On the lefthand side of the canvas we have a toolbox of all the shapes that the workflow can carry out like creating a task, sending an email etc..  To view the shapes click on ‘>’ to expand the toolbox.
    expandtoolbox
    Click to expand

    toolbox
    Expanded Toolbox
  15. The first shape we are going to drag onto the canvas is a Task. Drag the task shape taskicon into the placeholder on the canvas. The canvas should look like the image below. A ‘!’ explanation mark will be displayed against the task shape, don’t worry about that, K2 is just letting us know it’s not yet configured.taskcanvas
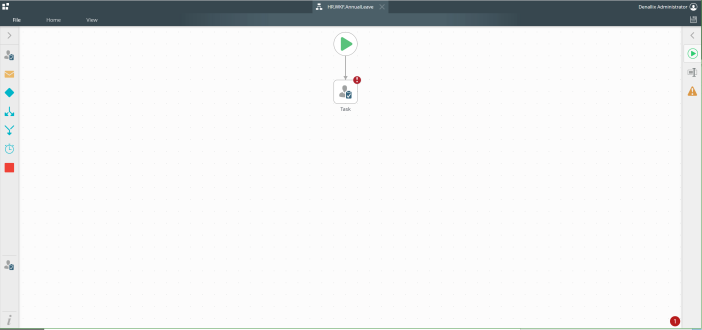
  16. Now Click on the Task shape on the canvas and now the righthand side configuration panel icons will change to show the task configurable options.
  17. Click on ‘<‘ on the configuration panel to expand the options.taskconfig1
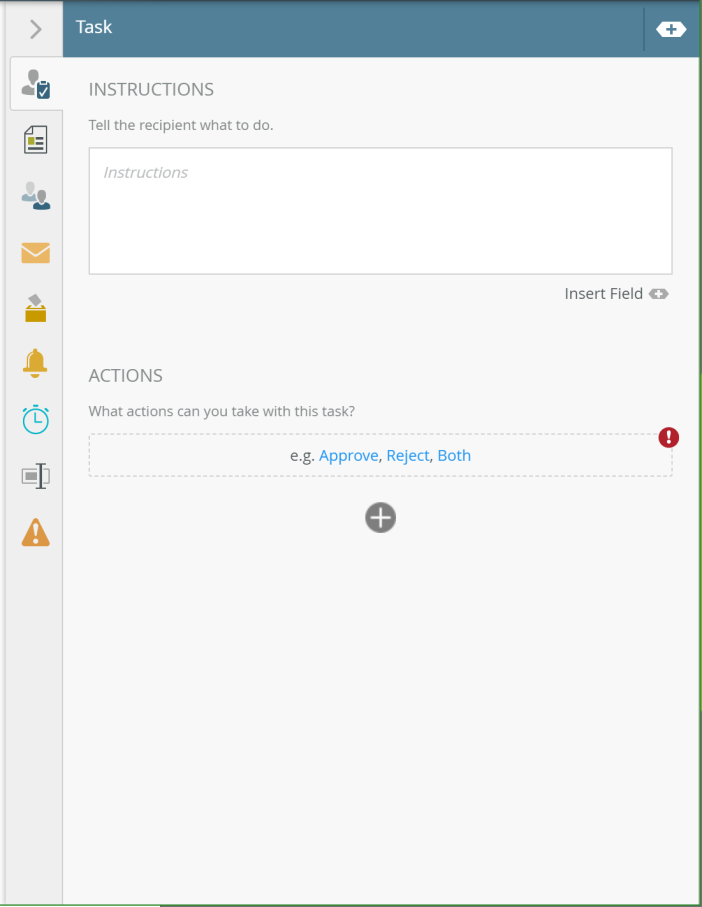
  18. The first tab in the task configuration options is where we can give some instructions to the person(s) receiving the task about what the task is about. It is also where we can say what actions the person(s) interacting with the task can perform.
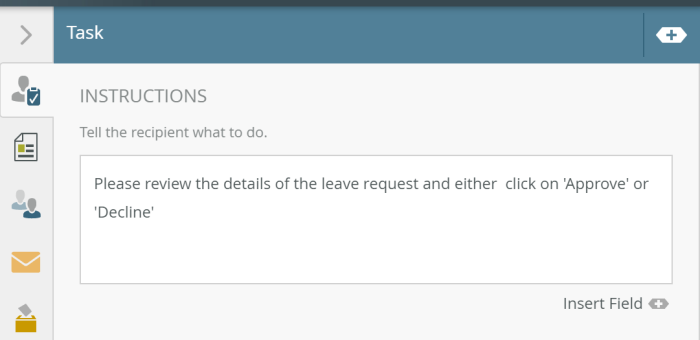
  19. So lets add some basic instructions “Please review the details of the leave request and either  click on ‘Approve’ or ‘Decline’instructions
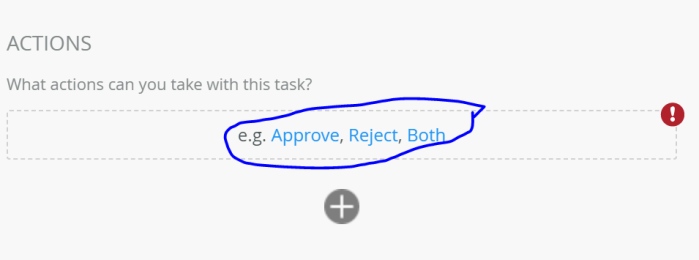
  20. Next we are going to add the actions for the task. For the standard actions like ‘Approve and ‘Reject’, K2 have made it easy for us by giving us them the default options which we can just click on to create the actions.defaultactions
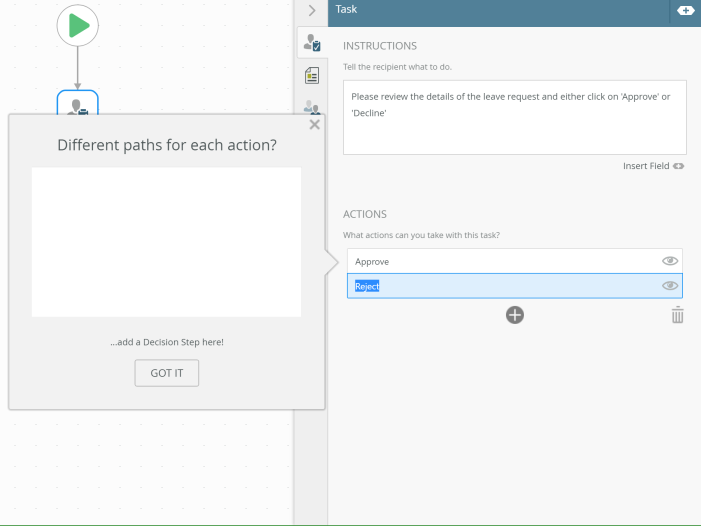
  21.   So lets just click on ‘Both’, the actions will appear and K2 Smart Assist will appear showing how to create action paths. Click on ‘x’ close to close the Smart Assist.defaultactions1
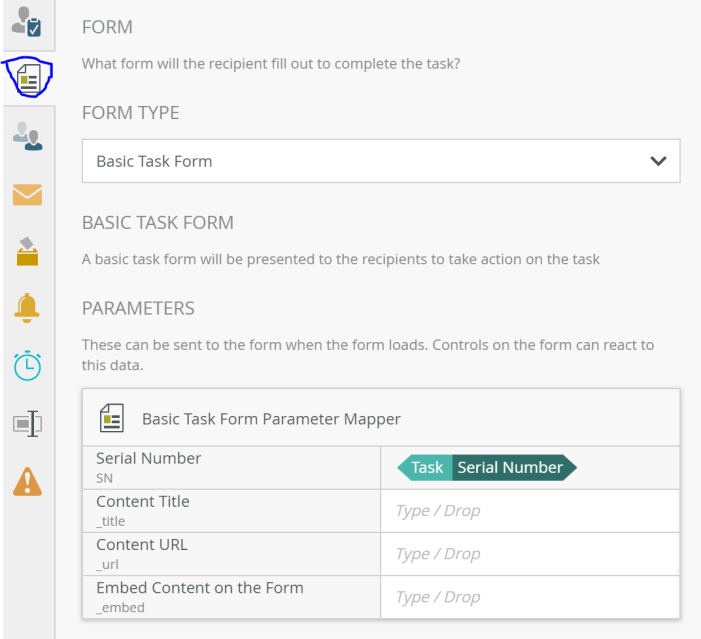
  22. Now click on the next tab in the configuration options, here we can choose which form will be used for the task.  We can choose from the following types
    1. Basic Task Form, K2 autogenerates a form which is presented to the user to choose a specific action
    2. Smartform, we can select an existing Smartform to use from the library
    3. Custom, we can enter in a custom form by putting in the URL of the form we are going to use.
    4. No form, it is possible to have a task that has no form for the user to go to.
  23. For now we are going to use ‘Basic Task Form’, we will go back later and change it to a specific form.basicform
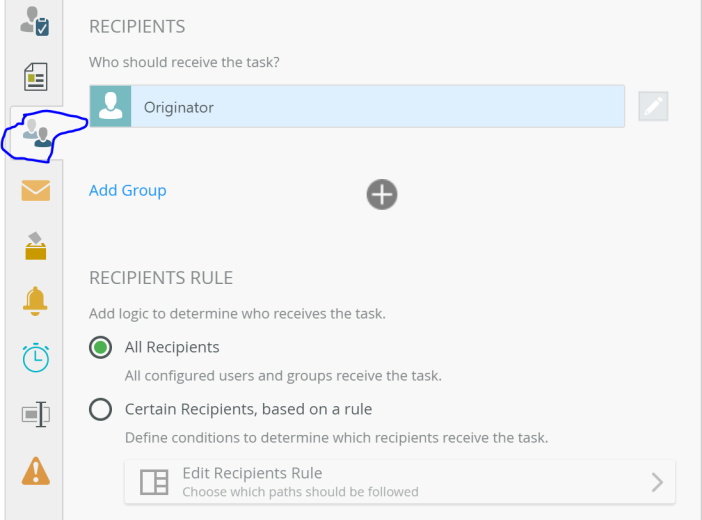
  24. Next we choose who will receive the task, so we need to click on the next tab to choose the recipient.recipeint
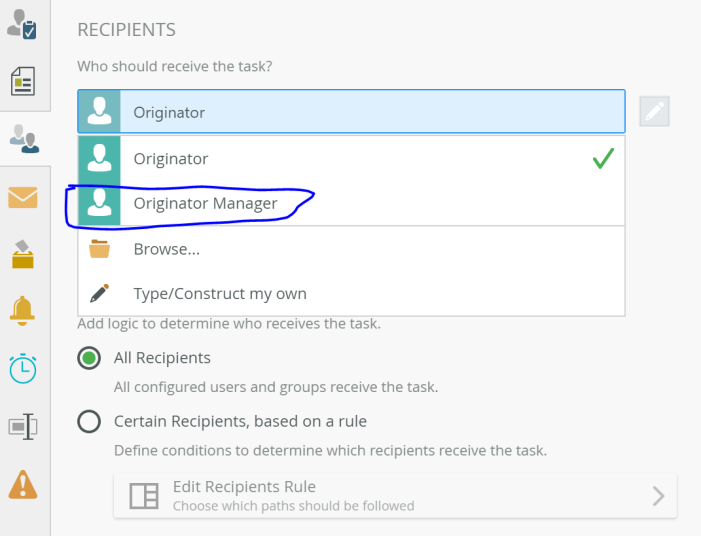
  25. By default the task will goto the person who submits the leave request. So we need to change this to be their line manager. Click on ‘Originator’ and select ‘Originator Manager’ from the list. Now the task when generated will go the manager of the person who submitted the leave request.recipeintLinemANAGER
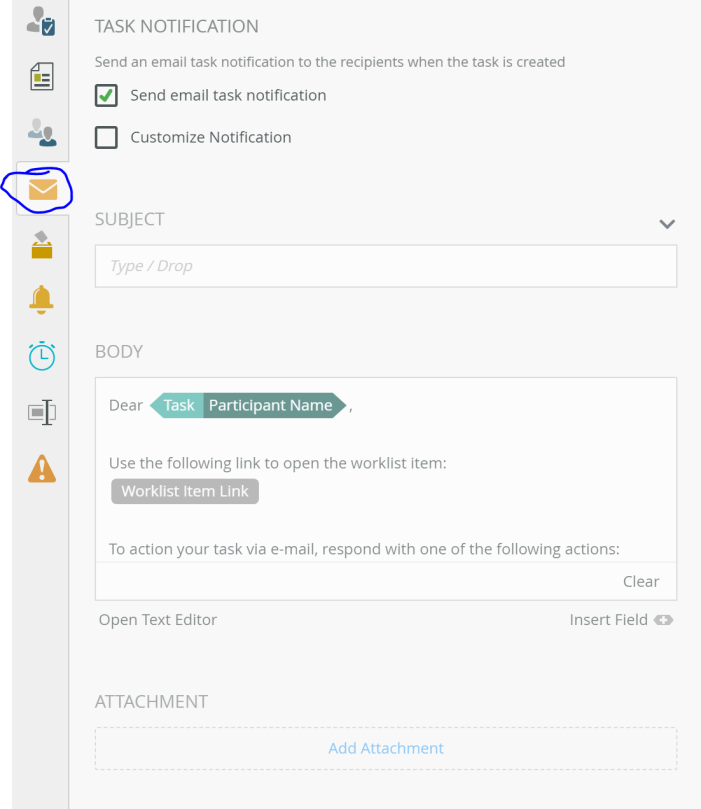
  26. Looking at the process map, the line manager also needs to receive an email notification to say that they have a leave request to complete. Click on the next tab down with letter icon. Here we can decide if the line manger will get an email notification. We can either use the standard notification email or we click on ‘Customise Notification’ and create a custom notification email which can include actual business data that is relevant to the task. For now we are just going to use the standard notification.NOTIFICATION
  27. For this walkthrough we will leave the other options for another time. We have now configured a basic task for the line manager to receive once a member of their team submits a leave request.
  28. Double click on the word ‘Task’ replace the text with ‘Line Manger Review’linemangerreview
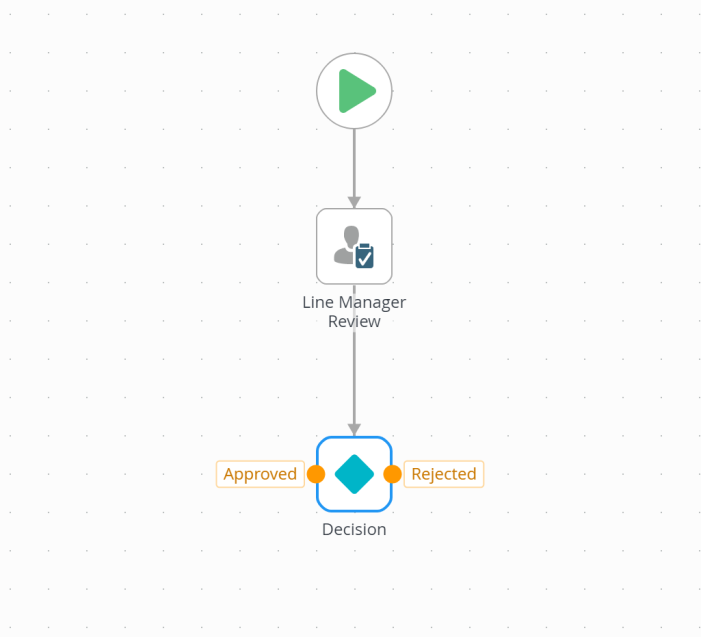
  29. Now to create the decision branches on the workflow, left click and drag from the bottom of the task shape to create a new line and placeholder.linemangerreview.actionsPNG
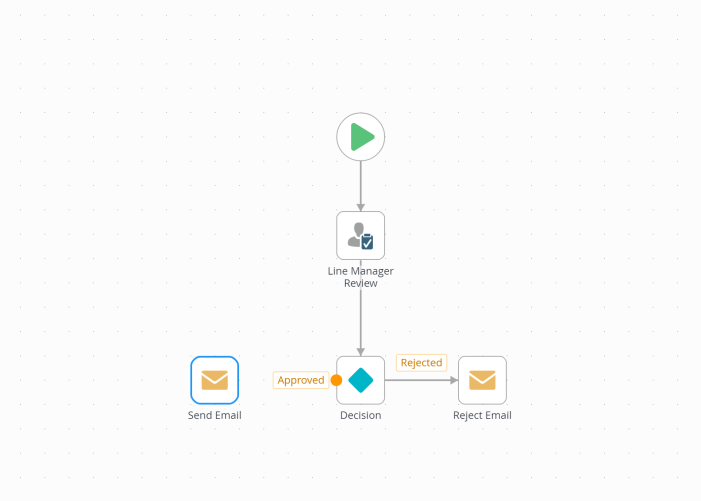
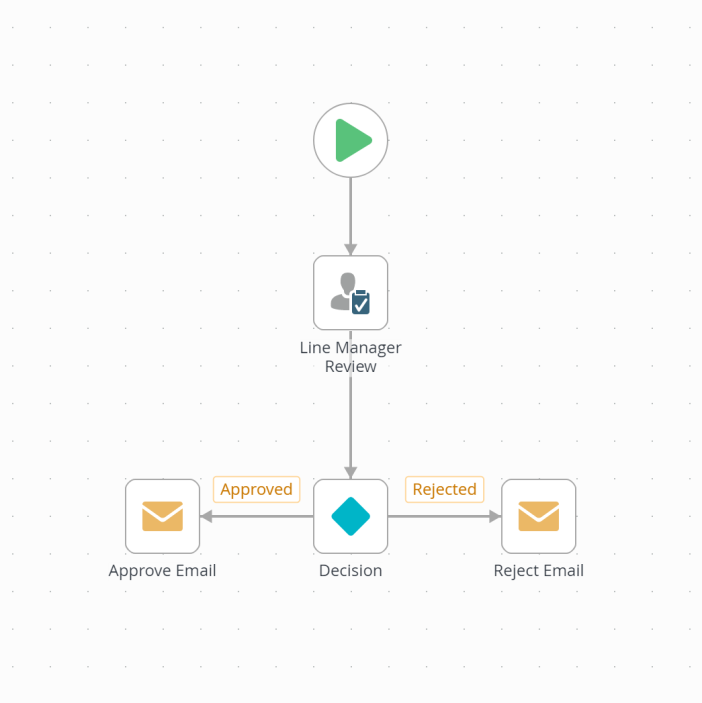
  30. Now drag the blue diamond shape (decision shape) bluediamond into the placeholder. K2 will then pick up we have two actions from the previous shape and will automatically create the decision outcomes based on those actions.linemangerreview.action1
  31. Now lets deal with the ‘Rejected’ decision branch.
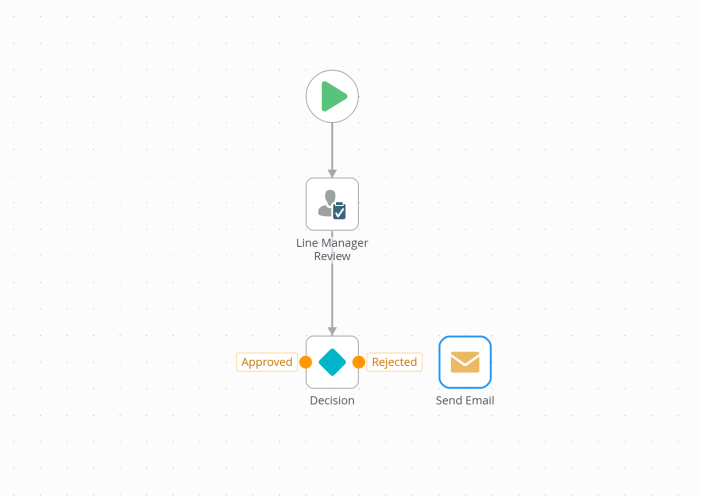
  32. In the process map, when a leave request has been rejected, we need to send an email to the employee who submitted the leave request. In the toolbox on the left hand side drag the email shape emailshape on to the canvas. Your canvas should look the below imagerejectedemail
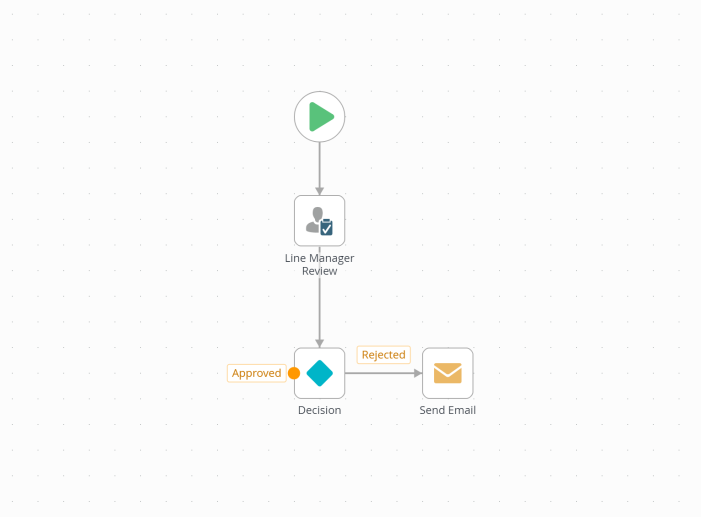
  33. Now left click on the  orange dot next to ‘Rejected’ and drag it on to email shape we just dragged onto the canvas.rejectedemail1
  34. Now lets configure the email, first of double click on the ‘Send Email’ text and enter in ‘Reject Email’
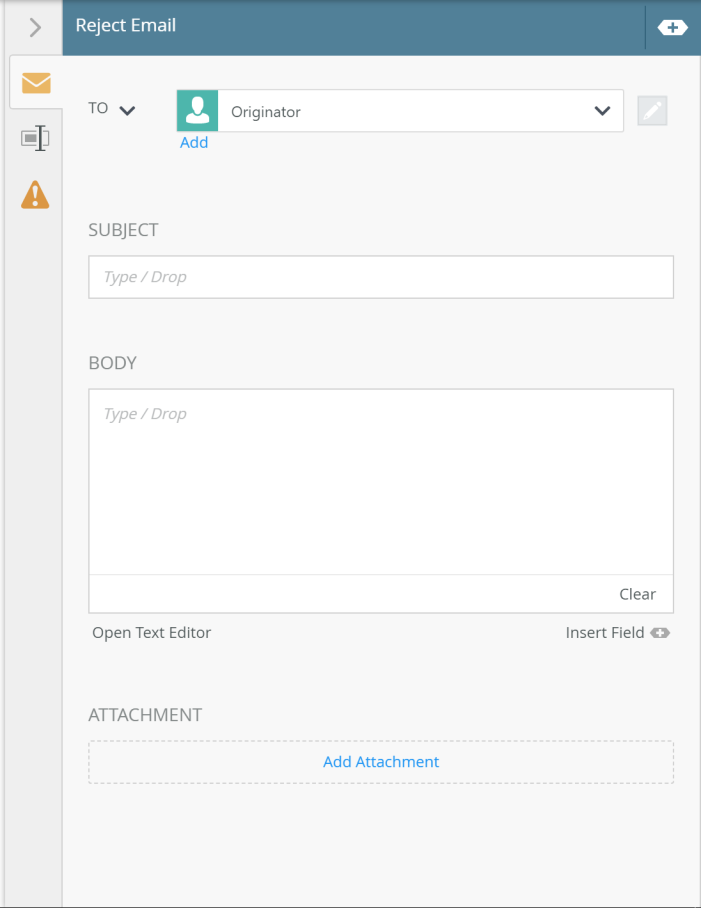
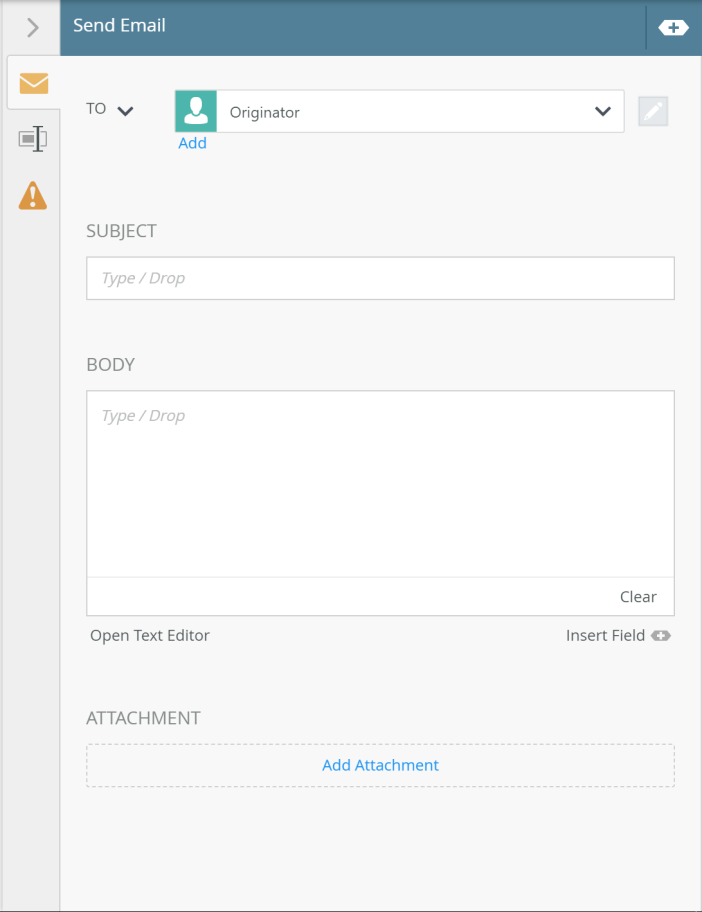
  35. Click on the email shape again and expand the configuration panel on the righthand side.configurerejectemail
  36. We don’t need to change ‘To’ as it is already set to ‘Originator’ which is the person who submitted the leave request form.
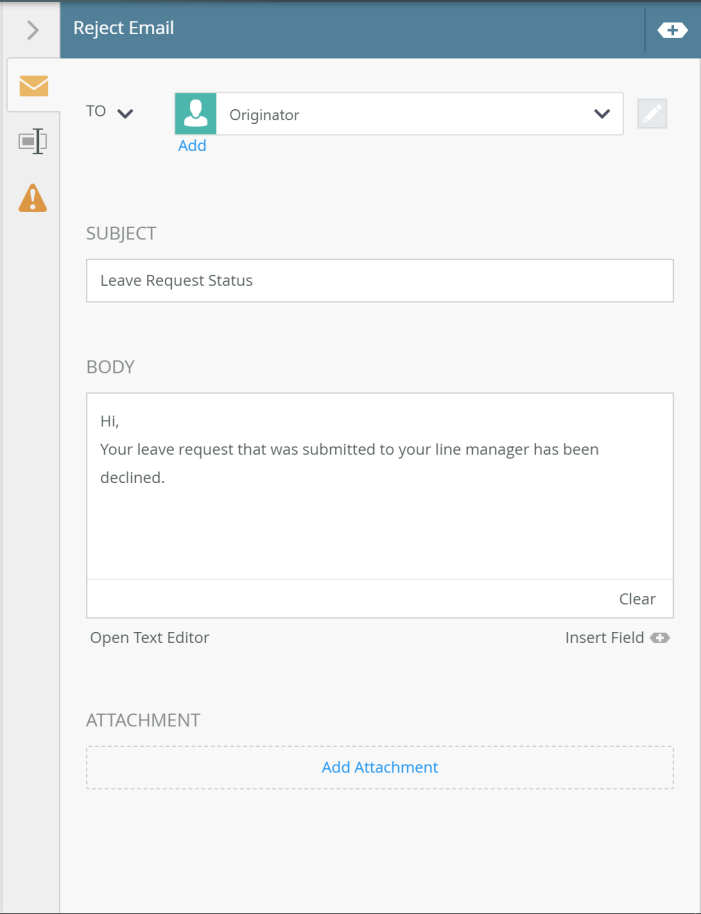
  37. In the Subject enter in the text ‘Leave Request Status’
  38. In the Body section for now just enter the following text ‘Hi, Your Leave request that was submitted to your line manager has been declined.’ We will come back to this later on and enter in some business data that relates to the actual leave request. But for phase 1 we will keep it very simple.configurerejectemail1
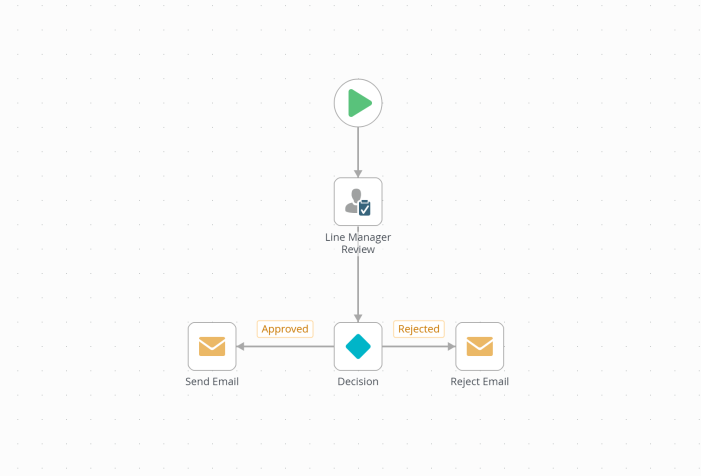
  39. Now  lets do the ‘Approved’ decision branch, like with the rejected branch drag another email shape from the toolbox  onto the canvas. approvedemail
  40.  Now drag the orange ‘Approved’ dot approved dot to the email the email shape.approvedemail1
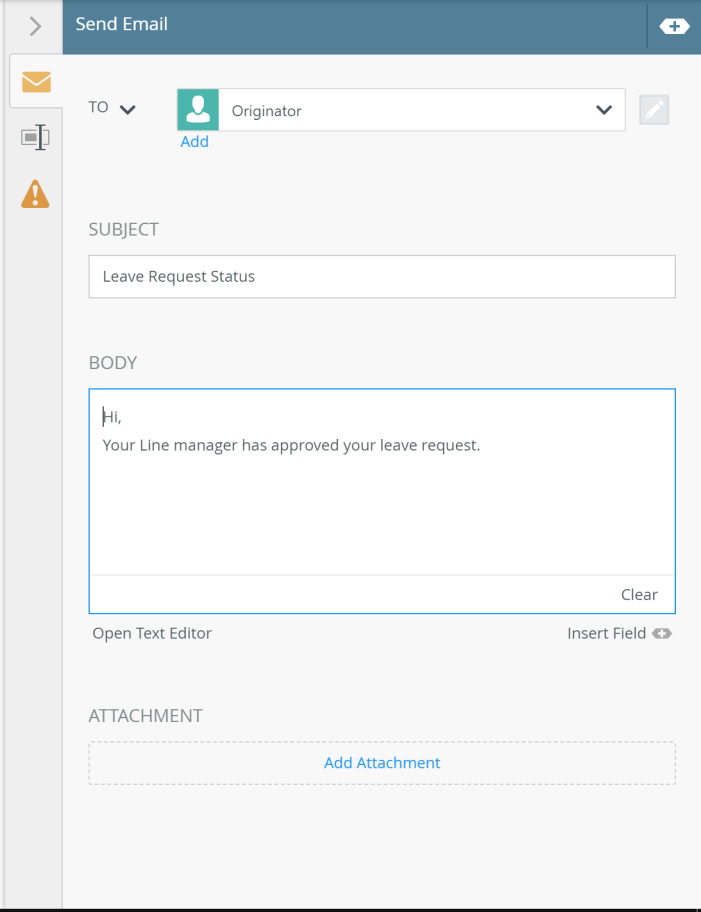
  41. Click on the email shape we just dragged onto the canvas and then expand the email configuration panel on the righthand side of the canvas.approvedemail2
  42. In the Subject enter ‘Leave Request Status’ and in the Body section enter in the following ‘Hi, your line manager has approved your leave request’approvedemail3.PNG
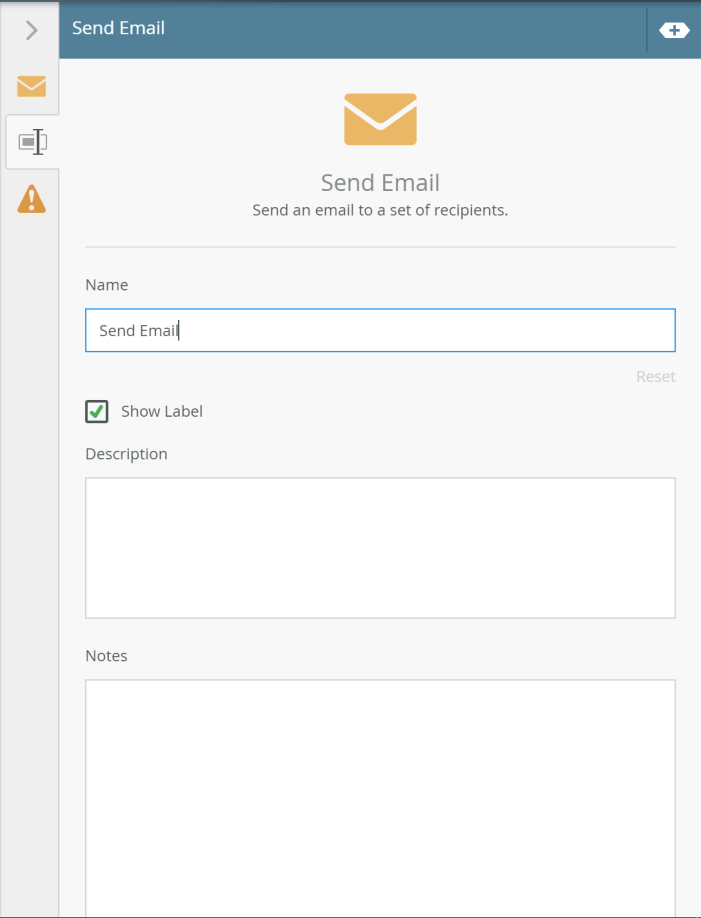
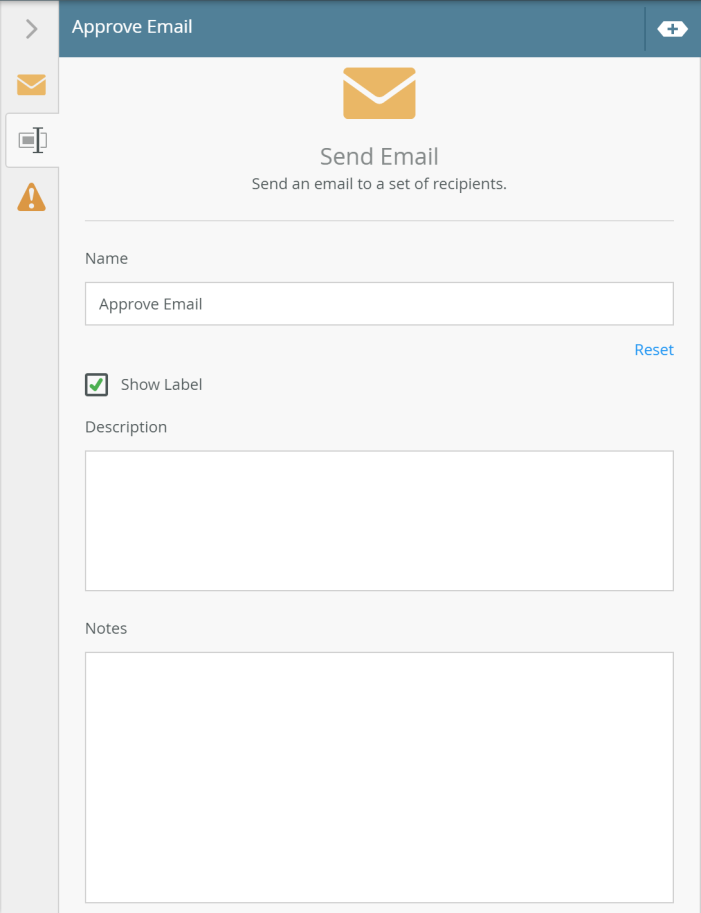
  43. Now click on the next tab in the email configuration panel, here we can change the name of the email shape from ‘Send Email’ to ‘Approve Email’. We can also use this section to enter in additional notes about the email shape.approvedemail4.PNG
  44. In the name section, remove the text ‘Send Email’ and change it to ‘Approve Email’approvedemail5
  45. We have now configured the email for when the leave request has been approved by the line manager. The canvas should now look like the image below.approvedemail6
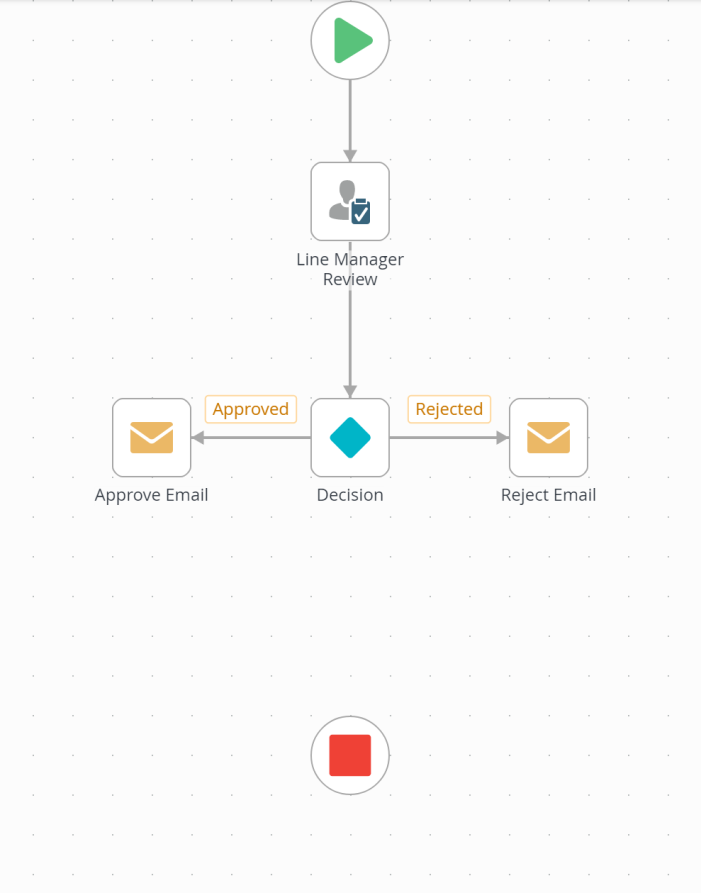
  46. Now to finish off the workflow we now need to add a ‘End’ shape. In the toolbox of shapes it is the Red Square end. Drag this on to the canvas underneath the other shapes. It should look like the image below.end1
  47. Now we can connect the ‘Approve Email’ and ‘Reject Email’ shapes to the end. Like when connecting the decision branch to the email shape. Just left click and drag from the bottom of the email shape to the end shape. Your canvas should now look like this.end2
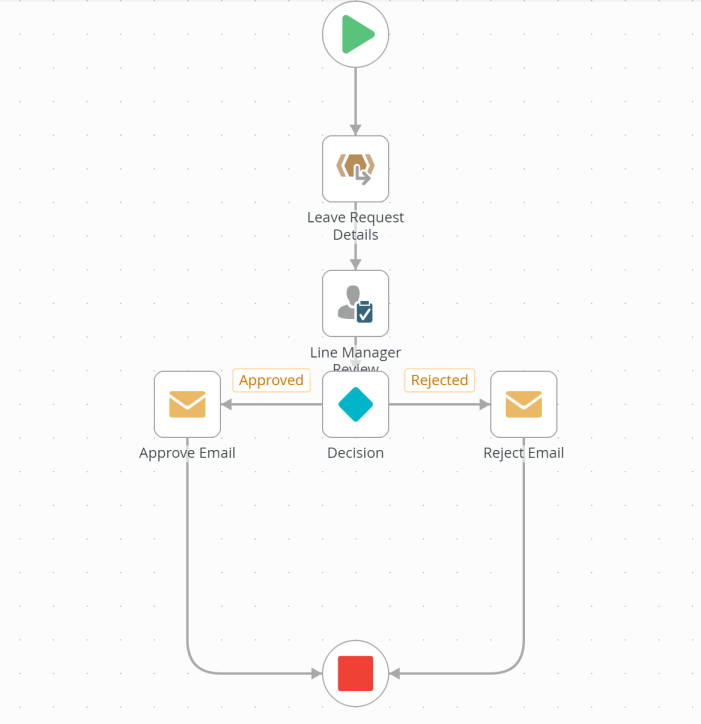
  48. Now we have completed a very a simple version of the leave request. The leave request gets submitted. The line manager of user who submitted the leave request then receives an email asking them to approve or reject the leave request. The user who submitted the leave request then will get an email telling them of the decision that was made by their line manager.

Using SmartObjects inside the leave request workflow

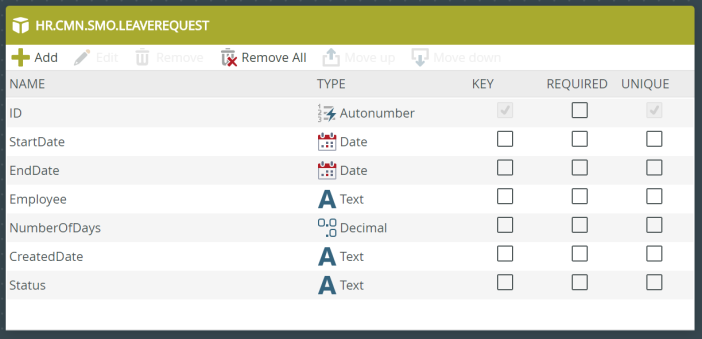
  1. The leave request has a SmartObject,
    1. HR.CMN.SMO.LeaveRequest, this holds the leave request details like leave dates, number of days, status, who created it and when.leavesmo
  2. So now lets edit the workflow we created earlier to use the data from the SmartObject HR.CMN.SMO.LeaveRequest. To do this we need to add a variable to hold the LeaveRequest number. This is so the workflow can find the correct leave request details.
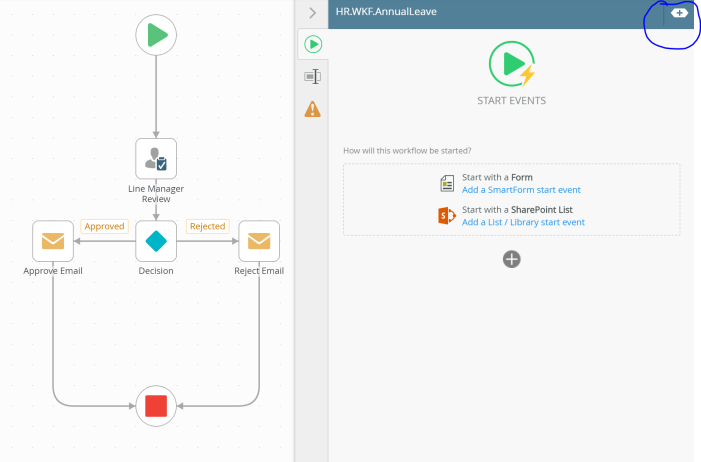
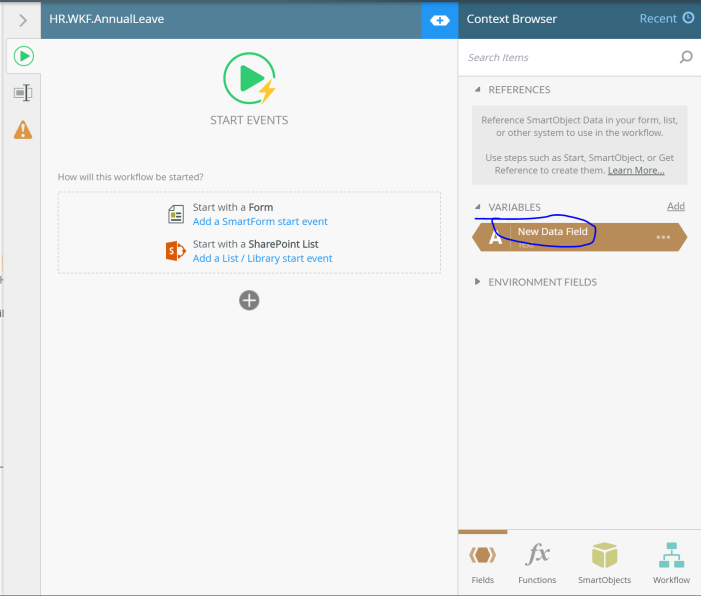
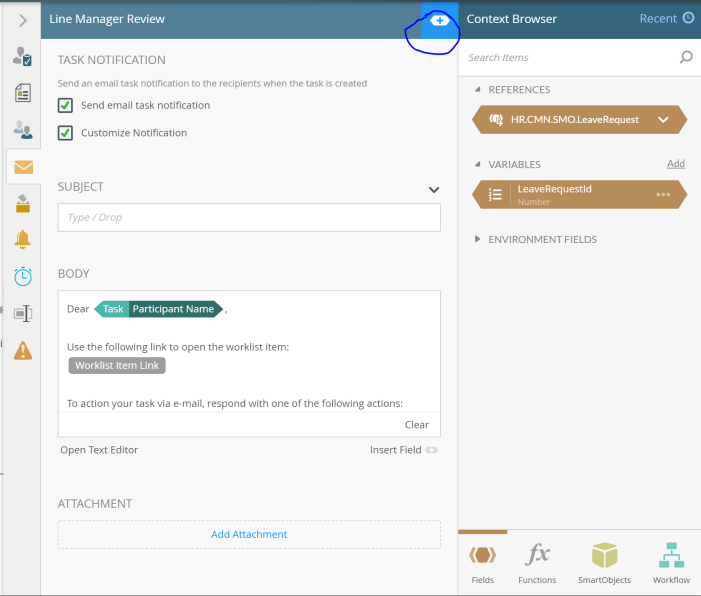
  3. Click on ‘Start’ shape and then click on the configuration panel on the righthand side of the canvas. Then click on ‘<+>’ symbol in the top right corner as circled in the image below.datafield
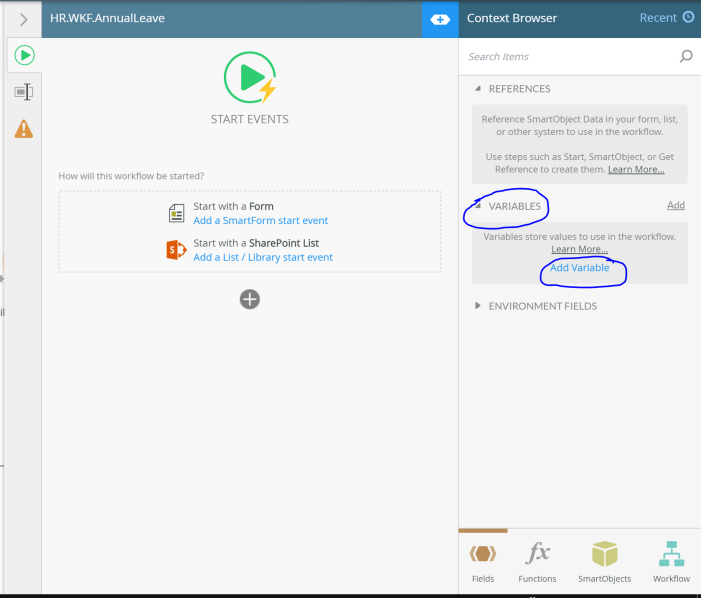
  4. This will expand the ‘Context Browser’ for the canvas. The context browser will show any references, variables and environment fields that are currently being used in the workflow. It also gives you access to workflow details and workflow functions.
  5. As this is the first time we have used the context browser in this workflow. We just a brief description of what references and variables are.  Under Variables click on ‘Add Variable’.datafield1
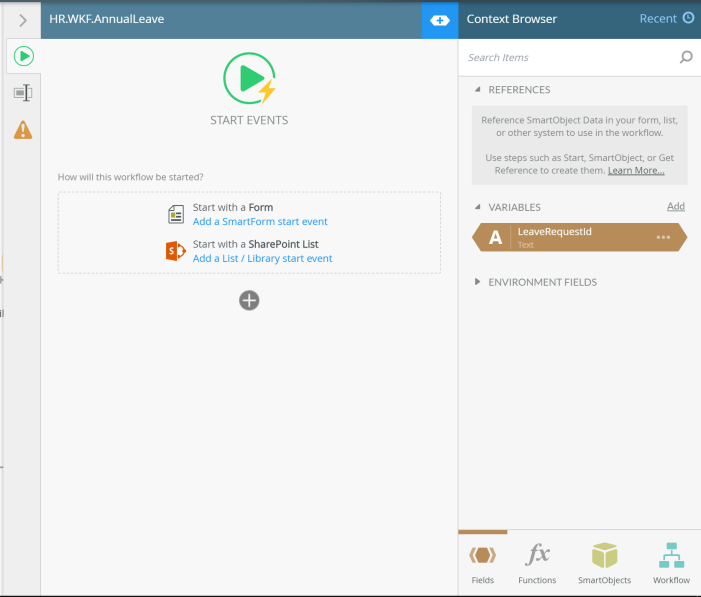
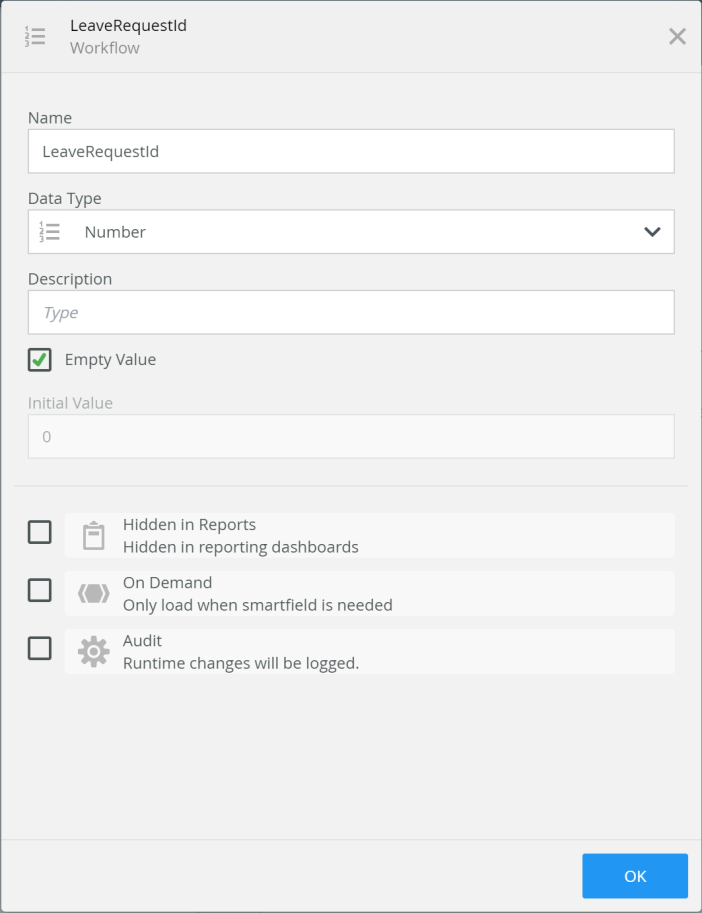
  6.  A new variable called ‘New Data Field’ is created. Click on the text ‘New Data Field’ and delete the text and replace it with the following text ‘LeaveRequestId’.datafield2datafield3
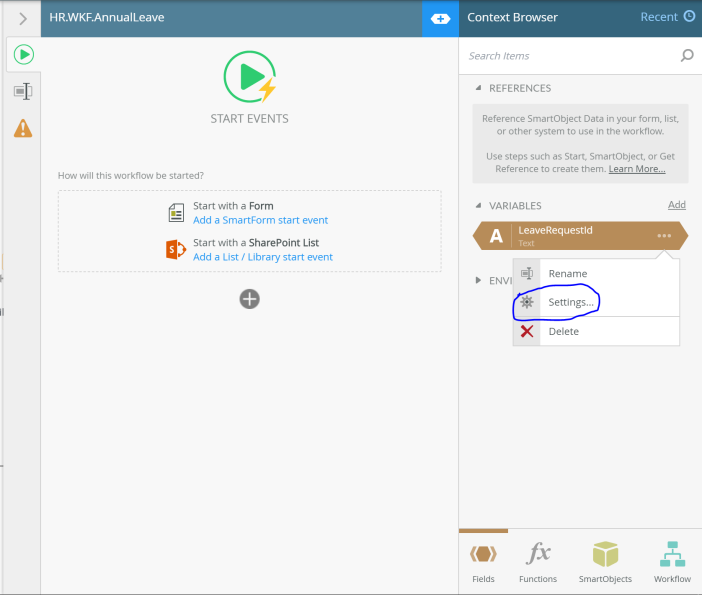
  7. The next thing we need to do is change the data type of this variable. At the moment it is set to ‘Text’ as we need the variable to store a number click on ‘…’ and click on ‘Settings’.datafield4
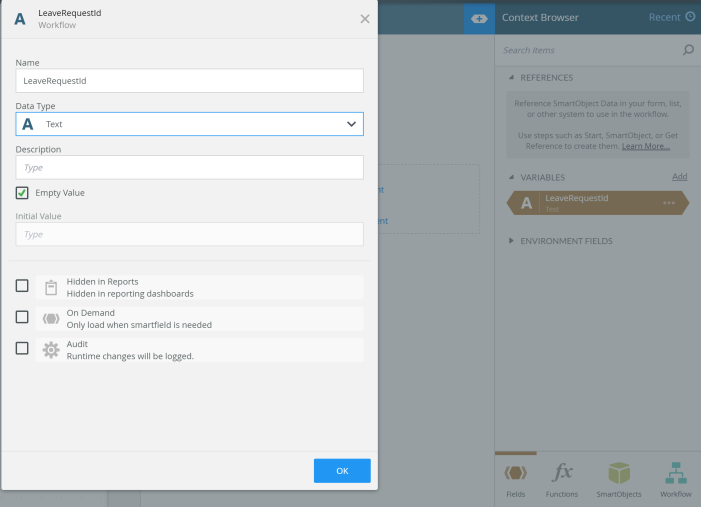
  8.  We are now in the settings for the variable, under ‘Data Type’ you will notice it says   ‘Text’.datafield5
  9. Click on the drop down list that says ‘Text’ under ‘Data Type’ and choose ‘Number’ and click on ‘Ok’.datafield6
  10. We have now created and configured a variable to hold the related Leave Request Number. We now need to tell the workflow which data to retrieve. To do this we need to create a short cut to the SmartObject ‘HR.CMN.SMO.LeaveRequest.
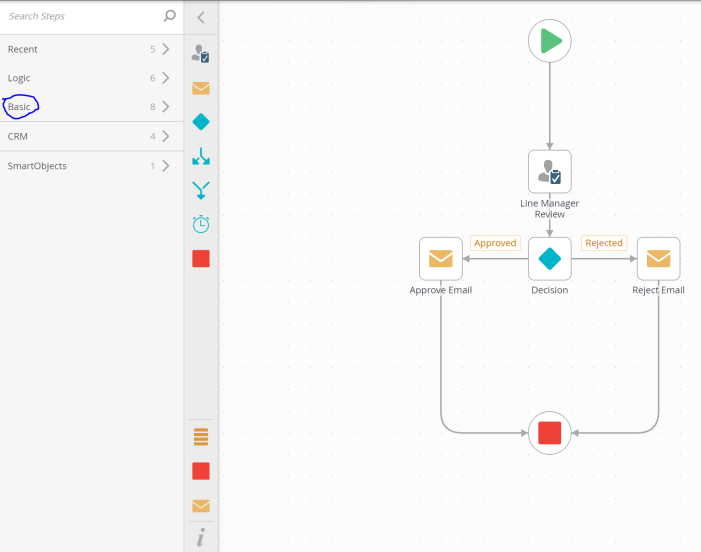
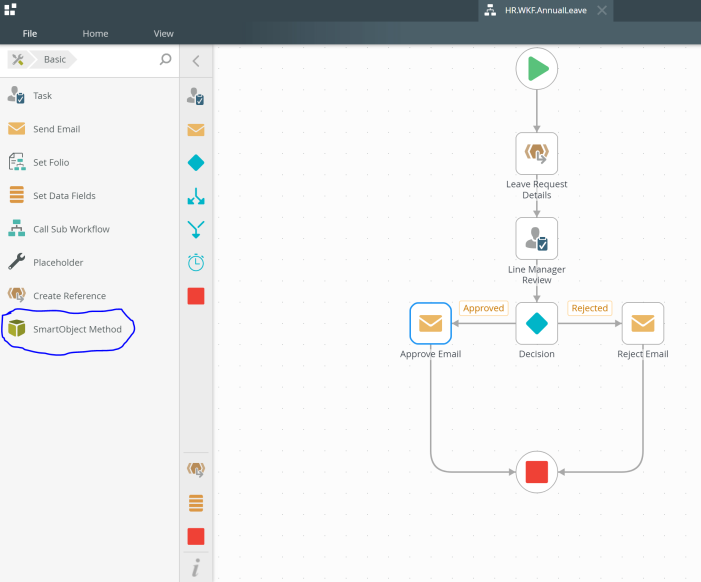
  11. Expand the shape toolbar on the lefthand side of the canvas and click on ‘Basic’.REFERENCE
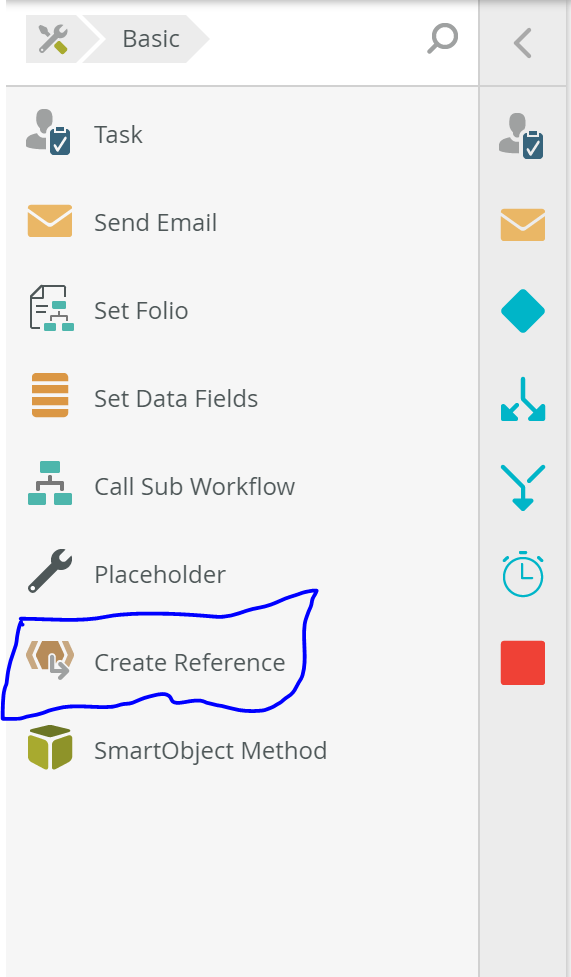
  12. We will now see all the shapes under the ‘Basic’ category.  The shape we want is called ‘Create Reference’.REFERENCE1
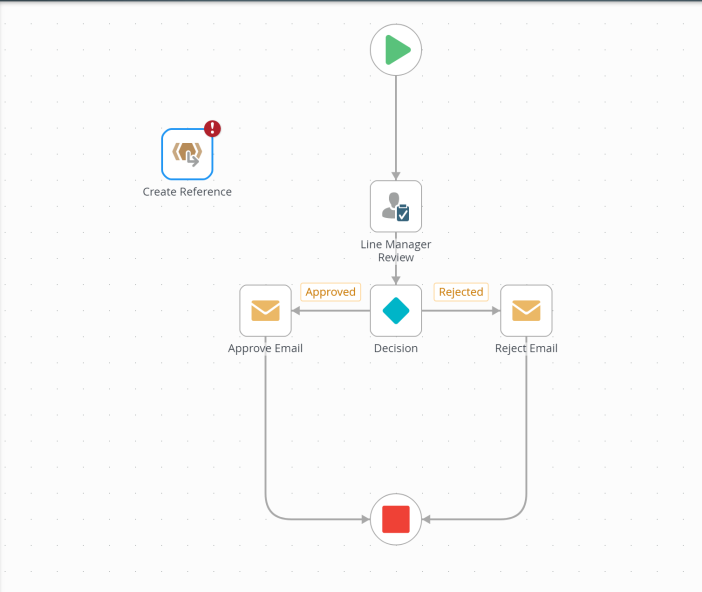
  13. Click and drag it on to the canvas. REFERENCE2
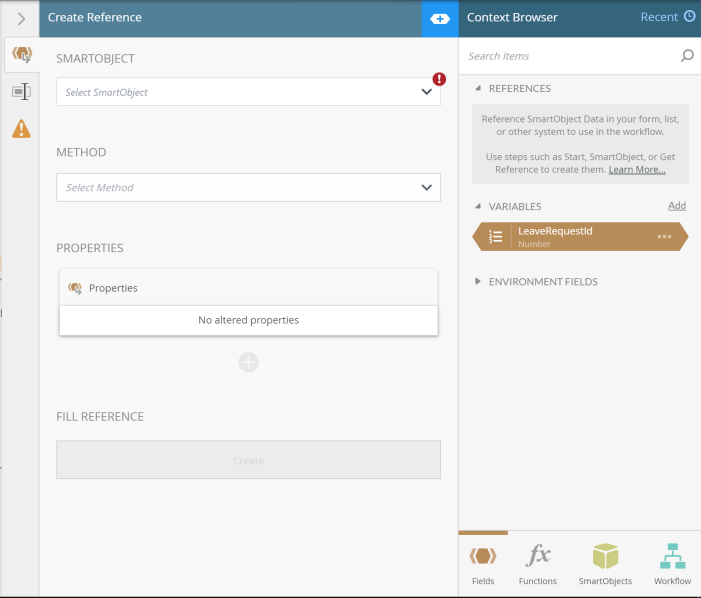
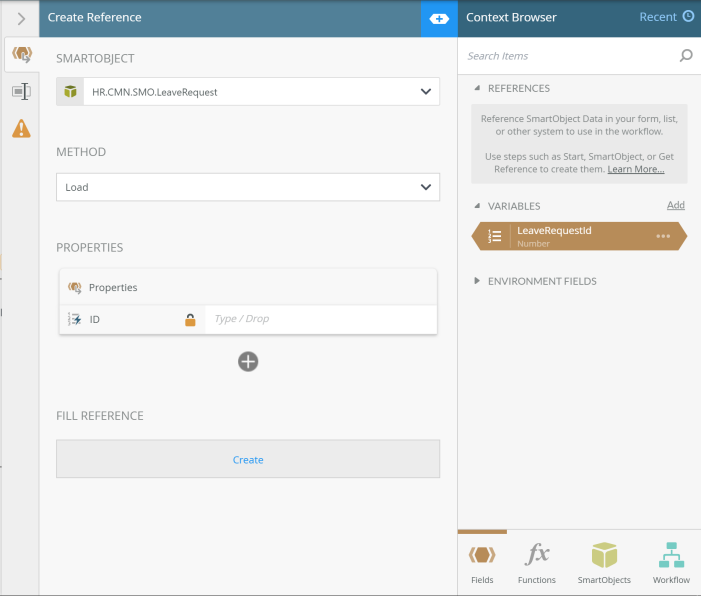
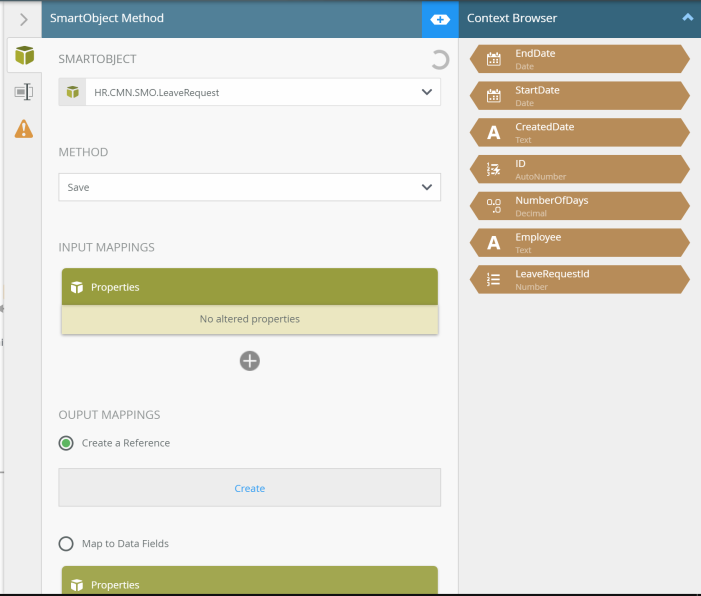
  14. Click on the ‘Create Reference’ shape and then expand the configuration panel on the righthand side of the canvas. The first thing you will notice that we have to do is select a SmartObject.createreference
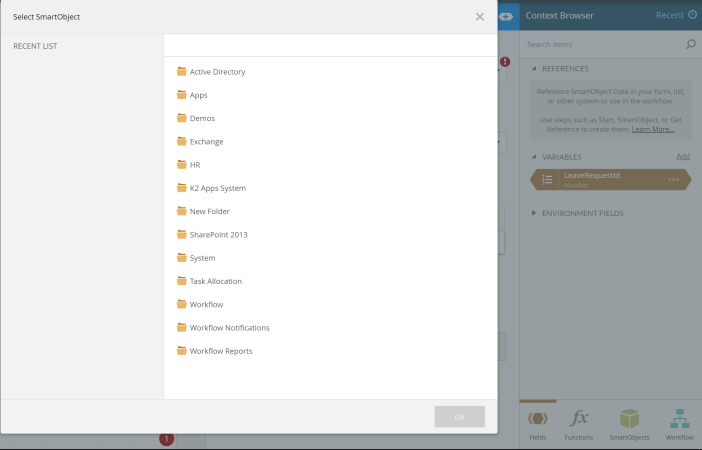
  15. Click on ‘Select SmartObject’, this will bring up a window to select a category where the SmartObject is stored.createreference1
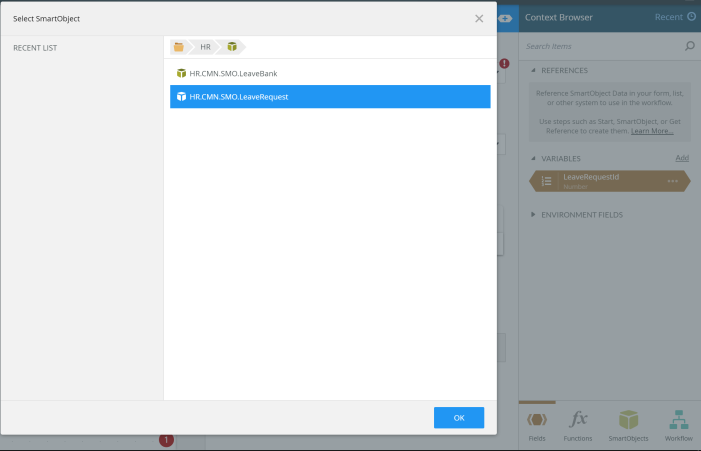
  16. The SmartObject we want is under ‘HR’ – ‘SmartObjects’. Click on ‘HR’ , then click on ‘SmartObjects’ and then select the SmartObject ‘HR.CMN.SMO.LeaveRequest’ and click on ‘OK’.createreference2
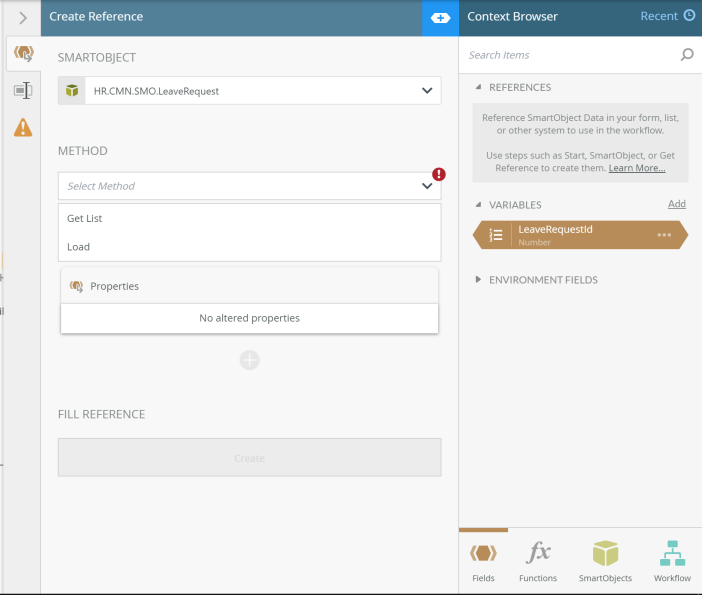
  17. Now that we have selected the SmartObject, we now need to select which method the reference will use to get the correct data.  Click on ‘Select Method’ and select ‘Load’.createreference3
  18. Because we have selected the ‘Load’ method, it requires some input data to retrieve the correct row of data. In this case the load method requires that a value is passed in the property named ‘Id’.createreference4
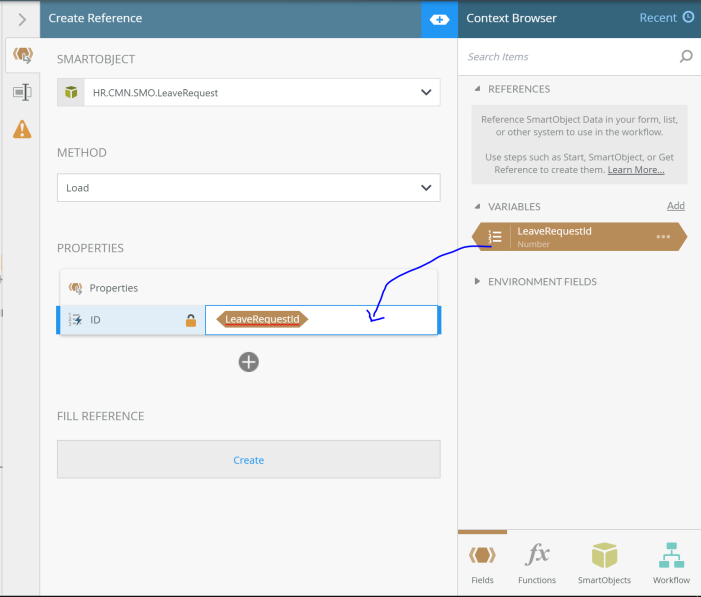
  19. If the ‘Context Browser’ is not expanded click on ‘<+>’ symbol in the top right corner of the panel. We will now see the variable we created earlier, now drag that into the box labeled ‘Type / Drop’ next to the property labelled ‘ID’. It should look like the image below.createreference5
  20. Now that we have configured the reference, to retrieve data where the value of the property ‘ID’ is the same as the value of the variable named ‘LeaveRequestId’. If you  you know SQL we are essentially doing this ‘Select * from HR.CMN.SMO.LeaveRequest where ID = @LeaveRequestId‘.
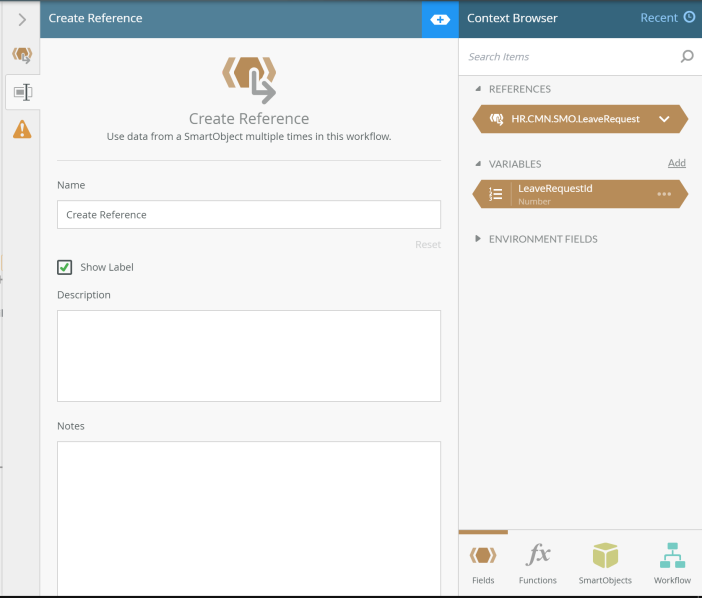
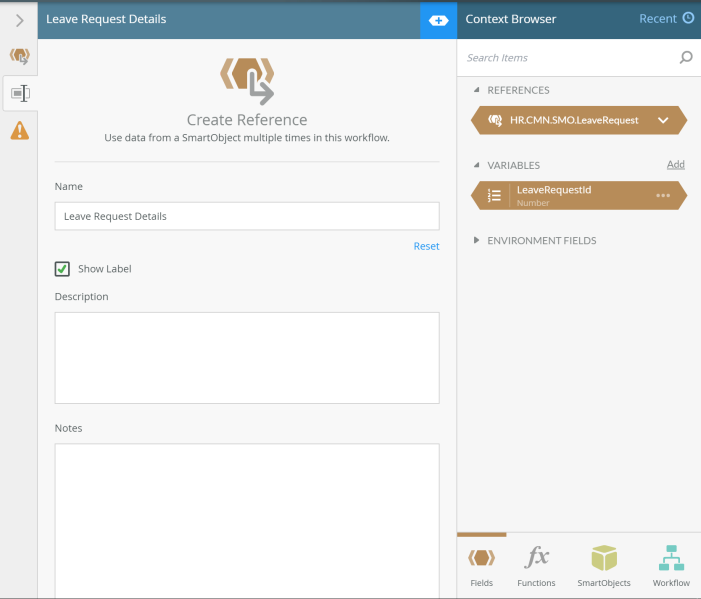
  21. Click on the next tab in the configuration panel and under ‘Name’ replace the text ‘Create Reference’ with ‘Leave Request Details ‘.createreference7createreference8
  22.  Click on ‘>’ to close the configuration panel’, we have now created a short cut to the leave request data. We now need to link the reference into the workflow so the workflow will retrieve the correct data before the task for the Line Manager is created.
  23. On the canvas, disconnect the line going from the ‘Start’ shape to the ‘Line Manager Review’ shape. As shown in the image below.createreference9
  24. Now drag the reference shape named ‘Leave Request Details’ in between the shapes ‘Start’ and ‘Line Manager Review’. Then connect the line from the ‘Start’ shape to the ‘Leave Request Details’. Then left click and drag a line down from the bottom of the ‘Leave Request Details’ shape to the top pf the ‘Line Manager Review’ shape. Your canvas should now look like the image below.createreference10
  25. Now that the workflow has access to the leave request details that was entered in the submitted leave request form we can now give some context to the emails that are sent out as part of the workflow.
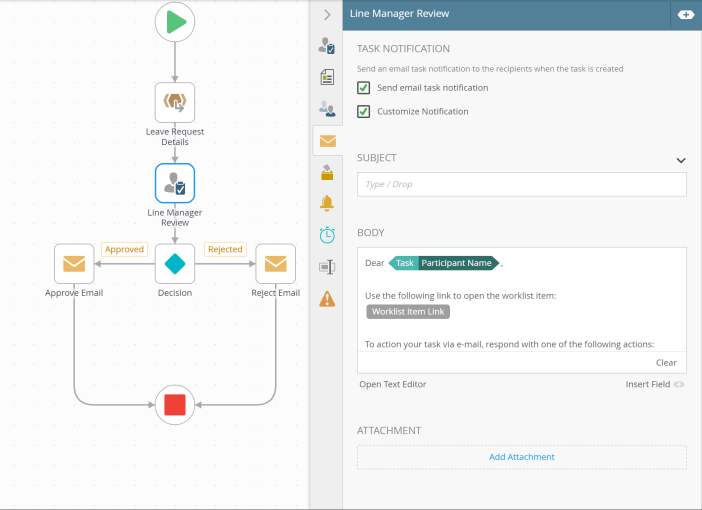
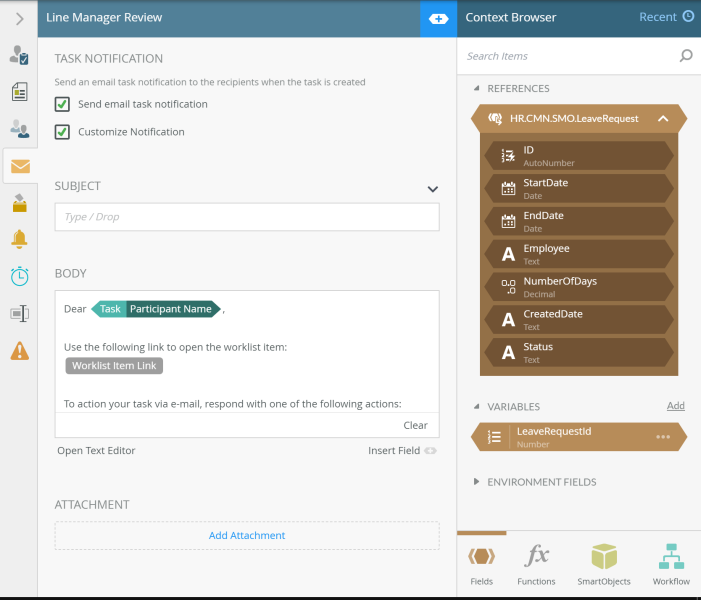
  26. Lets start with the email notification to the line manager of the person who submitted the leave request. Click on the task shape labeled ‘Line Manager Review’. Expand the shape’s configuration panel and click on the notification tab (4th tab down). It should look like this.leavemanagerreviewEmailData
  27. To edit the notification click on ‘Customise Notification’.
  28. Now we can configure what information the email notification will contain. Click on the context browser icon ‘<+>’.leavemanagerreviewEmailData1
  29. Now under ‘References’ we will see the reference we created earlier.  Under the reference section click on ‘HR.CMN.SMO.LeaveRequest’. This will expand the reference and we will now see all the properties.leavemanagerreviewEmailData2
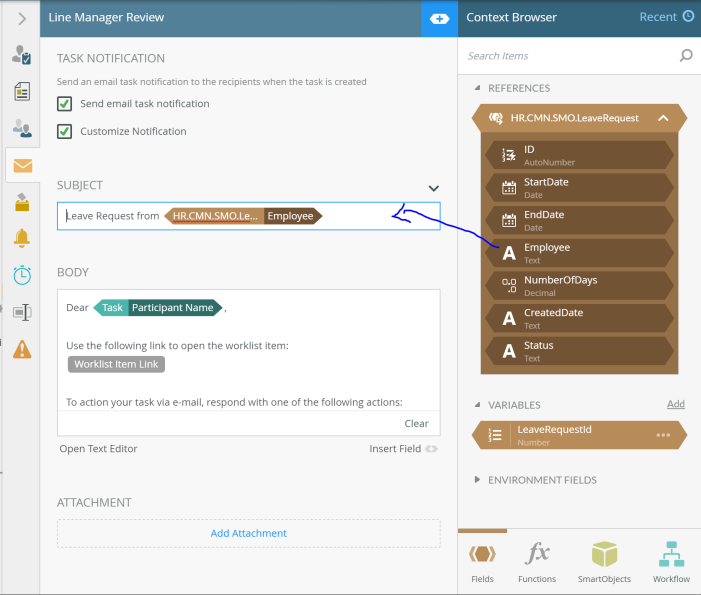
  30. All these properties can be used in the email notification. Lets start with the ‘Subject’ for the email. In the box under ‘Subject’ enter the following text ‘Leave Request from ‘ and then from the list of properties, drag employee into the box so it’s after ‘Leave Request from ‘. As shown in the image below.leavemanagerreviewEmailData3
  31. Now that we have done the ‘Subject’, we can now edit the body of the email.
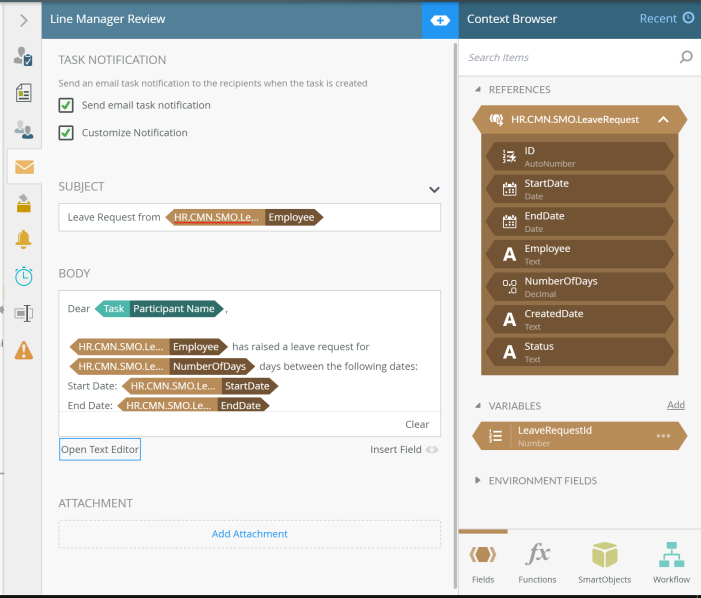
  32.  We can just drag in the properties that you want to be shown in the email. In this example I have added the following properties to the body
    1. Employee
    2. Start Date
    3. End Date
    4. Number of Days
  33. I haven’t deleted any of the information that was already in the email. The body of the email should look like the below image.leavemanagerreviewEmailData4
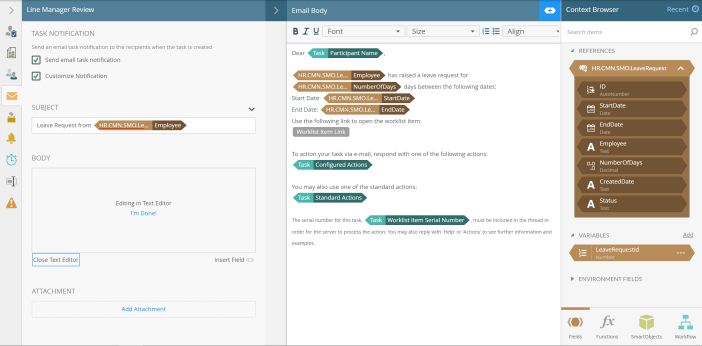
  34. If you want to expand the editor for the body of email click on ‘Open Text Editor’. This will  you a full on text editor to edit the email body.leavemanagerreviewEmailData5
  35. Click on ‘Close Text editor’ to close the editor, once finished. We have now configured the notification email to contain data from the leave request. To help the line manager make their decision on whether to approve the leave request.
  36. We can also do the same for the ‘Approve’ and ‘Reject’ Email. Click on the ‘Reject’ email shape and expand the configuration panel and then drag across any of the reference properties into the email Subject and Body.  rejectedemailData
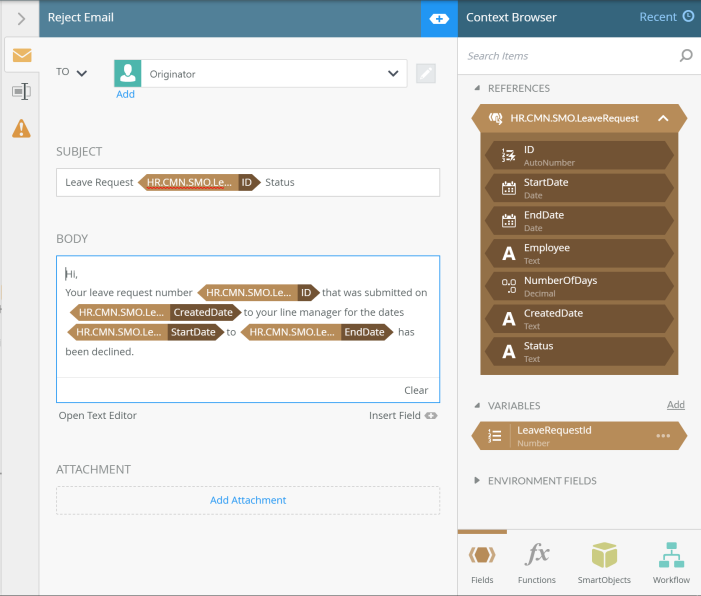
  37. Do the same for the ‘Approve’ email shape.
  38. Now we have configured all the email notifications to contain relevant data about the leave request.
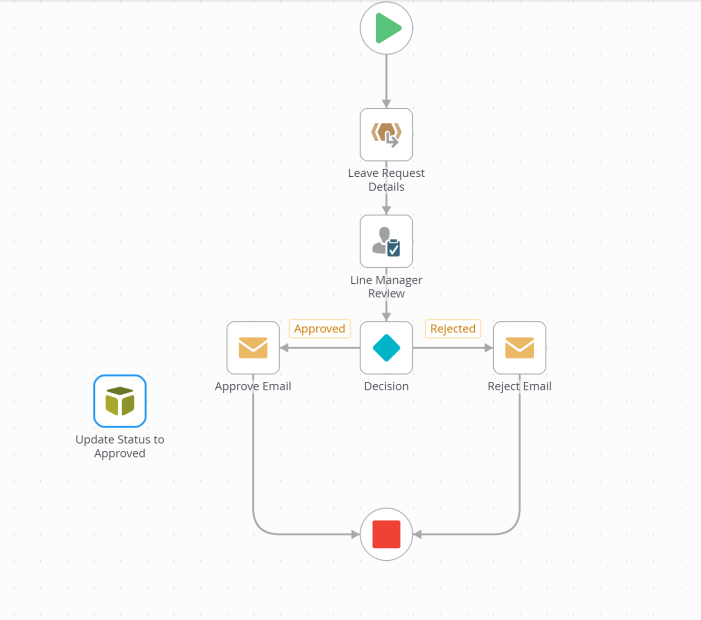
  39. The next thing we need to do is update the status of the Leave Request, once the line manager has approved or rejected the request so it can be recorded against the request.
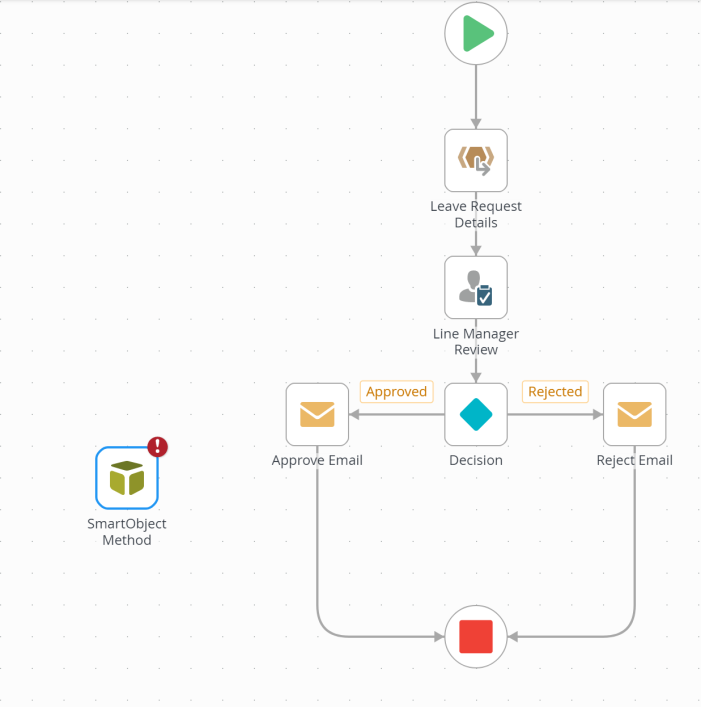
  40. To do the update, expand the shape panel and click on ‘Basic’ and then drag the ‘SmartObject Method’ shape on to the canvas.UpdateStatusUpdateStatus1
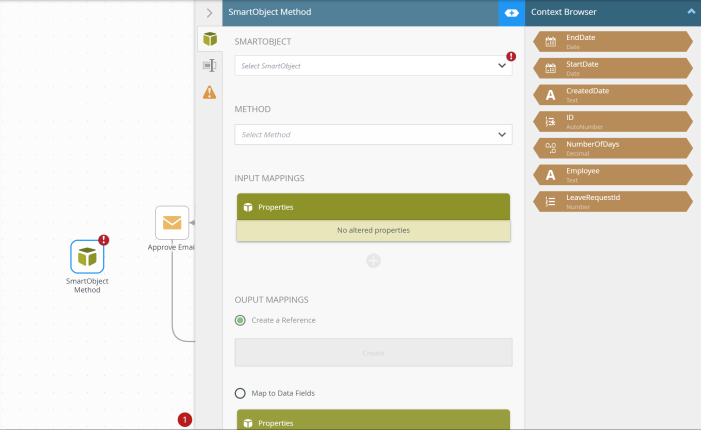
  41. Click on the ‘SmartObject Method’ shape and then expand the configuration panel on the righthand side of the canvas.UpdateStatus2
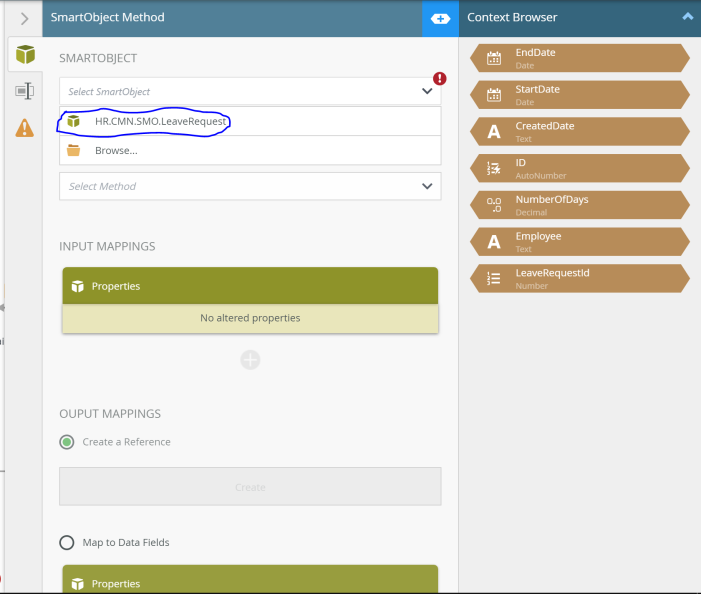
  42. Like in setting up the reference, we need to select the ‘SmartObject’ that the shape is going to call. Because we have already used the SmartObject ‘HR.CMN.SMO.LeaveRequest’ will appear already in the list when you click on ‘Select SmartObject’.UpdateStatus3
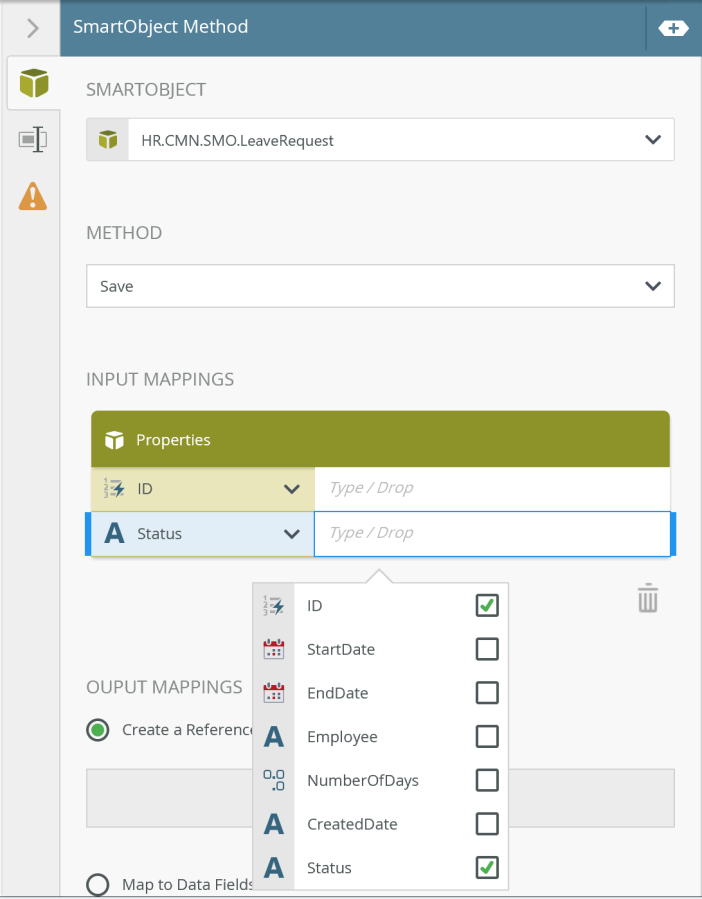
  43. Now that we have selected which SmartObject we are going to use, we now need to select the correct method. Click on ‘Select Method’, this will show us a list of methods that we can call from the SmartObject. Because we are doing an update we will need to select the ‘Save’ method.UpdateStatus4
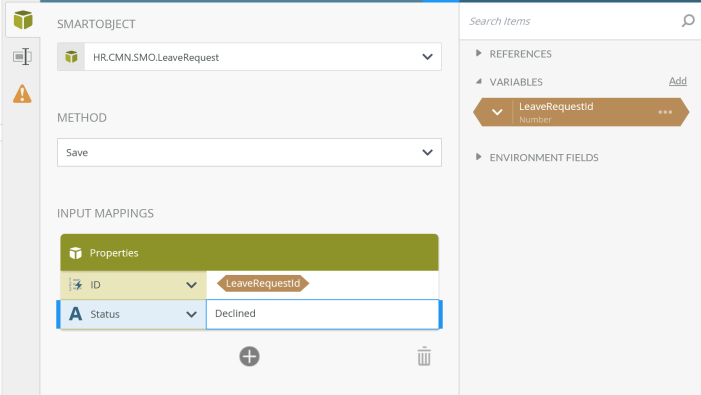
  44. Now we need to select which properties we are going to update. Under properties click on ‘+’  and click on the  ‘ID’ and ‘Status’ checkboxes in the list.smopatch
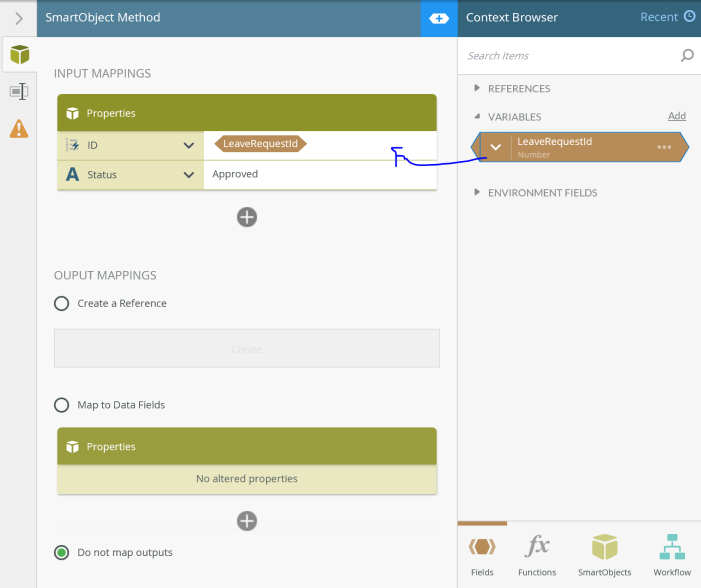
  45. In the box next to ‘Status’ enter in the text ‘Approved’ and  drag the variable ‘LeaveRequestId’ into box next to ‘ID’.patch
  46. As we don’t need to map any return properties  from the SmartObject click on ‘Do not map outputs’ under ‘Output Mappings’.
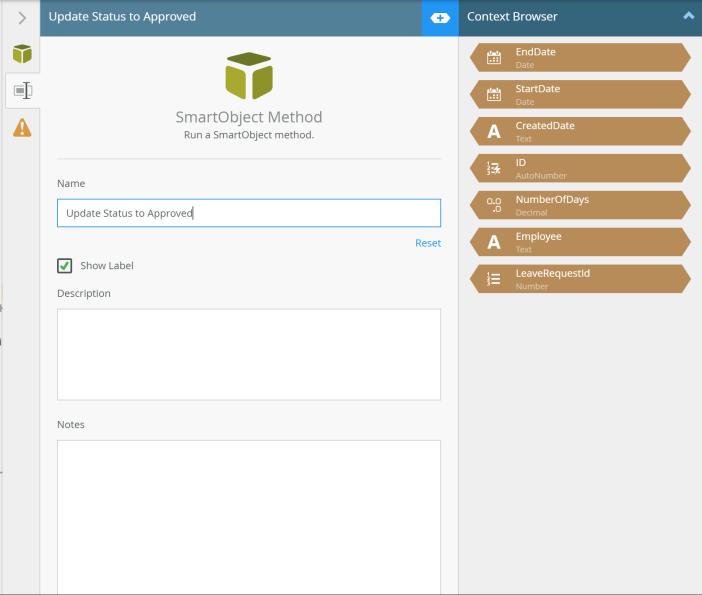
  47. Click on the 2nd tab in the configuration panel and replace the text ‘SmartObject Method’ under Name with ‘Update Status To Approved’UpdateStatus8
  48. Click on ‘>’ to close the configuration panel and your canvas should look like the below image.UpdateStatus9
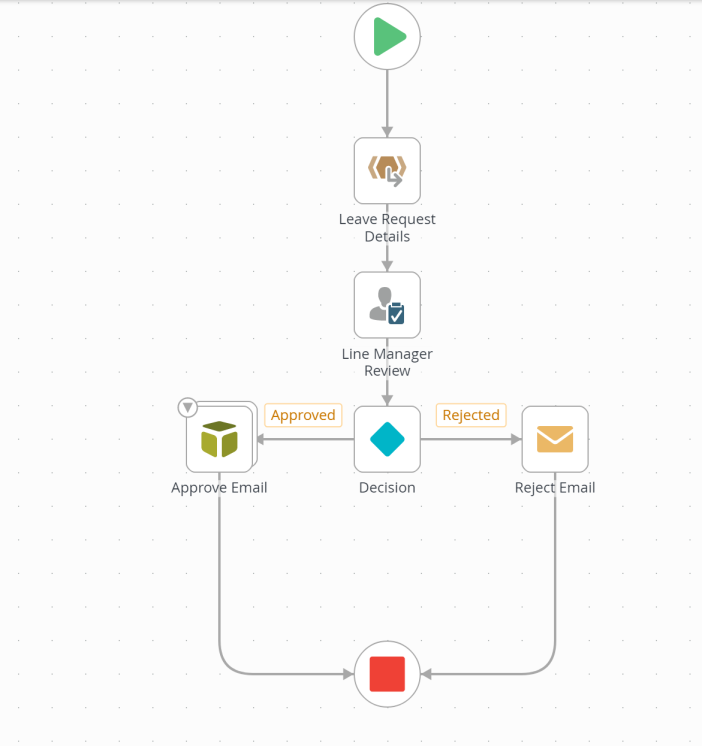
  49. We need to link this SmartObject shape into the workflow ‘Approved’ path. To do that just drag it on top of the ‘Approve Email’ shape. UpdateStatus10
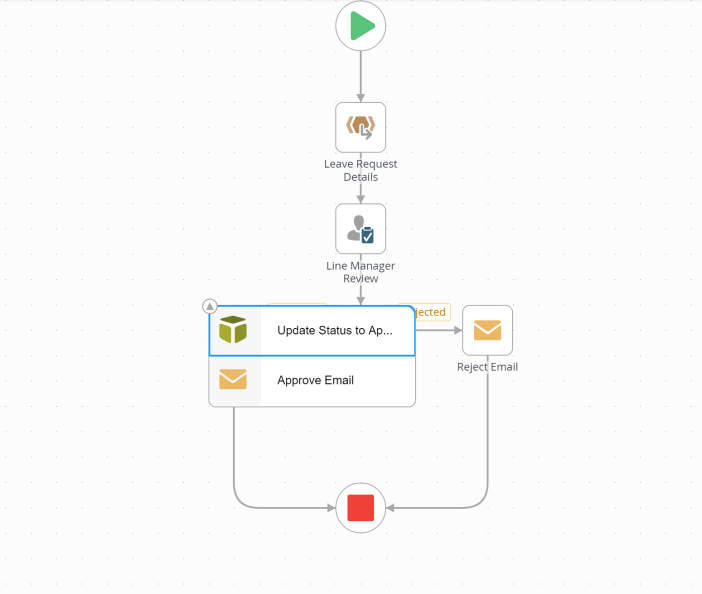
  50. You can then choose which order the shapes are stacked by moving them up down the list. The shape at the top of the stack will execute first and then once it has finished, it will then move on to the next shape in stack.
  51. Once you are happy with order of the shapes, your canvas should look like this.UpdateStatus11
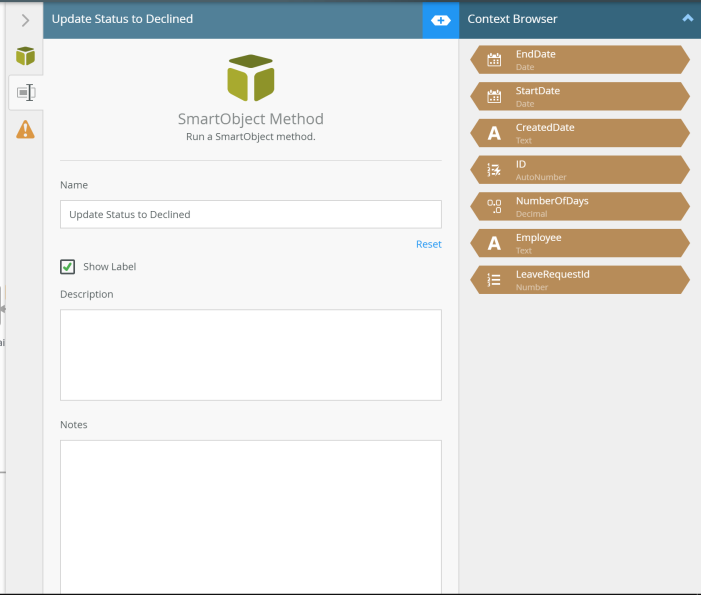
  52. Repeat steps 40 – 51 and instead of ‘Approved’ in the status box, enter in ‘Declined’patch1
  53. Change the name of the shape to ‘Update Status To Declined’UpdateStatus13
  54. Drag the shape onto the ‘Reject Email’ shape.UpdateStatus14
  55. Now we can deploy, to do that click on ‘File’ and then click on ‘Deploy’. deploy
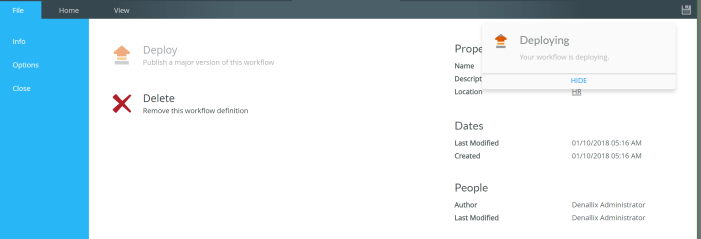
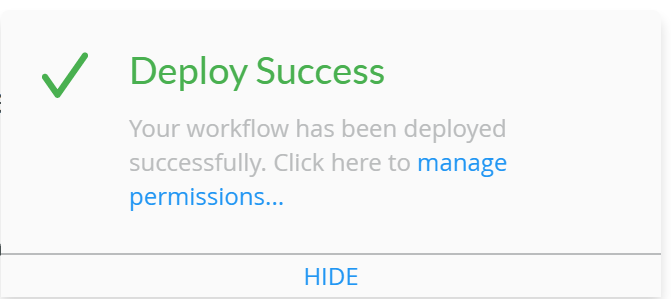
  56. You will know it has been deployed Successfully as you will get a message saying it has been successful. deploy1
Linking the Smartforms to the workflow

Now that we have got business data inside the workflow,  we just need to link the  Leave Request form to start the workflow and the Line Manager Review Task to action the task and take the workflow down a specific decision path.

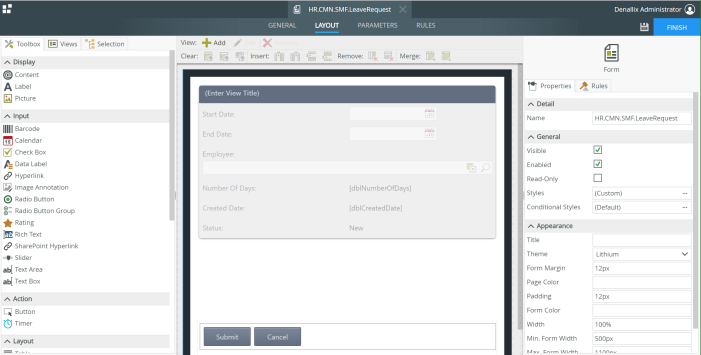
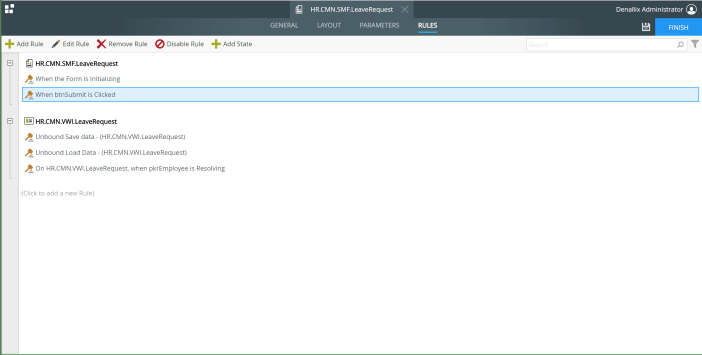
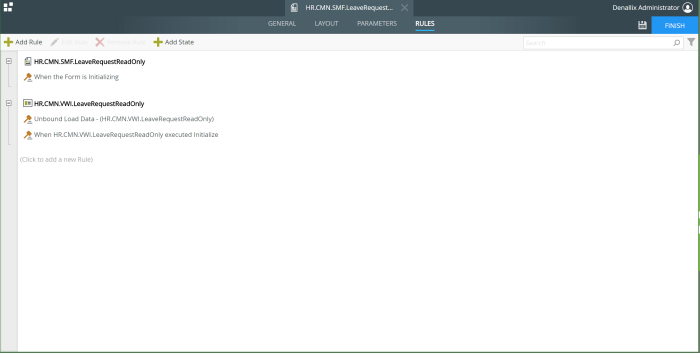
  1. Edit Smartform ‘HR.CMN.SMF.LeaveRequest’ and click on the ‘Rules’ tab.smartform1
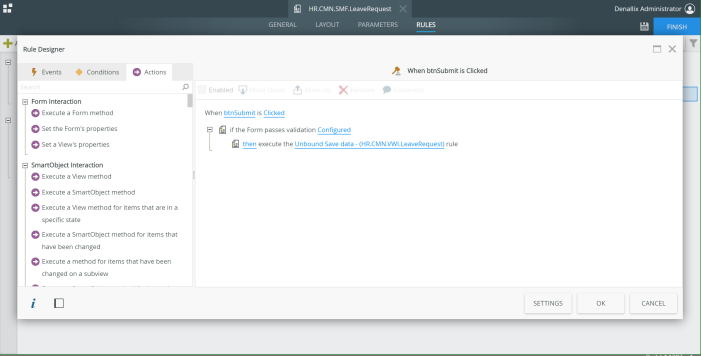
  2. Now in the rules tab, click on the rule ‘When btnSubmit is clicked’ and click on ‘Edit’smartform
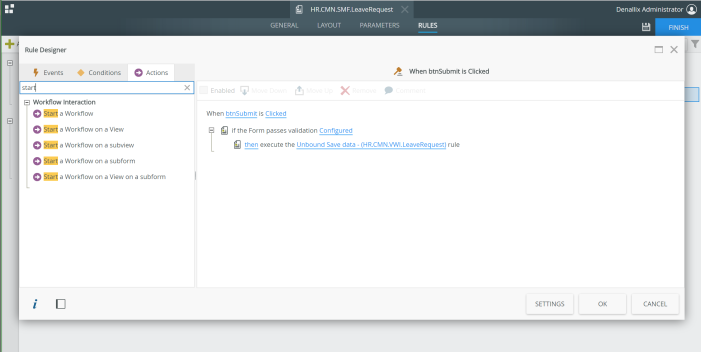
  3. We now need to add a rule to start the workflow when the submit button is clicked.edit
  4. Click on the ‘Actions’ tab and in the search box enter ‘Start’edit1
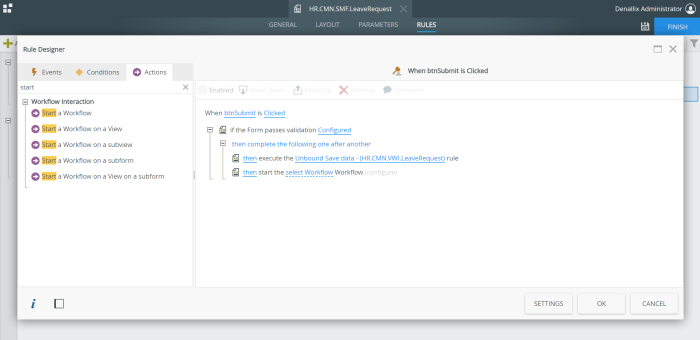
  5. Click on the action named ‘Start a Workflow’ it will then appear in the rule execution panel.edit2
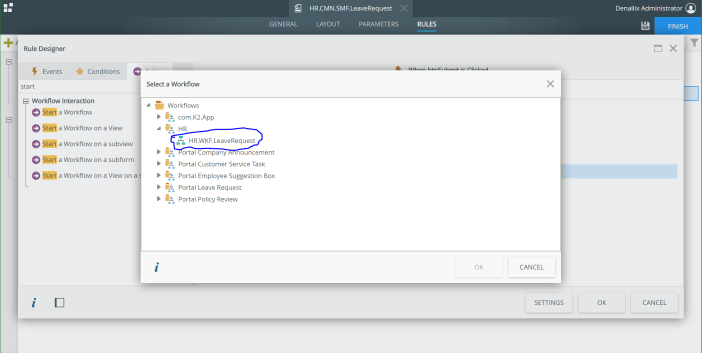
  6. Now click on ‘select Workflow’ linkedit3
  7.  A list of workflows on the environment will be listed, expand the folder ‘HR’ and then select the workflow we have created ‘HR.WKF.LeaveRequest’ and then click on ‘Ok’.edit4
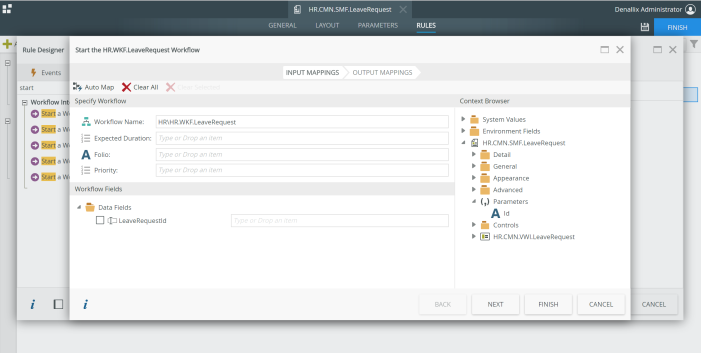
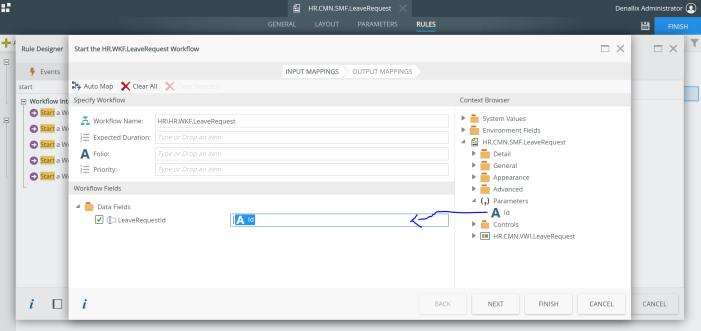
  8. Now back in the editor and then click on ‘Configure’.  In the new the window we can configure what data contains in the workflow, such as the leave request Id.edit5
  9. In the context browser expand ‘Parameters’ and drag the parameter ‘Id’ into the box labelled ‘LeaveRequestId’.edit6
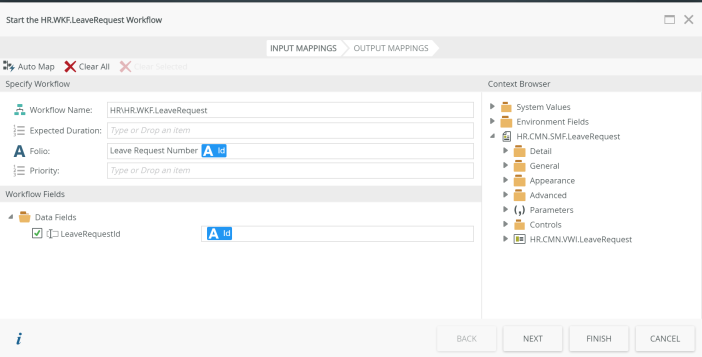
  10. In the box labelled ‘Folio’ enter in the following text ‘Leave Request Number ‘ and then drag the parameter ‘Id’ into the same box. So it should look like this.edit7
  11. Click on ‘Next’ and then ‘Finish’ and then ‘Ok’. Click on ‘Finish’ in the top left hand corner to save the form.  We have now setup the Leave Request form to start the approval workflow.finishedform
  12. Now we need to edit the task form to pick up the Line Manager Review actions. This  will be the form that the Line Manager opens up to review the leave request details. The line manager will then either click on the ‘Approve’ button to approve the leave request or the line manager will click on ‘Reject’ to reject the leave request.
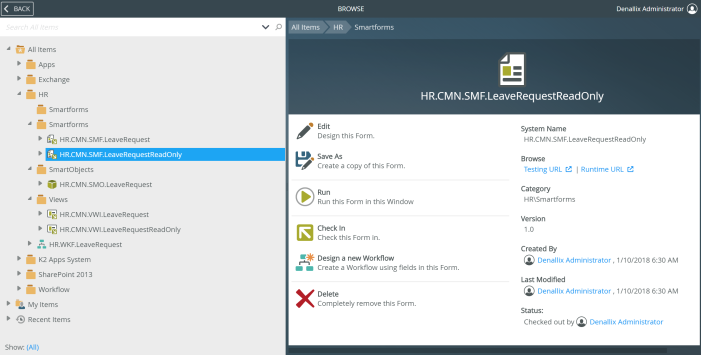
  13. In the designer, expand ‘HR’ and then expand ‘Smartforms’ and click on the form named ‘HR.CMN.SMF.LeaveRequestReadOnly’.editleaverequesttask
  14. Click on ‘Edit’.
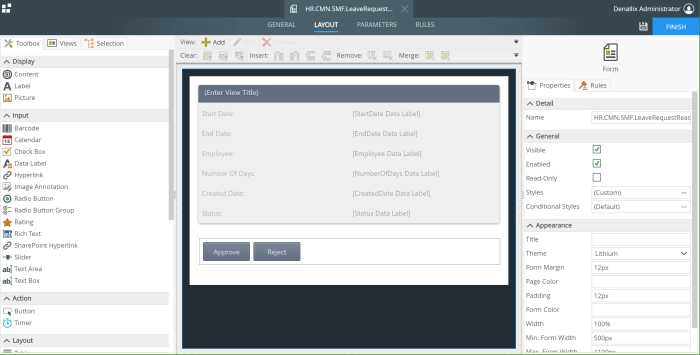
  15. We are now in the Smartform editor, you will notice that the form has two buttons
    1. Approve
    2. Reject
  16. We are going to link these buttons up to the actions/decisions on the workflow.editleaverequesttask1
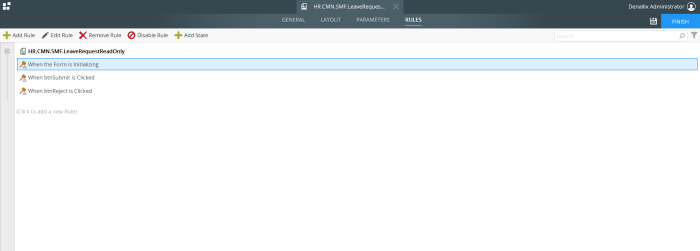
  17. Click on the ‘Rules’ tableaverequesttaskrule
  18. Click on ‘Add Rule’
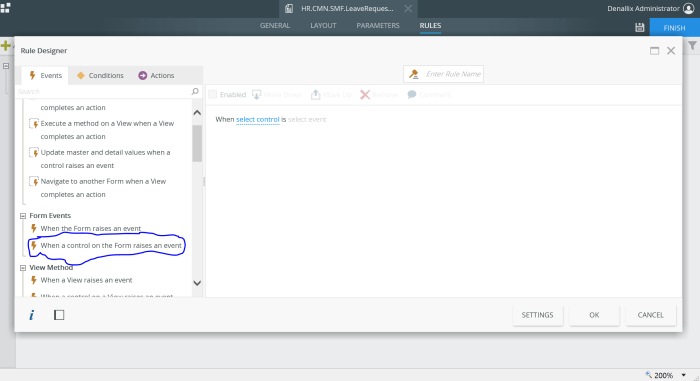
  19. In the events tab click on the event ‘When a control on the form raises an event’buttononclick
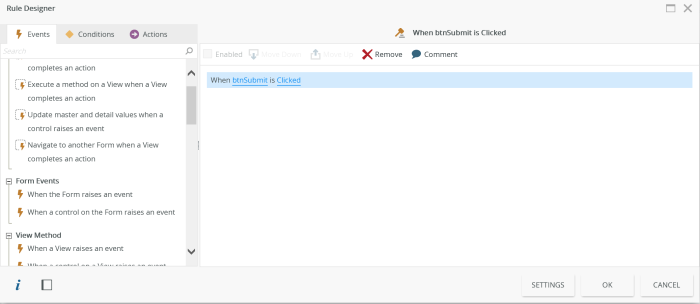
  20. In the rule designer click on the blue ‘select control’, from the list select ‘btnSubmit’.buttononclick1
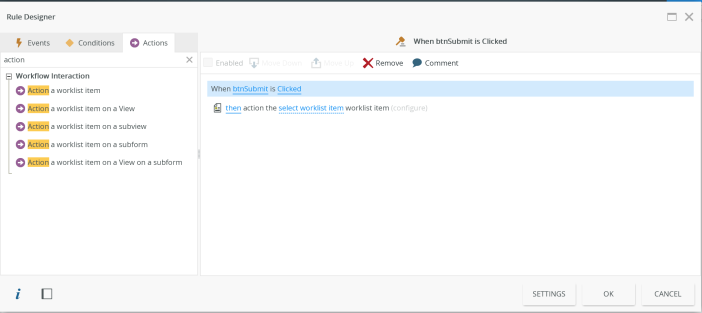
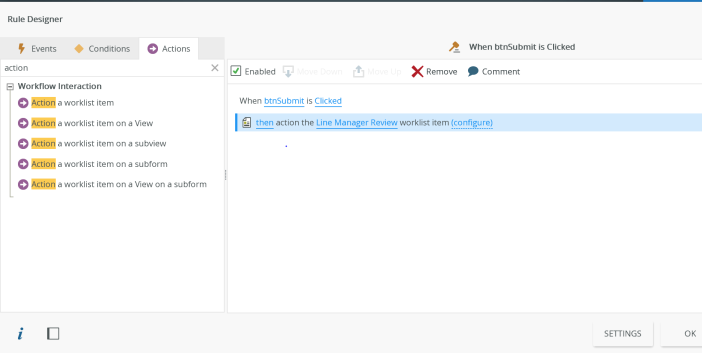
  21. Now click on the ‘Actions’ tab, in the search box enter the word ‘action’ and select the action ‘action worklist item’.buttononclick2
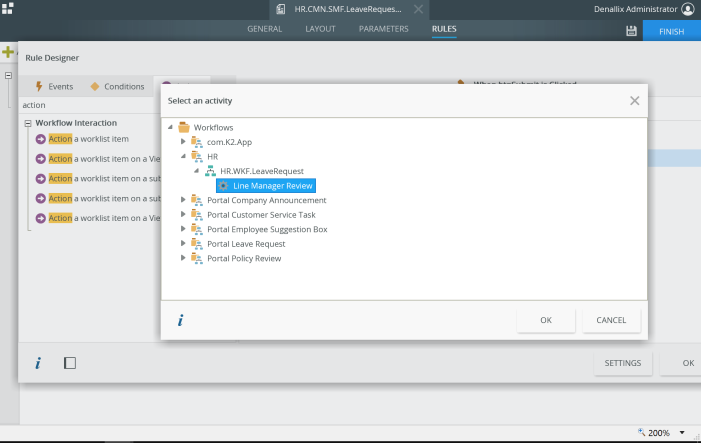
  22. Now click on ‘Select a worklist item’, in the pop up window expand ‘HR’ and the select the workflow we  deployed earlier on in this example. buttononclick3
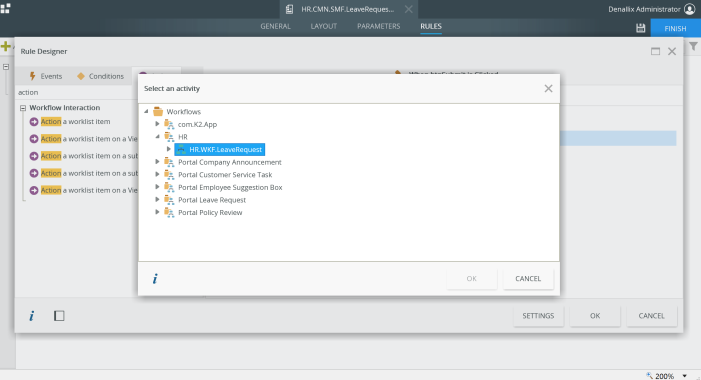
  23. Expand the workflow and then click on ‘Line Manager Review’ and click on ‘OK’buttononclick4
  24. Now, that we have selected the task, we can now configure what happens when the task is actioned. Click on ‘Configure’buttononclick5
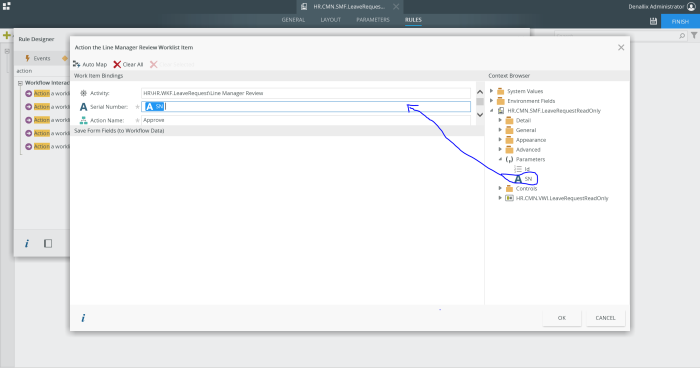
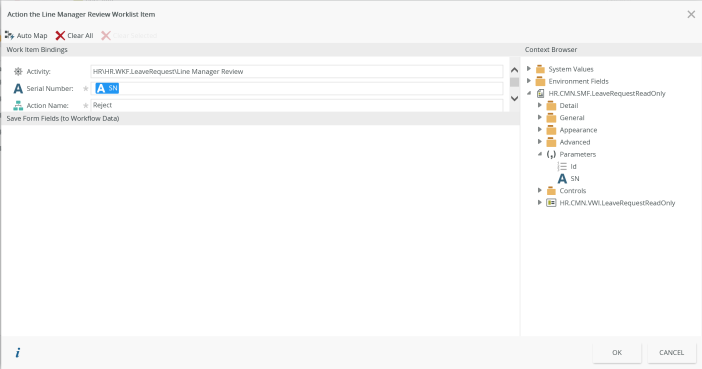
  25. In the context browser ‘expand’ parameters and drag the parameter ‘SN’ into the SN  box and in the ‘Action Name’ enter the text ‘Approve’ as this button is dealing with the ‘Approve’ Action. Click on ‘OK’.buttononclick6
  26. In the actions tab, in the search box enter ‘Close’ and click on ‘Close the browser window’ and click on ‘Ok’. buttononclick7
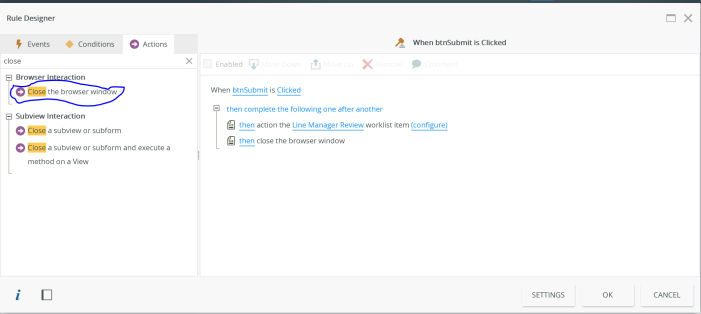
  27. Now when the ‘Approve’ button is clicked it will tell the workflow to go down the ‘Approve’ decision line and to close the form.
  28. We now need to do the same for the Reject button, select control ‘btnReject’ and repeat steps 19 – 27. Enter in the text ‘Reject’ into the Action Name box.buttononclick8
  29. We have now told the form to handle the response of the buttons to take the workflow down a certain path.
  30. Now we to handle what happens to the task, when form is opened.
  31. In the rule editor click on the rule ‘When the Form is Initializing ‘ and click on ‘Edit Rule’buttononclick9
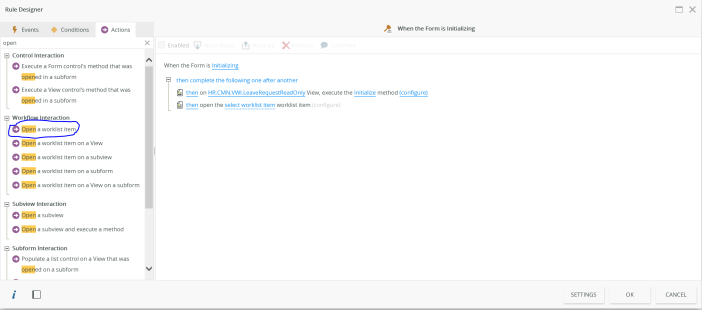
  32. In the actions tab enter in the word ‘Open’ in the search box and then select the action ‘Open a worklist item’.buttononclick10
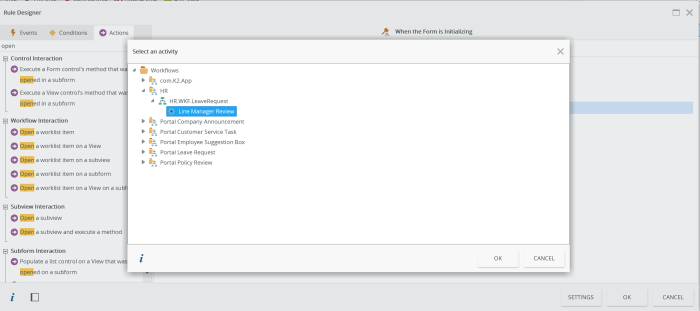
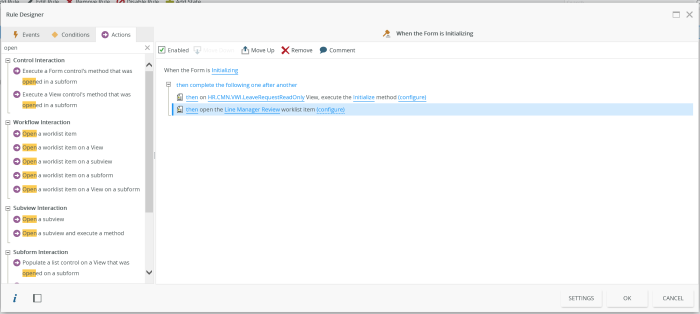
  33. Click on open worklist item and select the ‘Line Manager Review’ task, like we did in step 23.buttononclick11
  34. Click on ‘Ok’ and now click on ‘Configure’buttononclick12
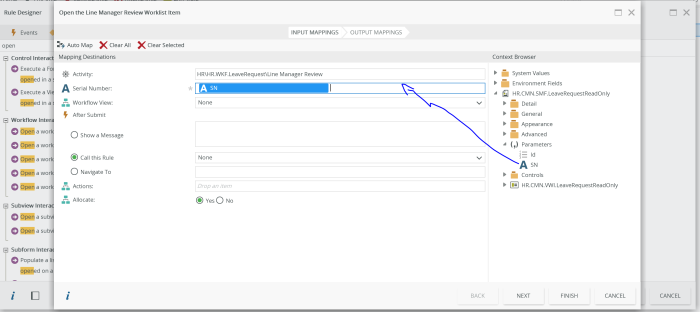
  35. Expand Parameters and drag the parameter ‘SN’ to the ‘SN’ box. Click on ‘Next’ and then ‘Finish’ and then click on ‘Ok’.buttononclick13
  36. Click on ‘Finish’ and now we have completed setting up the task form, to interact with the workflow.buttononclick14
  37. All we need to do now is tell the workflow to use the task form and not automatically generated form it will create when the ‘Line Manager Review’ task is activated.
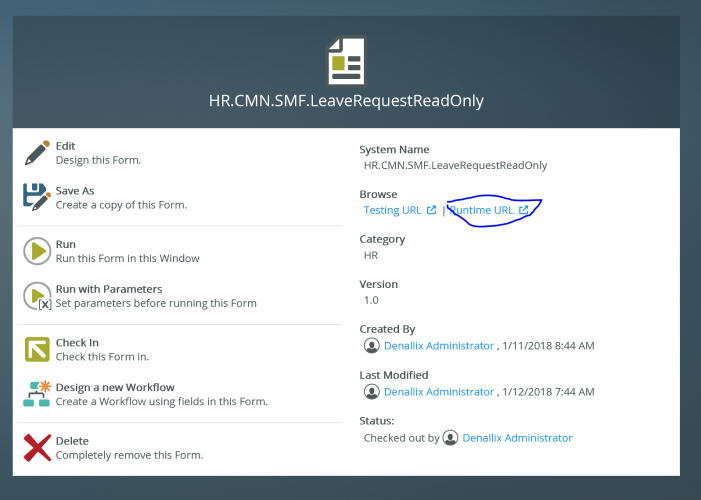
  38. Copy the form url, by clicking on ‘Runtime url’ and then copy the url from the address bar.urlurl2
  39. Now edit the workflow ‘HR.WKF.LeaveRequest’ and click on the shape ‘Line Manager Review’.
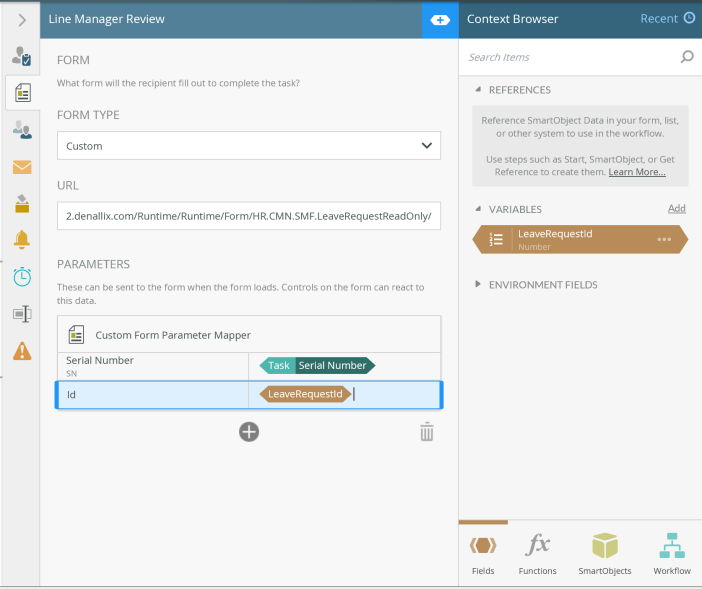
  40. Expand the configuration panel for the ‘Line Manager Review’ and click on the 2nd tab.
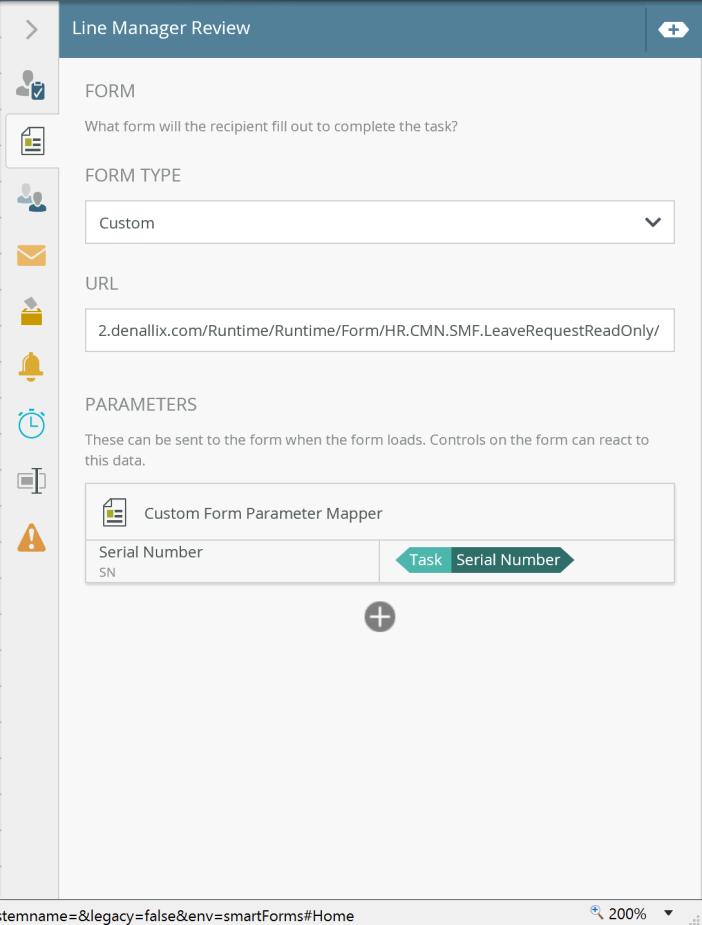
  41. Under form type select ‘Custom’ and in the URL box copy in the URL we copied from the step 38.url3
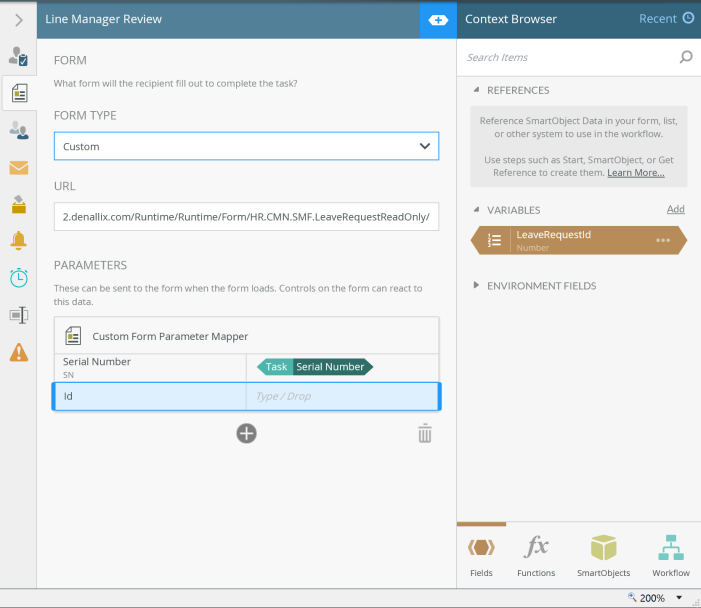
  42. Under Parameters click on ‘+’ , as we need to add an additional parameter, so the task form knows which leave request data to load.
  43. Under ‘Serial Number’ enter in the text ‘Id’url5.PNG
  44. Now expand the context browser, if not already expanded and drag the variable into the box next to ‘Id’ and underneath ‘Task Serial Number’ like in the image below.url4
  45. Now when the task form is opened, the form will retrieve the workflow task information and also retrieves the leave request details.
  46. Click on ‘Save’ and then click on ‘Deploy’
  47. We have now completed and finished building  our first app with K2 Five.


Keeping track of Emails with EWS and K2

I haven’t posted anything in a while as I have been working on another project, which I am hoping to unveil sometime very soon. In the meantime though  I wanted to talk about K2 and Exchange. Now we all know that K2 can talk to exchange and send emails and receive replies back in the form of SmartActions out of the box.

But what if we wanted to keep track of the emails sent from a K2 app then this gets a bit tricky. We could save the message in a database using  a SmartObject Event and then use the email Event to send the email. Which is an ok approach, but I think something could be done better, where we don’t need to have this two step/event approach.

So lets have a think about about what i want the assembly to do?

  1. Send an email
  2. View the mailbox
  3. View an email

We could modify the existing email event to do what I am suggesting below, but that would be a pain as we would need to do it every time we use the email event and would also require the person building the workflow to be able to write code.  With the approach  I am going to go through, it  will allow anyone to be able to build a workflow where it would track what emails are being sent without having to write code and more importantly every app will be able to see it’s own emails it has sent out.

We are going to create a Email Endpoint Assembly that will allow a workflow to send an email and reference a primary key , SN, Process Instance Id or  application type (see framework) and view it’s mailbox by same type of information.

Getting Started

We will need the following

  1. Visual Studio 2015+
  2. Microsoft exchange web service (EWS URL)
  3. Exchange version
  4. UserAccount specifically setup just to be used for K2 mailbox (I normally create a service account, that just has a mailbox)
  5. User Account Email Address
  6. Microsoft.Exchange.Webservices.dll

To do this i need use the assembly Microsoft.Exchange.Webservices.dll which you can get from here .

Once we have the above we can start building the new email endpoint assembly.

EWS Code

To setup the connection to exchange server,  it is important to identify which version of exchange we are talking too.

ExchangeService service = new ExchangeService(ExchangeVersion.Exchange2010_SP2);

When we have created an instance of the exchange service, we then give the instance the exchange web service url.

service.Url = new Uri(“Web service”);

ExchangeService service = new ExchangeService(ExchangeVersion.Exchange2010_SP2);
service.Credentials = new WebCredentials("Username", "Password");

service.Url = new Uri("Web service");
service.ImpersonatedUserId = new ImpersonatedUserId(ConnectingIdType.SmtpAddress, "Email Address");

We have now got a connection to exchange server via it’s web service and we can do a number of different things such as

  1. Send Email
  2. View mailbox contents , such as the inbox or sent items
  3. View an email
  4. We can also do things such as create meeting requests

We will look at the basic code for sending an email

Sending an Email

To send an email we need to create an instance of the EmailMessage object and pass in the Exchange Service Object.

EmailMessage email = new EmailMessage(service);

Once we have done that we can access the properties and methods of EmailMessage object.

So we can give are email a subject email.Subject = “Subject”;

We can also give the email body and decide whether we want to send a plain text or a HTML message.

email.Body = new MessageBody(BodyType.HTML, Body);

EmailMessage email = new EmailMessage(service);
email.Subject = "Subject";
email.Body = new MessageBody(BodyType.HTML, Body);

To add recipients (To, Cc, Bcc) we just need to add the following code

  • email.ToRecipients.Add(“address”);
  • email.CcRecipients.Add(“address”);
  • email.BccRecipients.Add(“address”);

If you have more than one email address for ‘To’ or ‘Cc’ or the ‘Bcc’ then we can simply loop through the correct address method parameter. Like in the example below.

 if (To.Contains(";"))
 {
 String[] to = To.Split(';');
 foreach (var address in to)
 {
 email.ToRecipients.Add(address);
 }
 }
 else
 {
 email.ToRecipients.Add(To);
 }

To send the email we simply use .Send(); method

 email.SendAndSaveCopy();

Now we can send a basic email. So let us have a look how we can now extend this email so it can contain some additional properties that relate to the workflow it is being sent from.

The EmailMessage object allows us to add properties called extend properties and they are really simple to create. The only thing you need to remember is that the GUID used to identify the property must be the same every time we an email is sent and needs to be the same for when when we retrieve the mailbox.

So in this example i am going to bind the process instance id to the email message. We will then be able to search the sent items mailbox and retrieve all the messages that relates to that process instance id.

Creating extend properties.

This is the most important part , extend properties is what allows the ability to be able to group emails by the process Instance I’d, business key etc.. 

Create a Guid called ‘ProcessInstanceId’ and assign it a GUID.

Guid ProcessInstanceId_PropertySetId = Guid.Parse("fc0a27be-f463-472e-bea8-648e62d1d7dc")

We then have to define the extend property by giving the property a name in this case the property is called ‘ProcessInstanceId’ and we define the data type of the property as a ‘String’.

 ExtendedPropertyDefinition ProcessInstanceId_ExtendedPropertyDefinition = new ExtendedPropertyDefinition(ProcessInstanceId_PropertySetId, "ProcessInstanceId", MapiPropertyType.String);


Now that we have defined the property , we can now populate the email with the process instance id. In code example below I am checking to see if the ‘ProcessInstanceId’ is greater than 0 or is not null and if true it will assign the property the value of the ‘ProcessInstanceId’ and if it is false it will assign the property a 0.

email.SetExtendedProperty(ProcessInstanceId_ExtendedPropertyDefinition, (ProcessInstanceId > 0 | ProcessInstanceId != null ? ProcessInstanceId : 0));


Now every time we send an email, it will now contain the process instance id.  In the complete code example of the ‘Send Emall’ method below I have also added some additional properties to contain the following

  1. Primary Key of the main business data
  2. ProcessTypeId (framework see here)
  3. Foilo of the process instance
  4. MessageId, so we can identify each email
public static string SendEmail(string Subject,string Body, string To, string Cc,string Bcc,int importance, string sn,string Folio, int? ProcessInstanceId, string ProcessTypeId, string BusinessKey)
 {
 string result = string.Empty;
 ExchangeService service = ConnectToExchange();
 try
 {
 if (To != null || To.Length != 0)
 {
 EmailMessage email = new EmailMessage(service);
 email.Subject = Subject;
 email.Body = new MessageBody(BodyType.HTML, Body);

Guid SN_PropertySetId = Guid.Parse("fc0a27be-f463-472e-bea8-648e62d1d7dc");
 ExtendedPropertyDefinition SN_ExtendedPropertyDefinition = new ExtendedPropertyDefinition(SN_PropertySetId, "SN", MapiPropertyType.String);
 email.SetExtendedProperty(SN_ExtendedPropertyDefinition, (!String.IsNullOrEmpty(sn) ? sn : "0_0"));

Guid Folio_PropertySetId = Guid.Parse("fc0a27be-f463-472e-bea8-648e62d1d7dc");
ExtendedPropertyDefinition Folio_ExtendedPropertyDefinition = new ExtendedPropertyDefinition(Folio_PropertySetId, "Folio", MapiPropertyType.String);
 email.SetExtendedProperty(Folio_ExtendedPropertyDefinition, (!String.IsNullOrEmpty(Folio) ? Folio : "Email Message"));

Guid ProcessInstanceId_PropertySetId = Guid.Parse("fc0a27be-f463-472e-bea8-648e62d1d7dc");
 ExtendedPropertyDefinition ProcessInstanceId_ExtendedPropertyDefinition = new ExtendedPropertyDefinition(ProcessInstanceId_PropertySetId, "ProcessInstanceId", MapiPropertyType.String);
 email.SetExtendedProperty(ProcessInstanceId_ExtendedPropertyDefinition, (ProcessInstanceId > 0 | ProcessInstanceId != null ? ProcessInstanceId : 0));

Guid BusinessKey_PropertySetId = Guid.Parse("fc0a27be-f463-472e-bea8-648e62d1d7dc");
 ExtendedPropertyDefinition BusinessKey_ExtendedPropertyDefinition = new ExtendedPropertyDefinition(BusinessKey_PropertySetId, "BusinessKey", MapiPropertyType.String);
 email.SetExtendedProperty(BusinessKey_ExtendedPropertyDefinition, (!String.IsNullOrEmpty(BusinessKey) ? BusinessKey : "0"));

Guid ProcessTypeId_PropertySetId = Guid.Parse("d6520129-3c59-4191-b9d7-4f5160329e4f");ExtendedPropertyDefinition ProcessTypeId_ExtendedPropertyDefinition = new ExtendedPropertyDefinition(ProcessTypeId_PropertySetId, "ProcessTypeId", MapiPropertyType.String);
 email.SetExtendedProperty(ProcessTypeId_ExtendedPropertyDefinition, (!String.IsNullOrEmpty(ProcessTypeId) ? ProcessTypeId : "00000000-0000-0000-0000-000000000000"));

Guid MessageId_PropertySetId = Guid.Parse("6e997d14-d9b3-4516-8d14-0a10b0aa74aa");
 string MessageId = Guid.NewGuid().ToString();
 ExtendedPropertyDefinition MessageId_ExtendedPropertyDefinition = new ExtendedPropertyDefinition(MessageId_PropertySetId, "ProcessTypeId", MapiPropertyType.String);
 email.SetExtendedProperty(MessageId_ExtendedPropertyDefinition, MessageId);


if (To.Contains(";"))
 {
 String[] to = To.Split(';');
 foreach (var address in to)
 {
 email.ToRecipients.Add(address);
 }
 }
 else
 {
 email.ToRecipients.Add(To);
 }


if (!string.IsNullOrEmpty(Cc))
 {
 if (Cc.Contains(";"))
 {
 String[] to = Cc.Split(';');
 foreach( var address in to)
 {
 email.CcRecipients.Add(address);
 }
 }
 else
 {
 email.CcRecipients.Add(Cc);

}
 }

if (!string.IsNullOrEmpty(Bcc))
 {
 if (Bcc.Contains(";"))
 {
 String[] to = Bcc.Split(';');
 foreach (var address in to)
 {
 email.BccRecipients.Add(address);
 }
 }
 else
 {
 email.BccRecipients.Add(Cc);

}
 }

if (importance > 0)
 {
 email.Importance = (importance == 1 ? Microsoft.Exchange.WebServices.Data.Importance.Normal : Importance.High);
 }

email.SendAndSaveCopy();

result = email.Id.ToString();
 }
 }
 catch(Exception ex)
 {
 result = "Error: " + ex.Message.ToString(); 
 }
 finally
 {

}
 return result;
 }

Retrieving an Exchange Mailbox

Now that we can send emails with K2 related data we now need to be able to retrieve those emails. So we can then view them in a SmartForm.

The first thing we need

public static List<EmailBox> GetMailBox(string MailBoxType,int PageSize)
 {
 ItemView view = new ItemView(PageSize);
 List<EmailBox> list = new List<EmailBox>();

Guid SN_PropertySetId = Guid.Parse("fc0a27be-f463-472e-bea8-648e62d1d7dc");
 ExtendedPropertyDefinition SN_ExtendedPropertyDefinition = new ExtendedPropertyDefinition(SN_PropertySetId, "SN", MapiPropertyType.String);

Guid Folio_PropertySetId = Guid.Parse("fc0a27be-f463-472e-bea8-648e62d1d7dc");
 ExtendedPropertyDefinition Folio_ExtendedPropertyDefinition = new ExtendedPropertyDefinition(Folio_PropertySetId, "Folio", MapiPropertyType.String);

Guid ProcessInstanceId_PropertySetId = Guid.Parse("fc0a27be-f463-472e-bea8-648e62d1d7dc");
 ExtendedPropertyDefinition ProcessInstanceId_ExtendedPropertyDefinition = new ExtendedPropertyDefinition(ProcessInstanceId_PropertySetId, "ProcessInstanceId", MapiPropertyType.String);

Guid BusinessKey_PropertySetId = Guid.Parse("fc0a27be-f463-472e-bea8-648e62d1d7dc");
 ExtendedPropertyDefinition BusinessKey_ExtendedPropertyDefinition = new ExtendedPropertyDefinition(BusinessKey_PropertySetId, "BusinessKey", MapiPropertyType.String);

Guid ProcessTypeId_PropertySetId = Guid.Parse("d6520129-3c59-4191-b9d7-4f5160329e4f");
 ExtendedPropertyDefinition ProcessTypeId_ExtendedPropertyDefinition = new ExtendedPropertyDefinition(ProcessTypeId_PropertySetId, "ProcessTypeId", MapiPropertyType.String);

Guid MessageId_PropertySetId = Guid.Parse("6e997d14-d9b3-4516-8d14-0a10b0aa74aa");
 ExtendedPropertyDefinition MessageId_ExtendedPropertyDefinition = new ExtendedPropertyDefinition(MessageId_PropertySetId, "ProcessTypeId", MapiPropertyType.String);

ExchangeService service = ConnectToExchange();
 view.PropertySet = new PropertySet(BasePropertySet.IdOnly, ItemSchema.Subject, SN_ExtendedPropertyDefinition, Folio_ExtendedPropertyDefinition, ProcessInstanceId_ExtendedPropertyDefinition, BusinessKey_ExtendedPropertyDefinition, ProcessTypeId_ExtendedPropertyDefinition, MessageId_ExtendedPropertyDefinition);

FindItemsResults<Item> findResults = service.FindItems((MailBoxType == "Sent" ? WellKnownFolderName.SentItems : WellKnownFolderName.Inbox), view);
 foreach(Item email in findResults.Items)
 {
 Item mail = Item.Bind(service, email.Id);
 list.Add(new EmailBox
 {
 MailBoxType = MailBoxType,
 Subject = mail.Subject,
 Body = mail.Body,
 Importance = mail.Importance.ToString(),
 Id = mail.Id.ToString(),
 Categories = mail.Categories.ToString(),
 DateTimeCreated = mail.DateTimeCreated,
 DateTimeReceived = mail.DateTimeReceived,
 DateTimeSent = mail.DateTimeSent,
 Cc = mail.DisplayCc,
 To = mail.DisplayTo,
 SN = (email.ExtendedProperties.Count > 0 ? email.ExtendedProperties[0].Value.ToString():string.Empty),
 Folio = (email.ExtendedProperties.Count > 0 ? email.ExtendedProperties[1].Value.ToString(): string.Empty),
 ProcessInstanceId = (email.ExtendedProperties.Count > 0 ? email.ExtendedProperties[2].Value.ToString(): string.Empty),
 BusinessKey = (email.ExtendedProperties.Count > 0 ? email.ExtendedProperties[3].Value.ToString(): string.Empty),
 ProcessTypeId = (email.ExtendedProperties.Count > 0 ? email.ExtendedProperties[4].Value.ToString(): string.Empty),
 MessageId = (email.ExtendedProperties.Count > 0 ? email.ExtendedProperties[5].Value.ToString(): string.Empty)

});

}
 return list;

}

d

de

Retrieve an Email

Now that we can retrieve a list of emails from a mailbox we now need to be able to retrieve a single email.

We can do this.ww

public static EmailBox GetEmail(string Id)
 {
 EmailBox email = new EmailBox();
 ExchangeService service = ConnectToExchange();

try
 {
 Item mail = Item.Bind(service, (ItemId)Id);
 {
 email.Subject = mail.Subject;
 email.Body = mail.Body;
 email.Importance = mail.Importance.ToString();
 email.Id = mail.Id.ToString();
 email.Categories = mail.Categories.ToString() ;
 email.DateTimeCreated = mail.DateTimeCreated;
 email.DateTimeReceived = mail.DateTimeReceived;
 email.DateTimeSent = mail.DateTimeSent;
 email.Cc = mail.DisplayCc;
 email.To = mail.DisplayTo;
 email.SN = (mail.ExtendedProperties.Count > 0 ? mail.ExtendedProperties[0].Value.ToString(): string.Empty);
 email.Folio = (mail.ExtendedProperties.Count > 0 ? mail.ExtendedProperties[1].Value.ToString(): string.Empty);
 email.ProcessInstanceId = (mail.ExtendedProperties.Count > 0 ? mail.ExtendedProperties[2].Value.ToString(): string.Empty);
 email.BusinessKey = (mail.ExtendedProperties.Count > 0 ? mail.ExtendedProperties[3].Value.ToString(): string.Empty);
 email.ProcessTypeId = (mail.ExtendedProperties.Count > 0 ? mail.ExtendedProperties[4].Value.ToString(): string.Empty);
 email.MessageId = (mail.ExtendedProperties.Count > 0 ? mail.ExtendedProperties[5].Value.ToString(): string.Empty);
}
}
 catch(Exception ex)
 { }
 finally
 {

}
 return email;
 }


Now that we have these methods to send an email, retrieve a mailbox and to retrieve an email. We can now register the library as an endpoint assembly. 

We could extend this to be able to add attachments and we could also look at the calendar meeting requests and doing the same with those and extend their properties 

We can then build a SmartObject around it and then we can use it within are workflows and Smartforms. To make it even easier for people to use the new email SmartObject, we could wrap a SmartWizard around the methods.

The full solution can be downloaded from here 


Slack and Simple K2 Integration

One of the big messaging apps for team collaboration is Slack and  is perfect platform to demo how to integrate K2 into it. This will be the first article on how we go about doing this.  Slack is free to use and so is great to demo with and it has an ever growing list of third party integration plugins to play with.

So before we start with the demo,what would we expect a K2 slack plugin to behave? I believe it behave in the following way.

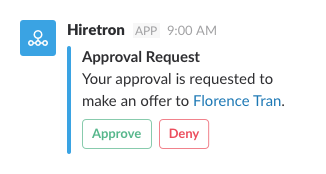
  1. Send notifications of tasks that we have to actiontask
  2. Be notified of when task has been completed and what the action was or the workflow has moved to a certain stage or when there is a workflow escalation.
  3. To be able to action a task from inside Slackhomepage_example_hiretron
  4. To be ask Slack what are my outstanding tasks or what is the status of a certain workflow

So lets starts with points 1 and 2 and deal with simple notifications.


Building a Simple messaging app for Slack

Lets start with a simple example, where we can K2 notification messages to Slack, whether its a public message , message to a particular group or a message to an individual person.

First of all we need to sign up for Slack and create a team, which you can down from here . Now we have a slack team, we just need to here  to get access to API for Slack.

api_slack

We are starting simple, so click on “Incoming webhooks” and then click on the link ‘ incoming webhook integration

introwebhooks

Building the web hook url

  1. Choose the channel you want to send the messages to, don’t we will be able to override this later on.

introwebhooks12. Click on the green button ‘Add incoming Webhook integration’
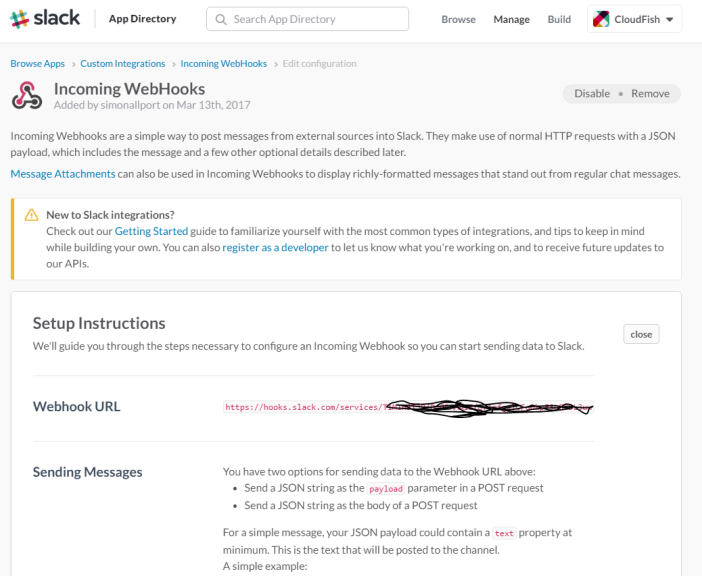
3. You can how see your web hook url, copy that.

introwebhooks24. Further down you can also customize the actual message. I have opted for a K2 look.

introwebhooks35. Click on ‘Save’, we have now created are web hook for incoming messaging.
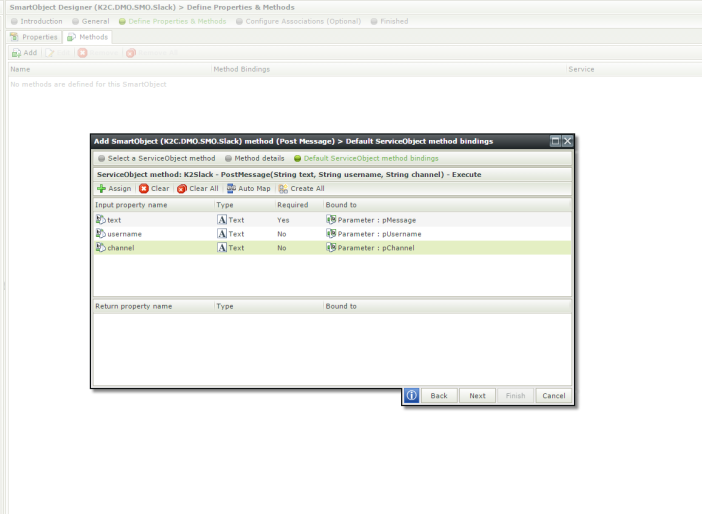
Slack endpoint assembly

Now we have the web hook, we can how write some code, so K2 can use it. We are going to use a endpoint assembly for this. So we are going to create a class that will take the endpoint and allow us to pass in a message, a optional username and optional group.

private static void PostMessage(Payload payload)
 {
 Encoding _encoding = new UTF8Encoding();
 Uri endpoint = new Uri("web hook here");

string payloadJson = JsonConvert.SerializeObject(payload);
 
 using (System.Net.WebClient client = new System.Net.WebClient())
 {
 System.Collections.Specialized.NameValueCollection data = 
new System.Collections.Specialized.NameValueCollection();
 data["payload"] = payloadJson;

var response = client.UploadValues(endpoint, "POST", data);

//The response text is usually "ok"
 string responseText = _encoding.GetString(response);
 }
 }

Simple code for posting a payload of information to the web hook url

public static void PostMessage(string text, string username = null, string channel = null)
 {
 Payload payload = new Payload()
 {
 Channel = channel,
 Username = username,
 Text = text
 };

PostMessage(payload);
 }

The actual public static method, we will be creating a SmartObject from and then using inside a workflow.

We can then build the solution and take the dll  and now tell K2 about it using the ‘Endpoint Assembly broker’. If you don’t know how to do that view my previous post on creating an Endpoint Assembly.

K2Service

Now just build a SmartObject that uses the service instance you just created.

Slack SMO

We can test it in the SmartObject tester

smotester

When it executes we get this response in Slack

smoslack

No that the SmartObject has been created, we can now use this method inside a workflow

Workflow

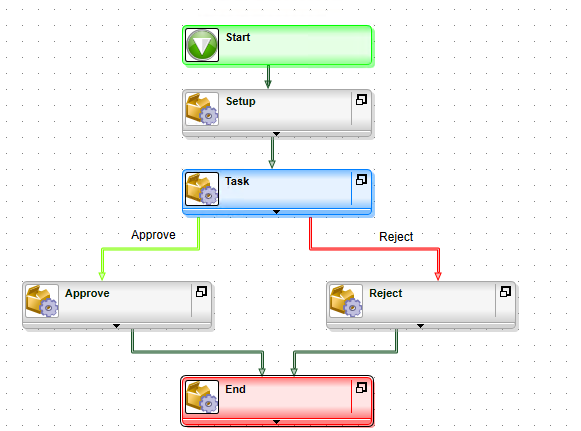
I am just going to use a simple workflow for this, that has one task and two actions.

test-workflow

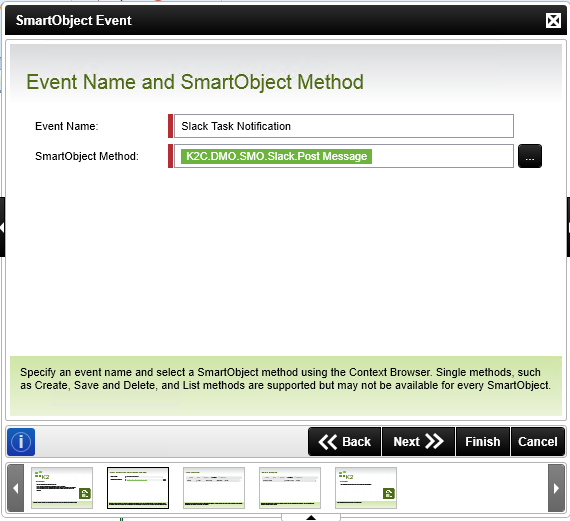
We just going to use a SmartObject event to call the Slack notification SmartObject to send a message to the destination user when a task is generated and then a message to the originator when the task is approved or rejected.

SlackSMOEVENT1

SlackSMOEVENT2.PNG

SlackSMOEVENT4

We do something similar for the approve and reject activities, except we put in the originator name and the message is that the task has been approved or rejected depending on the activity.

When we run the workflow the destination user gets this message in Slack

task

With a link to the task, when they action the task the originator will get this message

task1

Next time we will expand on this by making the notifications more advanced and by allowing the user to ask questions about K2.

The source code for this example can be downloaded from here

Testing a workflow inside a Smartform

So I have posted a few articles on testing in K2, we have looked at Unit Testing,  Testing Smartforms and then just recently more examples of testing a workflow.  After writing that article I realised that there was something missing. What about building a workflow testing tool inside of a Smartform. As it all well and good that we can write unit tests for testing a workflow, but that relies on the workflow developer being able to write code and being that the whole idea of K2 is to build low code , no code solutions. Then there should be away of doing it without the developer having to write code.

There are a number of tools out in the market and they do absolutely fantastic job of testing workflows without having to write code. But I wanted to see if it could be done inside a Smartform.

So my challenge is to build a Smartform App that would test a workflow, with out the tester having to write any code.

The app had to do the following

  1. Start any workflow and check that it has started
  2. Check that tasks have been created and the correct number
  3. Action a task
  4. Checking the task has been completed
  5. Check that the workflow has finished
  6. Check the workflow has gone down the direct path.

The app should all be in Smartforms and should be easy to use.

So lets see how I got on.  So i am going to start with the finished tool and then i will take us through it.

Testing Dashboard

The dashboard shows all the current tests that have been performed and shows the overall percentage of pass and failures.

dashboard

From here you can also click on ‘Create Test’ button to create a new test. Selecting an existing test and clicking on ‘Run Test’ will  run an existing test. Finally double clicking on a test will open up the details about the test.

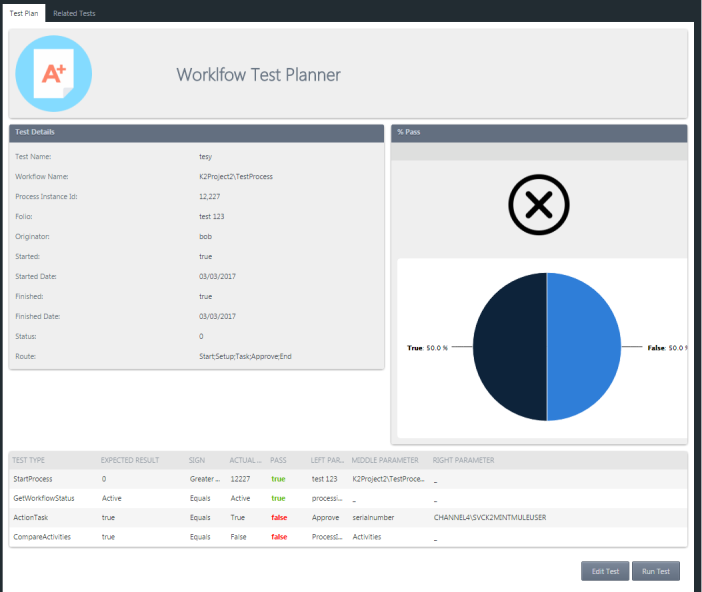
Test Details

So the test details shows the following information

test details

  1. Workflow being tested
  2. If has already been tested
  3. When it was tested
  4. Overall Pass or Fail
  5. What percentage passed and failed
  6. What was tested and whether each test passed or failed.
  7. It also shows any other tests relating to the workflow being tested.

From the test details you also have the ability to retest the test as well.

Creating a new test

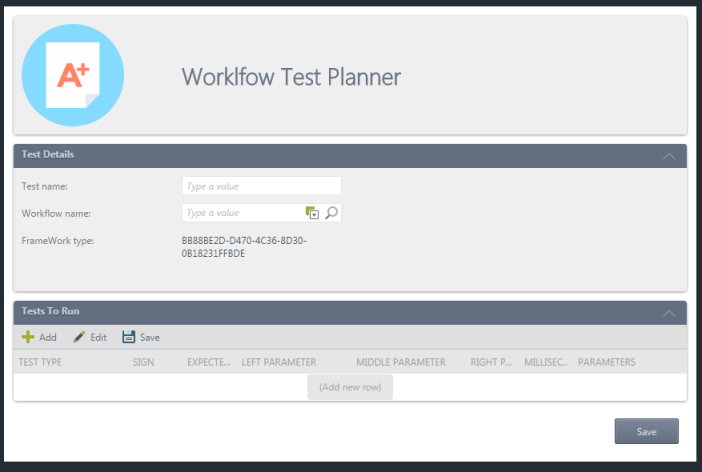
From the dashboard click on ‘Create Test’ button.

test builder.PNG

  1. In the new test form, give the test a name
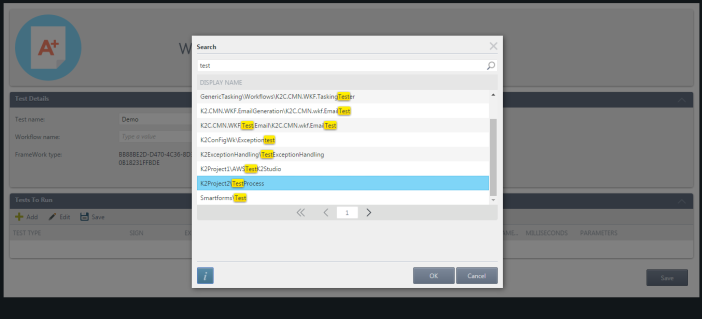
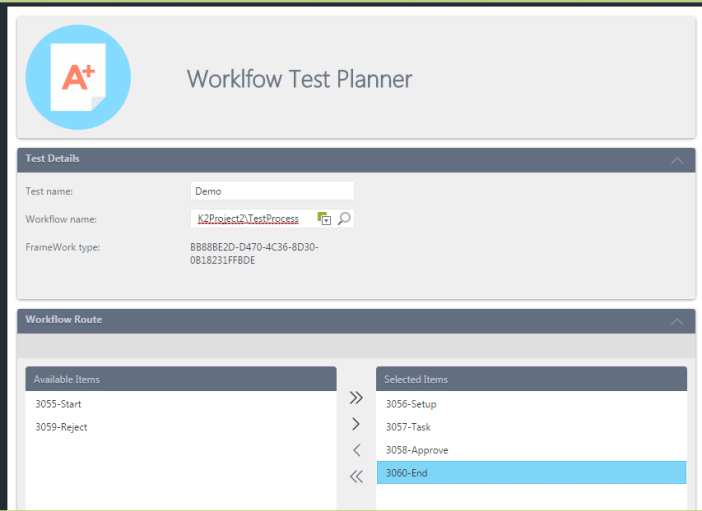
  2. Select a workflow that you are going to test. Once selected you will then be able to see all the activities of that workflow beneath.test-builder1
  3. Select the activities that the workflow will go throughtest-builder2
  4. The last section is where we build up the actual the tests and what results we expect from those tests.test-builder3

Building a simple test script

The workflow we have selected is a very simple one. It has the following activities

  1. Setup
  2. Task
  3. Approve
  4. Reject
  5. End

test-workflow

Task is where there is a client event which has one slot and goes to the originator.

Now that we have got the basic test details and what route we expect the test to go. We can now build are test script.

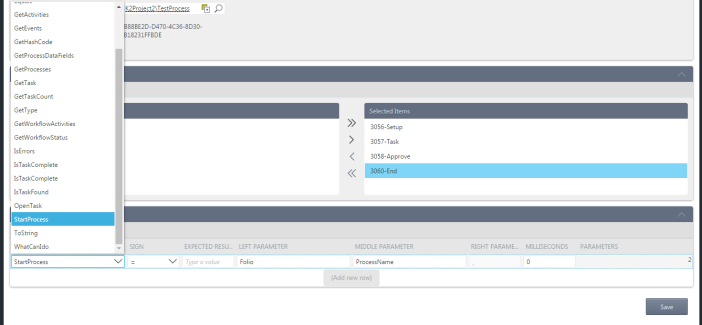
  1. Select ‘Start Process’ from the test type drop down list
  2. You will notice that the other text boxes in the row, will be pre populated with information and some will be disabled depending on what information the particular test type requires.
  3. Now we choose comparison sign we are going to use it can be either
    1.  =
    2. >
    3. >=
    4. <
    5. <=
  4. We are going to choose >
  5. In the expected result / comparison box lets enter 0, this is because if workflow starts successfully we expect a value greater than 0.
  6. So ‘Start Process’, needs to know the ‘Folio’ to give the workflow, you can either enter in something. Or if you leave it blank it will take the name we have given earlier to the test.
  7. The next parameter we need to give the test type is the process name. You can either copy the full workflow name and paste into this box or leave it and it will automatically get the workflow name.
  8. The next box is called milliseconds, you can either leave it at 0. Or you can enter in a value. This is useful as it may be your workflow is taking a while to perform an event. So you can enter in a delay to the tests to compensate for this.
  9.  Click on ‘Add’ again , we now what to check the status of the workflow, to make sure that once we started it. It is now active.
  10. So select ‘Get Workflow Status’ from the drop down list
  11. Choose ‘=’ from Sign
  12. Enter ‘Active’ in expected result
  13. We don’t need to enter in anything else
  14. Click on ‘Add’
  15. We now want to check to see if has generated some tasks
  16. Select ‘Get Task Count’
  17. Select ‘=’ in Sign
  18. Expected Result should be 1, as we know it’s only one slot and going to the originator.
  19. ProcessInstanceId, leave that how it is, as the testing framework will replace that with the actual process instance id as run time of the test
  20. Process name either enter in the full name or leave it and it will get automatically populated
  21. Next we can action the task
  22. Select ‘=’ for the sign
  23. In the expected result box enter ‘True’
  24. Where it’s says ‘Action’ we need to enter in the action we expect the test to use. So lets enter ‘Approve’
  25. Where it says ‘Serial Number’ we leave that and like the process instance id, it will be populated by the testing framework at run time.
  26. For Destination user, enter in the destination user that the task is supposed to be for.
  27. When this test type runs it will try and action the task based on the information we have given it (Task Action and Destination User) if the test is successful the actual result will be true.
  28. The last test we are going to do is to check that workflow has gone down the correct path and the correct activities were used. The test will compare the path we expect it to be. which was defined in the ‘Workflow Route’ section to the actual path taken.
  29. Select ‘Compare Activities’ from ‘Test Type’
  30. Select ‘=’ from Sign
  31. Enter in ‘True’ in expected result
  32. Leave ProcessInstanceId and Activities how it is
  33. In the Millisecond box enter ‘4000’ this will make the ‘Compare Activities’ test to wait 4000 milliseconds before starting the test. This will give the workflow time to perform it’s other activities before completing. If this test fails then increase the time. It will then pass.
  34. The test script should now look like thistest-builder4
  35. Now click on ‘Save’
  36. You will now see a read only version of the test
  37. With two buttons ‘Edit Test’ and ‘Run Test’

Running a Test

To run a test, either select a test from the test list and click on ‘Run Test’ or from the test details click on the button ‘Run Test’

Once the test has been completed, you will be displayed the results for each individual test and also the overall test.

resuts

Each individual test will show whether it has passed or failed. If it has passed the status will be true and in green and if had failed it will be false and in red.

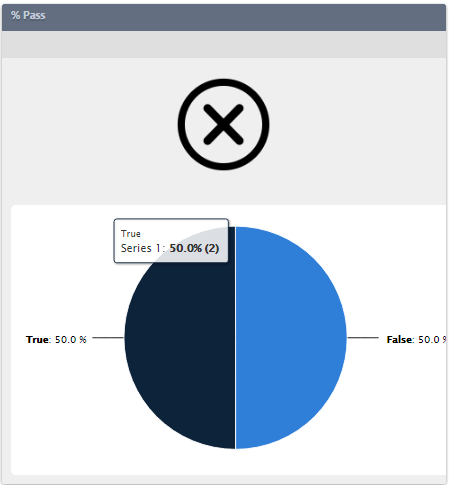
For each test that we create we also get the overall test result.

A failed test would be when any of the individual tests has failed

fail

It will show a pie chart showing the % of pass and fail with big black x cross above it.

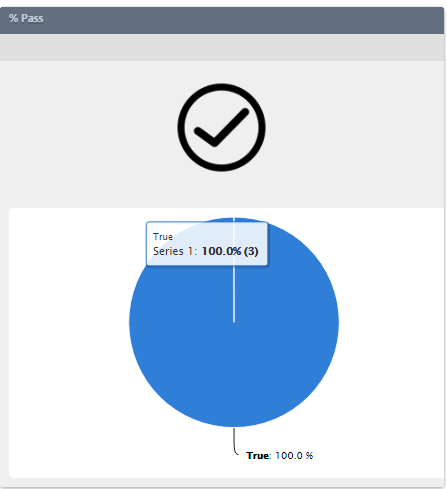
pass

For an overall Pass we get a tick and of course a 100%

These test results will remain until, you click on ‘Run Test’ again and this will overwrite the previous test results with the new ones.

Continue reading “Testing a workflow inside a Smartform”

Workflow Testing

In a previous article i went through how to unit test K2 workflow, now i have some more examples of testing a workflow from start to finish.

These unit tests just use the out of the box K2 API and Visual Studio’s testing framework. It uses an XML file to store test results and data such as task SN and process instance id.

The code can be downloaded from here 

Starting the workflow

To start a workflow we can use the following API

// <summary>
 /// Starts a workflow
 /// </summary>
 /// <param name="Folio"></param>
 /// <param name="ProcessName"></param>
 /// <returns></returns>
 public int StartProcess(string Folio, string ProcessName)
 {
 var con = ConfigurationManager.AppSettings;
 int ProcessInstanceId = 0;
 SourceCode.Workflow.Client.Connection K2Conn = new SourceCode.Workflow.Client.Connection();
 K2Conn.Open(servername);
 try
 {
 SourceCode.Workflow.Client.ProcessInstance K2Proc = K2Conn.CreateProcessInstance(ProcessName);
 
 K2Proc.Folio = Folio;
 K2Conn.ImpersonateUser(ServiceAccount);
 K2Conn.StartProcessInstance(K2Proc);
 ProcessInstanceId = K2Proc.ID;
 }
 catch (Exception EX)
 {
 ProcessInstanceId = 0;
 }
finally
 {
 K2Conn.Close();
 }
 return ProcessInstanceId;
 }

This method returns the process instance id. We can use this in a unit test and check to see if the value returned from the above method is greater than 0

Test: Unit Test for starting the workflow and check to see if it has started (Common)

/// <summary>
 /// Tests the starting of a workflow, should return a number greater than 0
 /// </summary>
 /// <param name="folio"></param>
 /// <param name="ProceesName"></param>
 /// <returns></returns>
 [TestMethod]
 public void StartWorkflow_Success()
 {
int actual = workflow.StartProcess(this.folio, this.ProcessName);
 this.proceessInstance = actual;
 Results.SaveResult(TestType.ProcessInstance,this.proceessInstance.ToString()); 
 Assert.AreNotEqual(0, actual);
 ProcInstId = this.proceessInstance;
 
 }

Check the workflow is running

Now that the workflow has started, we can run a method to check it’s current status

/// <summary>
 /// Gets the current status of the workflow
 /// </summary>
 /// <param name="processinstanceId"></param>
 /// <returns></returns>
 public string GetWorkflowStatus(int processinstanceId)
 {
 string Result = string.Empty;
 SourceCode.Workflow.Client.Connection K2Conn = new SourceCode.Workflow.Client.Connection();
 K2Conn.Open(servername);
 try
 {
 SourceCode.Workflow.Client.ProcessInstance K2Proc = K2Conn.OpenProcessInstance(processinstanceId);
 switch (K2Proc.Status1)
 {
 case SourceCode.Workflow.Client.ProcessInstance.Status.Active:
 {
 Result = SourceCode.Workflow.Client.ProcessInstance.Status.Active.ToString();
 break;
 }case SourceCode.Workflow.Client.ProcessInstance.Status.Completed:
 {
 Result = SourceCode.Workflow.Client.ProcessInstance.Status.Completed.ToString();
 break;
 }
 case SourceCode.Workflow.Client.ProcessInstance.Status.Deleted:
 {
 Result = SourceCode.Workflow.Client.ProcessInstance.Status.Deleted.ToString();
 break;
 }
 case SourceCode.Workflow.Client.ProcessInstance.Status.Error:
 {
 Result = SourceCode.Workflow.Client.ProcessInstance.Status.Error.ToString();
 break;
 }
 case SourceCode.Workflow.Client.ProcessInstance.Status.New:
 {
 Result = SourceCode.Workflow.Client.ProcessInstance.Status.New.ToString();
 break;
 }
 case SourceCode.Workflow.Client.ProcessInstance.Status.Running:
 {
 Result = SourceCode.Workflow.Client.ProcessInstance.Status.Running.ToString();
 break;
 }
 case SourceCode.Workflow.Client.ProcessInstance.Status.Stopped:
 {
 Result = SourceCode.Workflow.Client.ProcessInstance.Status.Stopped.ToString();
 break;
 }
 }  
 }
 catch (Exception ex)
 { Result = ex.Message; }
 finally
 {
 K2Conn.Close();
 }return Result;
 }

This method returns the current status, we can use this to see if the current workflow is running or if has completed

Test: Check workflow has started (Common)

/// <summary>
 /// Test to check that the workflow has started, by checking it's status
 /// </summary>
 /// <param name="ProcessInstanceId"></param>
 [TestMethod]
 public void StartWorkflow_Running_Success()
 {
int.TryParse(Results.GetResult(TestType.ProcessInstance), out this.proceessInstance);
 string actual = workflow.GetWorkflowStatus(this.proceessInstance);
 Results.SaveResult(TestType.StartStatus, actual);
 StringAssert.Equals(SourceCode.Workflow.Client.ProcessInstance.Status.Active.ToString(), actual);
 }

We could also take this same unit test and change the SourceCode.Workflow.Client.ProcessInstance.Status.Active to ‘Error’ or ‘Completed’

so we can create tests to see if the workflow is completed or it has gone into error state


Checking to see if  a task has been created

This method check to see if a task has been created for the particular process and instance.

public Boolean IsTaskFound(int ProcessInstanceId, string ProcessName)
 {
 Boolean Result = false;
 SourceCode.Workflow.Management.WorkflowManagementServer wrkmgt = new SourceCode.Workflow.Management.WorkflowManagementServer(servername, 5555);
 SourceCode.Workflow.Management.WorklistItems worklistItems = null;
 wrkmgt.Open();
 try
 {
 worklistItems = wrkmgt.GetWorklistItems("", "", "", "", "", "", "");
 foreach (SourceCode.Workflow.Management.WorklistItem worklistItem in worklistItems)
 {
 if (worklistItem.ProcInstID == ProcessInstanceId)
 {
 Result = true;
 }
 }
 }
 catch (Exception ex)
 {
Result = false;
}
 finally
 {
 wrkmgt.Connection.Close();
 }
return Result;
 }


Test: Work List – task found (Common)

Returns true if task has been found

/// <summary>
 /// Tests to see if tasks have been generated for this instance
 /// </summary>
 [TestMethod]
 public void WorkList_TasksFound_Success()
 {
 Thread.Sleep(milliseconds);
 int.TryParse(Results.GetResult(TestType.ProcessInstance), out this.proceessInstance);
 Boolean actual = false;
 actual = workflow.IsTaskFound(this.proceessInstance, this.ProcessName);
 Assert.AreEqual(true, actual);
 }


Checking the correct number of tasks has been created

This method gets the number of tasks that has been generated. So we can check if the correct number of tasks.

public int GetTaskCount(int ProcessInstanceId,string ProcessName)
 {
 int Result = 0;
 int count = 0;
 SourceCode.Workflow.Management.WorkflowManagementServer wrkmgt = new SourceCode.Workflow.Management.WorkflowManagementServer(servername ,5555);
 SourceCode.Workflow.Management.WorklistItems worklistItems = null;
 wrkmgt.Open();
 try
 {
 worklistItems = wrkmgt.GetWorklistItems("", "", "", "", "", "", "");
foreach (SourceCode.Workflow.Management.WorklistItem worklistItem in worklistItems)
 {
 if (worklistItem.ProcInstID == ProcessInstanceId)
 {
 count++;
 }
 }
 Result = count;
 }
catch (Exception ex)
 {
Result = 0;
}
 finally
 {
 wrkmgt.Connection.Close();
 }
return Result;
 }


Test: Correct number of tasks created (Common)

Returns the number of tasks, which we can then compare against the amount expected

/// <summary>
 /// Checks that the correct number of tasks is generated
 /// </summary>
 [TestMethod]
 public void WorkList_CorrectNumberOfTasksCreated_Success()
 {
 int.TryParse(Results.GetResult(TestType.ProcessInstance), out this.proceessInstance);
 int actual = 0;
 actual = workflow.GetTaskCount(this.proceessInstance, this.ProcessName);
 Results.SaveResult(TestType.TaskCount, actual.ToString());
 Assert.AreEqual(this.TaskCount, actual);
 }


Get task details

This methods takes the task, and gets the details about the task

/// <summary>
 /// Gets details about the task
 /// </summary>
 /// <param name="ProcessInstanceId"></param>
 /// <returns></returns>
 public List<tasklist> GetTask(int ProcessInstanceId,string ProcessName)
 {
List<tasklist> list = new List<tasklist>();
 SourceCode.Workflow.Management.WorkflowManagementServer wrkmgt = new SourceCode.Workflow.Management.WorkflowManagementServer(servername, 5555);
 SourceCode.Workflow.Management.WorklistItems worklistItems = null;
 wrkmgt.Open();
 try
 {
 worklistItems = wrkmgt.GetWorklistItems("", "", "", "", "", "", "");
foreach (SourceCode.Workflow.Management.WorklistItem worklistItem in worklistItems)
 {
 if (worklistItem.ProcInstID == ProcessInstanceId)
 {
 var x = worklistItem.ActivityName;
list.Add(new tasklist
 {
 Status = worklistItem.Status.ToString(),
 Destination = worklistItem.Destination,
 EventName = worklistItem.EventName,
 ActInstDestID = worklistItem.ActInstDestID.ToString(),
 ActivityName = worklistItem.ActivityName,
 SerialNumber = (ProcessInstanceId + "_" + worklistItem.ActInstDestID)
 });

}
 }
 }
 catch (Exception ex)
 {
// Result = false;
}
 finally
 {
 wrkmgt.Connection.Close();
 }
return list;
 }


Test:  Check that the correct task has been created (Common)

Returns the name of the activity which compares against the expected activity

/// <summary>
 /// Gets the activity name of the task
 /// </summary>
 [TestMethod]
 public void WorkList_RetrieveTaskList_Success()
 {
 string Actual = string.Empty;
 int.TryParse(Results.GetResult(TestType.ProcessInstance), out this.proceessInstance);
var task = workflow.GetTask(this.proceessInstance, this.ProcessName);
 
 this.SerialNumber = task[0].SerialNumber;
 Results.SaveResult(TestType.SerialNumber, this.SerialNumber);
 this.DestinationUser = task[0].Destination;
 Results.SaveResult(TestType.Destination, this.DestinationUser);
 Actual = task[0].ActivityName;
 Results.SaveResult(TestType.TaskActivity, Actual);
 Assert.AreEqual(this.TaskActivity, Actual);
}


Action a task

Actions the task and moves the workflow along

/// <summary>
 /// Actions a task
 /// </summary>
 /// <param name="action"></param>
 /// <param name="serialnumber"></param>
 /// <param name="destinationuser"></param>
 /// <returns></returns>
 public Boolean ActionTask(string action, string serialnumber, string destinationuser)
 {
 Boolean result = false;
 SourceCode.Workflow.Client.Connection K2Conn = new SourceCode.Workflow.Client.Connection();
 K2Conn.Open(servername);
 K2Conn.ImpersonateUser(destinationuser);
 SourceCode.Workflow.Client.WorklistItem K2WListItem = K2Conn.OpenWorklistItem(serialnumber);
 try
 {
K2WListItem.Actions[action].Execute();
 result = true;
 }
 catch (Exception ex)
 {
 result = false;
 }
 finally {
 K2Conn.Close();
 }
 return result;
 }

Test : Action’s the task

Returns true if the action of the task has been successful which we compare against the expected.

/// <summary>
 /// Actions a task
 /// </summary>
 [TestMethod]
 public void Task_GetActions_Sucess()
 {
 Boolean Actual = false;
 this.SerialNumber = Results.GetResult(TestType.SerialNumber);
 this.DestinationUser = Results.GetResult(TestType.Destination);
K2WorkflowMap.TaskDetails task = workflow.OpenTask(this.SerialNumber, this.DestinationUser)[0];
 Actual = workflow.ActionTask(this.TaskAction, this.SerialNumber, this.DestinationUser);
 Assert.AreEqual(true, Actual);
}

This test only accounts for one slot, it can be modified to loop through the task list for the particular instance.


Task Count

This method, counts the number of tasks for the current instance

 /// <summary>
 /// Gets the number of active tasks for instance of a workflow
 /// </summary>
 /// <param name="ProcessInstanceId"></param>
 /// <returns></returns>
 public int GetTaskCount(int ProcessInstanceId,string ProcessName)
 {
 int Result = 0;
 int count = 0;
 SourceCode.Workflow.Management.WorkflowManagementServer wrkmgt = new SourceCode.Workflow.Management.WorkflowManagementServer(servername ,5555);
 SourceCode.Workflow.Management.WorklistItems worklistItems = null;
 wrkmgt.Open();
 try
 {
 worklistItems = wrkmgt.GetWorklistItems("", "", "", "", "", "", "");
foreach (SourceCode.Workflow.Management.WorklistItem worklistItem in worklistItems)
 {
 if (worklistItem.ProcInstID == ProcessInstanceId)
 {
 count++;
 }
 }
 Result = count;
 }
catch (Exception ex)
 {
Result = 0;
}
 finally
 {
 wrkmgt.Connection.Close();
 }
return Result;
 }


Test: Check Task Complete (Common)

Test checks to see if the number of the tasks for instance is 0

/// <summary>
 /// checks to see if task is complete by checking that task has gone
 /// </summary>
 [TestMethod]
 public void Task_CheckTaskComplete_Success()
 {
 int.TryParse(Results.GetResult(TestType.ProcessInstance), out this.proceessInstance);
 int actual = 0;
 actual = workflow.GetTaskCount(this.proceessInstance, this.ProcessName);
 Results.SaveResult(TestType.TaskCount, actual.ToString());
 Assert.AreEqual(0, actual);
 }


Once the main lot of testing is complete we can check that that the correct number of activities have been executed and we can check that the correct activities have ran.

Also using the status method we can check if its completed.


Activities correct number

This method gets all the activities that ran during the process instance.

/// <summary>
 /// Gets the list of activities from process instance
 /// </summary>
 /// <param name="processinstanceId"></param>
 /// <returns></returns>
 public List<Activities> GetActivities(string processinstanceId)
{
List<Activities> list = new List<Activities>();
 SourceCode.Hosting.Client.BaseAPI.SCConnectionStringBuilder hostServerConnectionString = new SourceCode.Hosting.Client.BaseAPI.SCConnectionStringBuilder();
 hostServerConnectionString.Host = servername;
 hostServerConnectionString.Port = 5555;
 hostServerConnectionString.IsPrimaryLogin = true;
 hostServerConnectionString.Integrated = true;
SourceCode.SmartObjects.Client.SmartObjectClientServer serverName = new SourceCode.SmartObjects.Client.SmartObjectClientServer();
 serverName.CreateConnection();
 serverName.Connection.Open(hostServerConnectionString.ToString());
try
 {
SourceCode.SmartObjects.Client.SmartObject smartObject = serverName.GetSmartObject("Activity_Instance");
 smartObject.MethodToExecute = "List";
 smartObject.Properties["ProcessInstanceID"].Value = processinstanceId;
 SourceCode.SmartObjects.Client.SmartObjectList smoList = serverName.ExecuteList(smartObject);
 foreach (SourceCode.SmartObjects.Client.SmartObject item in smoList.SmartObjectsList)
 {
int ProcInstId = 0;
 int ActInstId = 0;
 int.TryParse(item.Properties["ProcessInstanceID"].Value, out ProcInstId);
 int.TryParse(item.Properties["ActivityInstanceID"].Value, out ActInstId);
DateTime startDate = DateTime.Today;
 DateTime finishDate = DateTime.Today;
 DateTime.TryParse(item.Properties["StartDate"].Value, out startDate);
 DateTime.TryParse(item.Properties["FinishDate"].Value, out finishDate);
list.Add(new Activities
 {
 ProcessInstanceId = ProcInstId,
 ActivityInstanceId = ActInstId,
 ActivityName = item.Properties["ActivityName"].Value,
 Status = item.Properties["Status"].Value,
 StartDate = startDate,
 FinishDate = finishDate
});
 }
}
 catch (Exception ex)
 {
 list.Add(new Activities
 {
 ProcessInstanceId = 0,
 ActivityInstanceId = 0,
 ActivityName = ex.Message,
 Status = "Error",
 StartDate = DateTime.Today,
 FinishDate = DateTime.Today
});
}
 finally {
serverName.Connection.Close();
 }
return list;
 }


Task: Compare Number Of Activities (Common)

This test compares the number of activities that actually ran for the instance against the number expected

/// <summary>
 /// Checks the correct number of activities ran
 /// </summary>
 [TestMethod]
 public void Activities_CompareNumberOfActivities_Success()
 {
 
 Thread.Sleep(milliseconds);
 int.TryParse(Results.GetResult(TestType.ProcessInstance), out this.proceessInstance);
int NumberOfActivitiesRan = workflow.GetActivities(this.proceessInstance.ToString()).Count;
 String[] activities = this.Activities.Split(';');
 int count = 0;
 foreach (var activity in activities)
 {
 count++;
}
Assert.AreEqual(count, NumberOfActivitiesRan);
 }


Activities than ran

This method loops through the activities that have ran against the an array of activities

public Boolean CompareActivities(int ProcessInstanceId, string Activities)
 {
Boolean result = false;
List<Activities> instAct = new List<Activities>();
 try
 {
 instAct = GetActivities(ProcessInstanceId.ToString());
String[] activities = Activities.Split(';');
 int count = 0;
 int match = 0;
 foreach (var activity in activities)
 {
 var instanceactivity = instAct.Where(p => p.ActivityName == activity);
foreach (var act in instanceactivity)
 {
 match++;
 }
count++;
 }
if (count == match)
 { result = true; }
 }
 catch (Exception ex)
 { }
 finally { }
return result;
}

Test: Correct Activities Ran (Common)

This test returns true if the activities ran is the same to the activities in the string array.

 /// <summary>
 /// Checks the correct activities were executed in correct order
 /// </summary>
 /// 
 [TestMethod]
 public void Activities_CorrectActivitiesRan_Success()
 {
 Thread.Sleep(milliseconds);
 int.TryParse(Results.GetResult(TestType.ProcessInstance), out this.proceessInstance);
Boolean actual = workflow.CompareActivities(this.proceessInstance, this.Activities);
 Assert.IsTrue(actual);
 }


Code Appendix

Below is the complete code

Interface Iworkflowframework.cs

using System;
using System.Collections.Generic;
using System.Linq;
using System.Text;
using System.Threading.Tasks;
namespace K2WorkflowMap
{
 interface Iworkflowframeworkcs
 {
int StartProcess(string Folio, string ProcessName);
 Boolean IsTaskFound(int ProcessInstanceId, string ProcessName);
 int GetTaskCount(int ProcessInstanceId, string ProcessName);
List<tasklist> GetTask(int ProcessInstanceId, string ProcessName);
 List<TaskDetails> OpenTask(string serialnumber, string destination);
List<ActionList> WhatCanIdo(SourceCode.Workflow.Client.Actions actions);
Boolean ActionTask(string action, string serialnumber, string destinationuser);
Boolean IsTaskComplete(int ProcInst, int Count, string processname);
Boolean IsTaskComplete(string action, string serialnumber, string destinationuser);
string GetWorkflowStatus(int processinstanceId);
List<dataField> GetProcessDataFields(int processinstanceId);
List<Activities> GetActivities(string processinstanceId);
List<Events> GetEvents(string activityid);
List<ActivityDesign> GetWorkflowActivities(int ProcId);
List<Workflow> GetProcesses();
}
}


Class Model.cs

using System;
using System.Collections.Generic;
using System.Linq;
using System.Text;
using System.Threading.Tasks;
namespace K2WorkflowMap
{
public enum TestToRun
 {
 Start = 1,
 CheckStatus = 2,
 TaskExists = 3,
 TaskCount = 4,
 CheckTask = 5,
 OpenTaskDetails = 6,
 TaskActions = 7,
 CompleteTask = 8,
 GetActivities = 9
}
 public class tasklist
 {
 public string ActInstDestID { get; set; }
 public string ActivityName { get; set; }
 public string EventName { get; set; }
 public string Destination { get; set; }
 public string Status { get; set; }
 public string SerialNumber { get; set; }
}
public class ActionList
 {
 public string ActionValue { get; set; }
 public string ActionText { get; set; }
 }
public class TaskDetails
 {
public string Status { get; set; }
 public string SerialNumber { get; set; }
 public SourceCode.Workflow.Client.Actions Actions { get; set; }
 public string Data { get; set; }
 public string DataFields { get; set; }
 }
 public class dataField
 {
 public string Name { get; set; }
 public string Value { get; set; }
 public string valueType { get; set; }
 }
public class Activities
 {
 public int ActivityInstanceId { get; set; }
 public int ProcessInstanceId { get; set; }
 public string ActivityName { get; set; }
 public DateTime StartDate { get; set; }
public DateTime FinishDate { get; set; }
 public String Status { get; set; }
 }
public class Events
 {
public int ActivityInstanceId { get; set; }
 public int ProcessInstanceId { get; set; }
 public string EventName { get; set; }
 public string Destination { get; set; }
 public DateTime StartDate { get; set; }
public DateTime FinishDate { get; set; }
 public String Status { get; set; }
 }
public class ActivityDesign
 {
 public int ID { get; set; }
 public string Name { get; set; }
 public string Description { get; set; }
 }
public class Workflow
 {
 public int ID { get; set; }
 public string Name { get; set; }
}
}

Class Results.cs

using System;
using System.Collections.Generic;
using System.Linq;
using System.Text;
using System.Threading.Tasks;
using System.Xml;
using System.IO;
namespace K2WorkflowUnitTest
{
 public enum TestType
 {
ProcessName,
 Folio,
 ProcessInstance,
 StartStatus,
 TaskCount,
 SerialNumber,
 Destination,
 TaskActivity,
 Actions,
 Activities,
 
 }
 public enum TestSubTypes
 {
Action,
 Activity,
 Event,
 }
public class Results
 {
 private string assemblyFolder;
 private string xmlFileName;
 public Results()
 {
 this.assemblyFolder = Path.GetDirectoryName(System.Reflection.Assembly.GetExecutingAssembly().Location);
 this.xmlFileName = Path.Combine(assemblyFolder, "DataStoreResults.xml");
 }
 public void SetUpXML(string ProcessName, string Folio)
 {
 //Gets the settings file
 if (!File.Exists(xmlFileName))
 {
 XmlTextWriter writer = new XmlTextWriter(xmlFileName, System.Text.Encoding.UTF8);
 writer.WriteStartDocument(true);
 writer.Formatting = Formatting.Indented;
 writer.WriteStartElement("Settings");
 writer.WriteStartElement("ProcessName");
 writer.WriteString(ProcessName);
 writer.WriteEndElement();
 writer.WriteStartElement("Folio");
 writer.WriteString(Folio);
 writer.WriteEndElement();
 writer.WriteStartElement("ProcessInstanceId");
 writer.WriteString("0");
 writer.WriteEndElement();
 writer.WriteStartElement("StartStatus");
 writer.WriteString("Stop");
 writer.WriteEndElement();
 writer.WriteStartElement("TaskCount");
 writer.WriteAttributeString("Actual","0");
 writer.WriteEndAttribute();
 writer.WriteString("0");
 writer.WriteEndElement();
 writer.WriteStartElement("SerialNumber");
 writer.WriteString("0");
 writer.WriteEndElement();
 writer.WriteStartElement("Destination");
 writer.WriteString("0");
 writer.WriteEndElement();
 writer.WriteStartElement("TaskActivity");
 writer.WriteString("0");
 writer.WriteEndElement();
 writer.WriteStartElement("Actions");
 writer.WriteStartElement("Action");
 writer.WriteString("0");
 writer.WriteEndElement();
 writer.WriteEndElement();
 writer.WriteStartElement("ActionResult");
 writer.WriteString("0");
 writer.WriteEndElement();
 writer.WriteStartElement("Activities");
 
 writer.WriteStartElement("Activity");
 
 writer.WriteString("0");
 writer.WriteStartElement("Event");
 writer.WriteString("0");
 writer.WriteEndElement();
 writer.WriteEndElement();
 writer.WriteEndElement();
 writer.WriteEndElement();
 writer.WriteEndDocument();
 writer.Close();
 }
 else
 {
XmlDocument xmlDoc = new XmlDocument();
 xmlDoc.Load(xmlFileName);
 xmlDoc.ChildNodes[1].ChildNodes[0].InnerXml = ProcessName;
 xmlDoc.ChildNodes[1].ChildNodes[1].InnerXml = Folio;
 xmlDoc.Save(xmlFileName);
 }

}


 /// <summary>
 /// Saves the result into XML Document
 /// </summary>
 /// <param name="testType"></param>
 /// <param name="Result"></param>
 public void SaveResult(TestType testType, string Result)
 {
 int childNodeIndex = 0;
 childNodeIndex = (int)testType;
 XmlDocument xmlDoc = new XmlDocument();
 try
 {
 xmlDoc.Load(xmlFileName);
 xmlDoc.ChildNodes[1].ChildNodes[childNodeIndex].InnerXml = Result;
 xmlDoc.Save(xmlFileName);
 }
 catch (Exception ex)
 {
}
 finally
 {
}
}
 /// <summary>
 /// Saves the result of sub node in XML Document
 /// </summary>
 /// <param name="testType"></param>
 /// <param name="subTestType"></param>
 /// <param name="Result"></param>
public void SaveResult(TestType testType, TestSubTypes subTestType ,string Result)
 {
 int childNode = 0;
 childNode = (int)testType;
int childNodeIndex = 0;
 childNodeIndex = (int)subTestType;
XmlDocument xmlDoc = new XmlDocument();
 try
 {
 xmlDoc.Load(xmlFileName);
 xmlDoc.ChildNodes[1].ChildNodes[childNode].ChildNodes[childNodeIndex].InnerXml = Result;
 xmlDoc.ChildNodes[1].ChildNodes[childNode].ChildNodes[childNodeIndex].Attributes["Name"].Value = Result;
 xmlDoc.Save(xmlFileName);
 }
 catch (Exception ex)
 {
}
 finally
 {
}
}
 
 /// <summary>
 /// Gets a saved result
 /// </summary>
 /// <param name="testType"></param>
 /// <returns></returns>
 public string GetResult(TestType testType)
 {
int childNodeIndex = 0;
 childNodeIndex = (int)testType;
string results = string.Empty;
 XmlDocument xmlDoc = new XmlDocument();
 xmlDoc.Load(xmlFileName);
 results = xmlDoc.ChildNodes[1].ChildNodes[childNodeIndex].InnerXml;
 return results;
}

}
}

Class Workflowframework.cs

using System;
using System.Collections.Generic;
using System.Linq;
using System.Text;
using System.Threading.Tasks;
using System.Configuration;
namespace K2WorkflowMap
{

public class WorkflowInstanceFramework : Iworkflowframeworkcs
 {
 public string servername = "cft-v-k2int02";
 public string ServiceAccount = @"CHANNEL4\SVCK2MINTMULEUSER";


/// <summary>
 /// Starts a workflow
 /// </summary>
 /// <param name="Folio"></param>
 /// <param name="ProcessName"></param>
 /// <returns></returns>
 public int StartProcess(string Folio, string ProcessName)
 {
 var con = ConfigurationManager.AppSettings;
 int ProcessInstanceId = 0;
 SourceCode.Workflow.Client.Connection K2Conn = new SourceCode.Workflow.Client.Connection();
 K2Conn.Open(servername);
 try
 {
 SourceCode.Workflow.Client.ProcessInstance K2Proc = K2Conn.CreateProcessInstance(ProcessName);
 
 K2Proc.Folio = Folio;
 K2Conn.ImpersonateUser(ServiceAccount);
 K2Conn.StartProcessInstance(K2Proc);
 ProcessInstanceId = K2Proc.ID;
 }
 catch (Exception EX)
 {
 ProcessInstanceId = 0;
 }
finally
 {
 K2Conn.Close();
 }
 return ProcessInstanceId;
 }
/// <summary>
 /// Checks to see if there is an task
 /// </summary>
 /// <param name="ProcessInstanceId"></param>
 /// <param name="ProcessName"></param>
 /// <returns></returns>
 public Boolean IsTaskFound(int ProcessInstanceId, string ProcessName)
 {
 Boolean Result = false;
 SourceCode.Workflow.Management.WorkflowManagementServer wrkmgt = new SourceCode.Workflow.Management.WorkflowManagementServer(servername, 5555);
 SourceCode.Workflow.Management.WorklistItems worklistItems = null;
 wrkmgt.Open();
 try
 {
 worklistItems = wrkmgt.GetWorklistItems("", "", "", "", "", "", "");
 foreach (SourceCode.Workflow.Management.WorklistItem worklistItem in worklistItems)
 {
 if (worklistItem.ProcInstID == ProcessInstanceId)
 {
 Result = true;
 }
 }
 }
 catch (Exception ex)
 {
Result = false;
}
 finally
 {
 wrkmgt.Connection.Close();
 }
return Result;
 }

/// <summary>
 /// Gets the number of active tasks for instance of a workflow
 /// </summary>
 /// <param name="ProcessInstanceId"></param>
 /// <returns></returns>
 public int GetTaskCount(int ProcessInstanceId,string ProcessName)
 {
 int Result = 0;
 int count = 0;
 SourceCode.Workflow.Management.WorkflowManagementServer wrkmgt = new SourceCode.Workflow.Management.WorkflowManagementServer(servername ,5555);
 SourceCode.Workflow.Management.WorklistItems worklistItems = null;
 wrkmgt.Open();
 try
 {
 worklistItems = wrkmgt.GetWorklistItems("", "", "", "", "", "", "");
foreach (SourceCode.Workflow.Management.WorklistItem worklistItem in worklistItems)
 {
 if (worklistItem.ProcInstID == ProcessInstanceId)
 {
 count++;
 }
 }
 Result = count;
 }
catch (Exception ex)
 {
Result = 0;
}
 finally
 {
 wrkmgt.Connection.Close();
 }
return Result;
 }
/// <summary>
 /// Gets details about the task
 /// </summary>
 /// <param name="ProcessInstanceId"></param>
 /// <returns></returns>
 public List<tasklist> GetTask(int ProcessInstanceId,string ProcessName)
 {
List<tasklist> list = new List<tasklist>();
 SourceCode.Workflow.Management.WorkflowManagementServer wrkmgt = new SourceCode.Workflow.Management.WorkflowManagementServer(servername, 5555);
 SourceCode.Workflow.Management.WorklistItems worklistItems = null;
 wrkmgt.Open();
 try
 {
 worklistItems = wrkmgt.GetWorklistItems("", "", "", "", "", "", "");
foreach (SourceCode.Workflow.Management.WorklistItem worklistItem in worklistItems)
 {
 if (worklistItem.ProcInstID == ProcessInstanceId)
 {
 var x = worklistItem.ActivityName;
list.Add(new tasklist
 {
 Status = worklistItem.Status.ToString(),
 Destination = worklistItem.Destination,
 EventName = worklistItem.EventName,
 ActInstDestID = worklistItem.ActInstDestID.ToString(),
 ActivityName = worklistItem.ActivityName,
 SerialNumber = (ProcessInstanceId + "_" + worklistItem.ActInstDestID)
 });

}
 }
 }
 catch (Exception ex)
 {
// Result = false;
}
 finally
 {
 wrkmgt.Connection.Close();
 }
return list;
 }
 /// <summary>
 /// Task Details
 /// </summary>
 /// <param name="serialnumber"></param>
 /// <param name="destination"></param>
 /// <returns></returns>
 public List<TaskDetails> OpenTask(string serialnumber, string destination)
 {
List<TaskDetails> list = new List<TaskDetails>();
SourceCode.Workflow.Client.Connection K2Conn = new SourceCode.Workflow.Client.Connection();
 K2Conn.Open(servername);
 K2Conn.ImpersonateUser(destination);
 SourceCode.Workflow.Client.WorklistItem K2WListItem = K2Conn.OpenWorklistItem(serialnumber);
try
 {
list.Add(new TaskDetails
 {
 Status = K2WListItem.Status.ToString(),
 SerialNumber = K2WListItem.SerialNumber,
 Actions = K2WListItem.Actions,
 Data = K2WListItem.Data,
 DataFields = K2WListItem.ProcessInstance.DataFields.ToString()
 });
 K2WListItem.Release();
 }
 catch (Exception ex)
 {
 list.Add(new TaskDetails
 {
 Status = "No Task"
 });
}
 finally {
 K2Conn.Close();
 }
 return list;
 }
/// <summary>
 /// List of Actions
 /// </summary>
 /// <param name="actions"></param>
 /// <returns></returns>
 public List<ActionList> WhatCanIdo(SourceCode.Workflow.Client.Actions actions)
 {
 List<ActionList> list = new List<ActionList>();
 if (actions != null)
 {
 foreach (SourceCode.Workflow.Client.Action action in actions)
 {
 list.Add(new ActionList
 {
 ActionText = action.Name,
 ActionValue = action.Name
 });
 }
 }
 else {
list.Add(new ActionList
 {
 ActionText = "No Action",
 ActionValue = "No Action"
 });
 }
return list;
 }

 /// <summary>
 /// Actions a task
 /// </summary>
 /// <param name="action"></param>
 /// <param name="serialnumber"></param>
 /// <param name="destinationuser"></param>
 /// <returns></returns>
 public Boolean ActionTask(string action, string serialnumber, string destinationuser)
 {
 Boolean result = false;
 SourceCode.Workflow.Client.Connection K2Conn = new SourceCode.Workflow.Client.Connection();
 K2Conn.Open(servername);
 K2Conn.ImpersonateUser(destinationuser);
 SourceCode.Workflow.Client.WorklistItem K2WListItem = K2Conn.OpenWorklistItem(serialnumber);
 try
 {
K2WListItem.Actions[action].Execute();
 result = true;
 }
 catch (Exception ex)
 {
 result = false;
 }
 finally {
 K2Conn.Close();
 }
 return result;
 }
/// <summary>
 /// Checks to see if the task count has decreased
 /// </summary>
 /// <param name="ProcInst"></param>
 /// <param name="Count"></param>
 /// <returns></returns>
 public Boolean IsTaskComplete(int ProcInst, int Count,string processname)
 {
 Boolean result = false;
 int LastCount = Count;
 int NewCount = GetTaskCount(ProcInst,processname);
 if (LastCount == Count)
 {
 result = false;
 }
 else
 {
 result = true;
 }
return result;
 }
/// <summary>
 /// Checks to see if the actual task that was actioned has been successful
 /// </summary>
 /// <param name="action"></param>
 /// <param name="serialnumber"></param>
 /// <param name="destinationuser"></param>
 /// <returns></returns>
 public Boolean IsTaskComplete(string action, string serialnumber, string destinationuser)
 {
 Boolean result = true;
 SourceCode.Workflow.Client.Connection K2Conn = new SourceCode.Workflow.Client.Connection();
 K2Conn.Open(servername);
 K2Conn.ImpersonateUser(destinationuser);
 SourceCode.Workflow.Client.WorklistItem K2WListItem = K2Conn.OpenWorklistItem(serialnumber);
 try
 {
K2WListItem.Actions[action].Execute();
 result = false;
 }
 catch (Exception ex)
 {
 result = true;
 }
 finally
 {
 K2Conn.Close();
 }
 return result;
 }
/// <summary>
 /// Gets the current status of the workflow
 /// </summary>
 /// <param name="processinstanceId"></param>
 /// <returns></returns>
 public string GetWorkflowStatus(int processinstanceId)
 {
 string Result = string.Empty;
 SourceCode.Workflow.Client.Connection K2Conn = new SourceCode.Workflow.Client.Connection();
 K2Conn.Open(servername);
 try
 {
 SourceCode.Workflow.Client.ProcessInstance K2Proc = K2Conn.OpenProcessInstance(processinstanceId);
 switch (K2Proc.Status1)
 {
 case SourceCode.Workflow.Client.ProcessInstance.Status.Active:
 {
 Result = SourceCode.Workflow.Client.ProcessInstance.Status.Active.ToString();
 break;
 }
case SourceCode.Workflow.Client.ProcessInstance.Status.Completed:
 {
 Result = SourceCode.Workflow.Client.ProcessInstance.Status.Completed.ToString();
 break;
 }
 case SourceCode.Workflow.Client.ProcessInstance.Status.Deleted:
 {
 Result = SourceCode.Workflow.Client.ProcessInstance.Status.Deleted.ToString();
 break;
 }
 case SourceCode.Workflow.Client.ProcessInstance.Status.Error:
 {
 Result = SourceCode.Workflow.Client.ProcessInstance.Status.Error.ToString();
 break;
 }
 case SourceCode.Workflow.Client.ProcessInstance.Status.New:
 {
 Result = SourceCode.Workflow.Client.ProcessInstance.Status.New.ToString();
 break;
 }
 case SourceCode.Workflow.Client.ProcessInstance.Status.Running:
 {
 Result = SourceCode.Workflow.Client.ProcessInstance.Status.Running.ToString();
 break;
 }
 case SourceCode.Workflow.Client.ProcessInstance.Status.Stopped:
 {
 Result = SourceCode.Workflow.Client.ProcessInstance.Status.Stopped.ToString();
 break;
 }
 }


 }
 catch (Exception ex)
 { Result = ex.Message; }
 finally
 {
 K2Conn.Close();
 }
return Result;
 }
/// <summary>
 /// Gets the process data fields
 /// </summary>
 /// <param name="processinstanceId"></param>
 /// <returns></returns>
 public List<dataField> GetProcessDataFields(int processinstanceId)
 {
 List<dataField> list = new List<dataField>();
 SourceCode.Workflow.Client.Connection K2Conn = new SourceCode.Workflow.Client.Connection();
 K2Conn.Open(servername);
 try
 {
 SourceCode.Workflow.Client.ProcessInstance K2Proc = K2Conn.OpenProcessInstance(processinstanceId);
 foreach (SourceCode.Workflow.Client.DataField datafield in K2Proc.DataFields)
 {
 list.Add(new dataField {
Name = datafield.Name,
 Value = datafield.Value.ToString(),
 valueType = datafield.ValueType.ToString()
});
 }
 }
 catch (Exception ex)
 {
 list.Add(new dataField
 {
Name = "Error",
 Value = ex.Message.ToString()
});
}
 finally {
 K2Conn.Close();
 }
return list;
 }
 public Boolean CompareActivities(int ProcessInstanceId, string Activities)
 {
Boolean result = false;
List<Activities> instAct = new List<Activities>();
 try
 {
 instAct = GetActivities(ProcessInstanceId.ToString());

String[] activities = Activities.Split(';');
 int count = 0;
 int match = 0;
 foreach (var activity in activities)
 {
 var instanceactivity = instAct.Where(p => p.ActivityName == activity);
foreach (var act in instanceactivity)
 {
 match++;
 }
count++;
 }
if (count == match)
 { result = true; }
 }
 catch (Exception ex)
 { }
 finally { }
return result;
}


/// <summary>
 /// Gets the list of activities from process instance
 /// </summary>
 /// <param name="processinstanceId"></param>
 /// <returns></returns>
 public List<Activities> GetActivities(string processinstanceId)
{
List<Activities> list = new List<Activities>();
 SourceCode.Hosting.Client.BaseAPI.SCConnectionStringBuilder hostServerConnectionString = new SourceCode.Hosting.Client.BaseAPI.SCConnectionStringBuilder();
 hostServerConnectionString.Host = servername;
 hostServerConnectionString.Port = 5555;
 hostServerConnectionString.IsPrimaryLogin = true;
 hostServerConnectionString.Integrated = true;
SourceCode.SmartObjects.Client.SmartObjectClientServer serverName = new SourceCode.SmartObjects.Client.SmartObjectClientServer();
 serverName.CreateConnection();
 serverName.Connection.Open(hostServerConnectionString.ToString());
try
 {
SourceCode.SmartObjects.Client.SmartObject smartObject = serverName.GetSmartObject("Activity_Instance");
 smartObject.MethodToExecute = "List";
 smartObject.Properties["ProcessInstanceID"].Value = processinstanceId;
 SourceCode.SmartObjects.Client.SmartObjectList smoList = serverName.ExecuteList(smartObject);
 foreach (SourceCode.SmartObjects.Client.SmartObject item in smoList.SmartObjectsList)
 {
int ProcInstId = 0;
 int ActInstId = 0;
 int.TryParse(item.Properties["ProcessInstanceID"].Value, out ProcInstId);
 int.TryParse(item.Properties["ActivityInstanceID"].Value, out ActInstId);
DateTime startDate = DateTime.Today;
 DateTime finishDate = DateTime.Today;
 DateTime.TryParse(item.Properties["StartDate"].Value, out startDate);
 DateTime.TryParse(item.Properties["FinishDate"].Value, out finishDate);
list.Add(new Activities
 {
 ProcessInstanceId = ProcInstId,
 ActivityInstanceId = ActInstId,
 ActivityName = item.Properties["ActivityName"].Value,
 Status = item.Properties["Status"].Value,
 StartDate = startDate,
 FinishDate = finishDate
});
 }
}
 catch (Exception ex)
 {
 list.Add(new Activities
 {
 ProcessInstanceId = 0,
 ActivityInstanceId = 0,
 ActivityName = ex.Message,
 Status = "Error",
 StartDate = DateTime.Today,
 FinishDate = DateTime.Today
});
}
 finally {
serverName.Connection.Close();
 }
return list;
 }
/// <summary>
 /// Gets a list of Events for an activity
 /// </summary>
 /// <param name="activityid"></param>
 /// <returns></returns>
 public List<Events> GetEvents(string activityid)
 {
 List<Events> list = new List<Events>();
 SourceCode.Hosting.Client.BaseAPI.SCConnectionStringBuilder hostServerConnectionString = new SourceCode.Hosting.Client.BaseAPI.SCConnectionStringBuilder();
 hostServerConnectionString.Host = servername;
 hostServerConnectionString.Port = 5555;
 hostServerConnectionString.IsPrimaryLogin = true;
 hostServerConnectionString.Integrated = true;
SourceCode.SmartObjects.Client.SmartObjectClientServer serverName = new SourceCode.SmartObjects.Client.SmartObjectClientServer();
 serverName.CreateConnection();
 serverName.Connection.Open(hostServerConnectionString.ToString());
try
 {
SourceCode.SmartObjects.Client.SmartObject smartObject = serverName.GetSmartObject("Event_Instance");
 smartObject.MethodToExecute = "List";
 smartObject.Properties["ActivityInstanceID"].Value = activityid;
 SourceCode.SmartObjects.Client.SmartObjectList smoList = serverName.ExecuteList(smartObject);
 foreach (SourceCode.SmartObjects.Client.SmartObject item in smoList.SmartObjectsList)
 {
int ProcInstId = 0;
 int ActInstId = 0;
 int.TryParse(item.Properties["ProcessInstanceID"].Value, out ProcInstId);
 int.TryParse(item.Properties["ActivityInstanceID"].Value, out ActInstId);
DateTime startDate = DateTime.Today;
 DateTime finishDate = DateTime.Today;
 DateTime.TryParse(item.Properties["StartDate"].Value, out startDate);
 DateTime.TryParse(item.Properties["FinishDate"].Value, out finishDate);
list.Add(new Events
 {
 ProcessInstanceId = ProcInstId,
 ActivityInstanceId = ActInstId,
 EventName = item.Properties["EventName"].Value,
 Status = item.Properties["Status"].Value,
 StartDate = startDate,
 FinishDate = finishDate,
 Destination = item.Properties["Destination"].Value
});
 }
}
 catch (Exception ex)
 {
 list.Add(new Events
 {
 ProcessInstanceId = 0,
 ActivityInstanceId = 0,
 EventName = ex.Message,
 Status = "Error",
 StartDate = DateTime.Today,
 FinishDate = DateTime.Today
});
}
 finally
 {
serverName.Connection.Close();
 }
return list;
 }
public void IsErrors(int processinstanceId, string workflowname)
 {


}


/// <summary>
 /// Gets all the activities that are in a workflow
 /// </summary>
 /// <param name="ProcId"></param>
 /// <returns></returns>
 public List<ActivityDesign> GetWorkflowActivities(int ProcId)
 {
 List<ActivityDesign> list = new List<ActivityDesign>();
 SourceCode.Workflow.Management.WorkflowManagementServer workflowServer = new SourceCode.Workflow.Management.WorkflowManagementServer(servername, 5555);
 workflowServer.Open();
 try
 {
 
 foreach (SourceCode.Workflow.Management.Activity activity in workflowServer.GetProcActivities( ProcId))
 {
 list.Add(new ActivityDesign
 {
ID = activity.ID,
 Name = activity.Name,
 Description = activity.Description
});

 }
 }
 catch (Exception ex)
 {
 list.Add(new ActivityDesign
 {
ID = 0,
 Name = "Error",
 Description = ex.Message
 });
 }
 finally
 {
 workflowServer.Connection.Close();
 }
 return list;
}
/// <summary>
 /// Gets a list of all the workflows
 /// </summary>
 /// <returns></returns>
 public List<Workflow> GetProcesses()
 {
 List<Workflow> list = new List<Workflow>();
SourceCode.Workflow.Management.WorkflowManagementServer workflowServer = new SourceCode.Workflow.Management.WorkflowManagementServer(servername,5555);
 workflowServer.Open();
 try
 {
 SourceCode.Workflow.Management.Criteria.ProcessCriteriaFilter filter = new SourceCode.Workflow.Management.Criteria.ProcessCriteriaFilter();
 SourceCode.Workflow.Management.Processes processes = workflowServer.GetProcesses(filter);
 foreach (SourceCode.Workflow.Management.Process process in processes)
 {
 if (process.DefaultVersion == true)
 {
 list.Add(
 new Workflow
 {
 ID = process.ProcID,
 Name = process.FullName
}
);
 }
 }
 }
 catch (Exception ex)
 {
 list.Add(
 new Workflow
 {
 ID = 0,
 Name = ex.Message
}
);
 }
 finally
 {
 workflowServer.Connection.Close();
 }
 return list;
 }
 }
}


XML DataStoreResult.xml

Used to hold test data

<?xml version="1.0" encoding="utf-8" ?>
<Settings>
<ProcessName>k2-server-int02</ProcessName>
<Folio></Folio>
<ProcessInstanceId>5555</ProcessInstanceId>
<StartStatus>End</StartStatus>
<TaskCount Actual="1">0</TaskCount>
 <SerialNumber>00_00</SerialNumber>
 <Destination>Bob</Destination>
 <Actions>
 <Action>Approve</Action>
 </Actions>
 <ActionResult>Approve</ActionResult>
 <Activities>
 <Activity>
 <Event name="Status Check">Pass</Event>
 </Activity>
 </Activities>
</Settings>

Unit Test Unittest.cs

using System;
using Microsoft.VisualStudio.TestTools.UnitTesting;
using System.Threading;
namespace K2WorkflowUnitTest
{
 [TestClass]
 public class UnitTest1
 {
private string folio;
 private string ProcessName;
 private int proceessInstance;
 private string SerialNumber;
 private string TaskAction;
 private int TaskCount = 0;
 private string Activities;
 private string DestinationUser;
 private string TaskActivity;
 private int milliseconds;
 private SourceCode.Workflow.Client.Actions Actions;
 private K2WorkflowMap.WorkflowInstanceFramework workflow;
 private Results Results;
public int ProcInstId { get; set; }
[TestInitialize]
 public void TestInitialize()
 {
 this.folio = "I am a folio 3";
 this.ProcessName = @"K2Project2\TestProcess";
 this.TaskActivity = "Task";
 this.TaskAction = "Approve";
 this.Activities = "Setup;Task;Approve;End";
 this.TaskCount = 1;
 this.milliseconds = 3000;
 workflow = new K2WorkflowMap.WorkflowInstanceFramework();
 Results = new Results();
 Results.SetUpXML(this.ProcessName, this.folio);
 }
 /// <summary>
 /// Tests the starting of a workflow, should return a number greater than 0
 /// </summary>
 /// <param name="folio"></param>
 /// <param name="ProceesName"></param>
 /// <returns></returns>
 [TestMethod]
 public void StartWorkflow_Success()
 {
int actual = workflow.StartProcess(this.folio, this.ProcessName);
 this.proceessInstance = actual;
 Results.SaveResult(TestType.ProcessInstance, this.proceessInstance.ToString());
 Assert.AreNotEqual(0, actual);
 ProcInstId = this.proceessInstance;
}
/// <summary>
 /// Test to check that the workflow has started, by checking it's status
 /// </summary>
 /// <param name="ProcessInstanceId"></param>
 [TestMethod]
 public void StartWorkflow_Running_Success()
 {
int.TryParse(Results.GetResult(TestType.ProcessInstance), out this.proceessInstance);
 string actual = workflow.GetWorkflowStatus(this.proceessInstance);
 Results.SaveResult(TestType.StartStatus, actual);
 StringAssert.Equals(SourceCode.Workflow.Client.ProcessInstance.Status.Active.ToString(), actual);
 }

/// <summary>
 /// Tests to see if tasks have been generated for this instance
 /// </summary>
 [TestMethod]
 public void WorkList_TasksFound_Success()
 {
 Thread.Sleep(milliseconds);
 int.TryParse(Results.GetResult(TestType.ProcessInstance), out this.proceessInstance);
 Boolean actual = false;
 actual = workflow.IsTaskFound(this.proceessInstance, this.ProcessName);
 Assert.AreEqual(true, actual);
 }
 /// <summary>
 /// Checks that the correct number of tasks is generated
 /// </summary>
 [TestMethod]
 public void WorkList_CorrectNumberOfTasksCreated_Success()
 {
 int.TryParse(Results.GetResult(TestType.ProcessInstance), out this.proceessInstance);
 int actual = 0;
 actual = workflow.GetTaskCount(this.proceessInstance, this.ProcessName);
 Results.SaveResult(TestType.TaskCount, actual.ToString());
 Assert.AreEqual(this.TaskCount, actual);
 }
 /// <summary>
 /// Gets the activity name of the task
 /// </summary>
 [TestMethod]
 public void WorkList_RetrieveTaskList_Success()
 {
 string Actual = string.Empty;
 int.TryParse(Results.GetResult(TestType.ProcessInstance), out this.proceessInstance);
var task = workflow.GetTask(this.proceessInstance, this.ProcessName);
 
 this.SerialNumber = task[0].SerialNumber;
 Results.SaveResult(TestType.SerialNumber, this.SerialNumber);
 this.DestinationUser = task[0].Destination;
 Results.SaveResult(TestType.Destination, this.DestinationUser);
 Actual = task[0].ActivityName;
 Results.SaveResult(TestType.TaskActivity, Actual);
 Assert.AreEqual(this.TaskActivity, Actual);
}
 /// <summary>
 /// Actions a task
 /// </summary>
 [TestMethod]
 public void Task_GetActions_Sucess()
 {
 Boolean Actual = false;
 this.SerialNumber = Results.GetResult(TestType.SerialNumber);
 this.DestinationUser = Results.GetResult(TestType.Destination);
K2WorkflowMap.TaskDetails task = workflow.OpenTask(this.SerialNumber, this.DestinationUser)[0];
 Actual = workflow.ActionTask(this.TaskAction, this.SerialNumber, this.DestinationUser);
 Assert.AreEqual(true, Actual);
}
/// <summary>
 /// checks to see if task is complete by checking that task has gone
 /// </summary>
 [TestMethod]
 public void Task_CheckTaskComplete_Success()
 {
 int.TryParse(Results.GetResult(TestType.ProcessInstance), out this.proceessInstance);
 int actual = 0;
 actual = workflow.GetTaskCount(this.proceessInstance, this.ProcessName);
 Results.SaveResult(TestType.TaskCount, actual.ToString());
 Assert.AreEqual(0, actual);
 }
 /// <summary>
 /// Checks the correct number of activities ran
 /// </summary>
 [TestMethod]
 public void Activities_CompareNumberOfActivities_Success()
 {
 
 Thread.Sleep(milliseconds);
 int.TryParse(Results.GetResult(TestType.ProcessInstance), out this.proceessInstance);
int NumberOfActivitiesRan = workflow.GetActivities(this.proceessInstance.ToString()).Count;
 String[] activities = this.Activities.Split(';');
 int count = 0;
 foreach (var activity in activities)
 {
 count++;
}
Assert.AreEqual(count, NumberOfActivitiesRan);
 }
/// <summary>
 /// Checks the correct activities were executed in correct order
 /// </summary>
 /// 
 [TestMethod]
 public void Activities_CorrectActivitiesRan_Success()
 {
 Thread.Sleep(milliseconds);
 int.TryParse(Results.GetResult(TestType.ProcessInstance), out this.proceessInstance);
Boolean actual = workflow.CompareActivities(this.proceessInstance, this.Activities);
 Assert.IsTrue(actual);
 }


}
}

Next Challenge

It’s that time of the year again where we start to move from those cold winter nights and frosty mornings.  To longer warmer days as we move towards Spring.

For me I am looking for that next  challenge. If your company uses K2 and you need some help whether it be solution design, development of K2 based applications. Or if your organisation is looking to create a centre of excellence within your organisation or you have team members that need to be trained in developing with K2 Blackpearl and Smarforms. Then please get in touch with me  as I am a  K2 Master and I specialise in K2 development and evangelism.

My rates are competive within the K2 market and I am willing to work anywhere in the UK/Europe/World. If you need more than one person then I can also provide your organisation with a K2 development team with each member having in depth knowledge and experience working in the K2 platform

Below is my experience and if you need someone like me in your organisation please email me at simon.allport@cloudfish.solutions or ping me on LinkedIn

With over 17 years experience working on Microsoft based solutions, I have managed and designed solutions for a number of large enterprise clients including the Channel 4,NHS, MOD and NATO.  I am a regular contributor at industry events and have presented at a number of SharePoint conferences.

Working as part of a team, I am highly motivated to produce software that is functional and looks good.  I am security cleared for the Ministry of Defense.

Technologies that I have experience with

C# Crystal Reports
SharePoint 2007,2010,2013 HTML \ XML \CSS
K2 Blackpearl

K2 Appit

JavaScript

WPF Access 97/2000
N-Tier Architecture Object Oriented / Data Modelling
Silver Light ASP \ ASP.net
AJAX IIS \ DNS Administration
SQL Server 00, 05, 08, 12, Azure Office 365
Unit testing VB .net  & VBScript
Entity Framework Linq
SAP

Oracle

Salesforce & Dynamics CRM

Web Services (REST, WCF, Asmx, Azure Data)

Skills:

  • Project Management
  • Solution Design
  • System Analysis
  • Development
  • Technical deep dive talks
  • Leading Training Sessions
  • Presenting at Key Events
  • Researching new technology
  • Proof of concepts
  • Specification Writing
  • Evangelism

Other Qualifications

  • Certified Scrum Master
  • K2 Master
  • K2 Black pearl Core
  • K2 Smart forms builder
  • K2 Connect
  • K2 Extensions
  • K2 SharePoint
  • MCP in .NET Framework 3.5, ASP.NET Application Development
  • .Net Enterprise Solutions
  • Microsoft Curriculum Certificate (SQL Server)

cert

k2_master_badgems_cert_professional_logo_blk_rgb

References and full CV

Available on Request

K2 Management Portal: Using the K2 Scheduler

In the latest update of K2, there is now a management portal and one of the key new features of this is the ability to schedule workflows. Which up to now was only available if you had K2 for SharePoint , Appit or if you could decipher the K2 Scheduler API. Your only other option was to write a windows service that would call your scheduled workflow.


How to access the K2 Management portal

The K2 management portal can be accessed from here http://[k2servername]/Management

home

The management portal replaces the management console found in the K2 Work space, but doesn’t replace the work space completely.

The K2 Scheduler lives under ‘Workflow Server’ heading in the menu on the left. Expanding ‘Workflow Server’ you have a number of different options. The one we are after is ‘Schedules’ which is the fourth one down.

home1

Schedules

Clicking on Schedules shows a list of currently scheduled workflows and the ability to ‘Add’, ‘Edit’ and ‘Delete’  scheduled workflows from the scheduler


Creating a new scheduled workflow

To create a new scheduled workflow follow the following steps

  1. Click on ‘Schedules’
  2. Click on ‘New’
    scheduler
  3.  A form will pop up, for you to fill in
  4. Enter a name of what the scheduled workflow will be called
  5. Enter a description
  6. Enabled is checked by default
  7. Next enter the name of the workflow you want to schedule, either by entering it’s full name or by clicking on the search button to search for it
  8. Once you have found the desired workflow, it’s process data fields will load up and up have the option to populate them with values
  9. The folio can also use the date and time as default or can be edited with a value
    scheduler1
  10. Now if we scroll down the form, we can now tell the scheduler when it should run
  11. Under pattern, we can choose what the scheduling pattern should be


Pattern
Description
Once K2 will schedule the workflow to run just once on a certain day and time

once

Daily K2 will schedule the workflow to run every weekday or intervals of days. It also has a start date and time and can be configured to end after a number of occurrences or by a end date and time

daily

Weekly K2 will schedule the workflow to run at least once a week on a certain day. It also has a start date and time and can be configured to end after a number of occurrences or by a end date and time

scheduler3

Monthly K2 will schedule a workflow to run at least once a month, in monthly intervals. It has the ability to schedule a workflow to start on the last or first day of the month or first / last day of the week. It also has a start date and time and can be configured to end after a number of occurrences or by a end date and time

monthly

Yearly K2 will schedule the workflow to run at least once on a particular month. It has the ability to schedule a workflow to start on the last or first day of the month or first / last day of the week. It also has a start date and time and can be configured to end after a number of occurrences or by a end date and time

yearly

Interval With intervals, you can tell K2 to schedule a workflow to start by minutes, hours, days,months and years.It also has a start date and time and can be configured to end after a number of occurrences or by a end date and time

interval

12. Click on ‘Ok’, the scheduled workflow is now scheduled to start at it’s selected interval.

scheduler4

13. From here you can see when it last ran, whether it has been successful or failed and also the ability to enable and disable the scheduled workflow

scheduler5

With K2 releasing the Scheduler in the management portal, this means we can now build some interesting workflows that relies on scheduling of workflows to perform autonomous daily tasks. Such as sending out daily emails to a subscription list.

Testing Smartforms with the Smartform tester in K2 4.7

There are a number of Smartform testing tools currently on the market to allow developers to test their Smartforms. But in 4.7 there is something hidden away that is just dying to be played with. Like the developer’s best friend SmartObject Service Tester, there is now a tool that will allow you to automate testing of your Smartforms.

How to access it

To access this hidden gem of a tool, go to the K2 Designer and click on ‘show’ link at the bottom of the page and in the pop up click on System.

show-all

How you will notice in the context browser for the designer there is now some additional categories.

This slideshow requires JavaScript.

  1. Expand System
  2. Expand Forms
  3. Expand Smartform tester
  4. Click on ‘SmartForms Tester – Landing Page’
  5. Click on the ‘Runtime URL’ in the properties page
  6. The Smartform Tester Portal will now load up and we can start to build a test case


SmartForms Tester Portal

This is where we can manage the automating of the forms from creating new tests to running existing ones.

smartform-tester-form

K2 do give us some examples of how to use the tester portal in the ‘Examples’ folder or what they like to call ‘Suites’

So lets create a ‘Suite’


Creating a Test Suite

  1. Click on ‘Test Suites’
  2. A list of options will appear at the top
  3. Click on ‘New Suite’
  4. A pop up window will appear enter in the name of  what your suite is going to be called. I am going to call mine ‘Annual Leave’
  5. Click on ‘Accept’
  6. Click on ‘Refresh List’ button
  7. You will now see the suite you just created in the list

This slideshow requires JavaScript.


Creating  a new test

  1. Click on the suite you just created
  2. The list options above will change
  3. Click on ‘New Test’
  4. This will open a new window, from where we can build a new test case
  5. Click on smartform-tester-form25 in the Smartform section and choose the View or Smartform you want to test. In this case i am going to create a simple test to test a view
  6. When you select a view/form it will then appear in the in  top section of the testing  form
  7. Below the name of the select artifact
  8. Is the actions this where will build the test script that the portal will execute for us


This slideshow requires JavaScript.

Creating the automated test script

  1. In the actions section, you will see there part of a action already selected
  2. Because i have chosen a view to test. The first drop down list has ‘View’ selected. The 2nd drop down list has ‘Control’ selected.
  3. From the 3rd drop down list we can now choose a control on the view
  4. I am going to choose  the picker control ‘pkrUsername’.
  5. A 4th drop down list appears and should have ‘Change Value’ selected
  6. Text box is also available, where a value can be entered. I am going to enter in ‘sallport’smartform-tester-form8
  7. When we execute this action  the tester, will put ‘sallport’ into the picker control for you.
  8. Click on ‘Add’ to add another action smartform-tester-form26
  9. I am going to select the ‘calStartDate’ control and enter in a date and i am going to the same with for ‘calEndDate’
  10. I am going to add another action so it can ‘select’ a leave type. I am going to enter in ‘Paid leave’
  11. Last of all i am going to select the ‘Button’ control and tell it to click the button.
  12. Now that my simple test script of filling out the view and clicking on the button to submit the data. I am ready to get the tester to run it for me.
  13. But before I do that just click on the smartform-tester-form27 in the top left hand corner and select ‘Save’ from the context menu
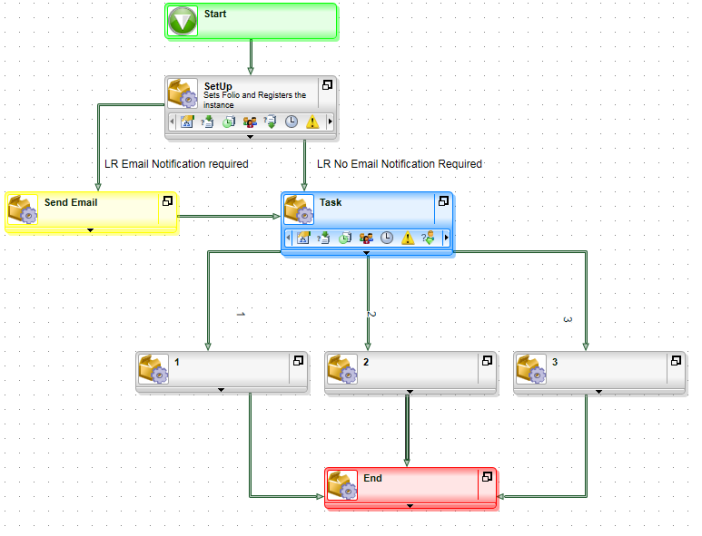
  14. ‘Save Test’ pop window will appear, enter in a name for test and make sure the correct suite is selected and click on ‘Ok’

This slideshow requires JavaScript.

Running the test

From the test designer, we can either run the whole script or by clicking one of the actions we can test a particular line.

  1. I am going to run the whole script, so click on ‘Run All’ button. The designer will then carry out the actions line by line.
  2. A report will then be displayed telling you if it was successful or not.
  3. The actions line will also all be green and of course the data inserted into the view will be displayed and of course you can check the SmartObject that was used to save the data.
  4. You can also run the test from main testing portal , by selecting the test from the suite and then clicking on ‘Run Test’ option

This slideshow requires JavaScript.


So this is a basic how to use the Smartform tester, and there are other options that I have not covered such as delayed actions and modifying variables and assertions such total count of items in a list etc..

Demo forms can be downloaded from here

Conclusion

What is good about this tool it’s all built using Smartforms, so not only are we seeing some new controls that are not made available yet to in the Smartform designer, such as the context menu, the action list with is probably a more advanced list view. I hope these will made available soon.

The 2nd good thing about this is that the test data is available as SmartObjects which mean we can then use these to build rich testing reports that also take into account business data.

It’s great start to something that will hopefully be fleshed out with further updates in the future. So it would be possible to fill out the form, get a task and action it, all in one test case.


Bill’s Tasking Workflow Pattern

Sending tasks is easy to do in K2, but to make them more adaptable from outside the work is a bit more tricky. A colleague of mine named Bill Irvine, came up with pattern to standardize the way tasking is developed and used.  So taking his idea i have come up with own interpretation of his tasking pattern so this why i am calling this Bill’s  tasking workflow pattern.


Getting Started

To get started we need the following SmartObjects, I have included the sql for the tables and store procedures.  When the framework is released it will be included as apart of that.

Tables

Tasking relies on the following tables

tasking-db

Task Library

Contains all the task types. It contains Id of the form that the task will navigate too and also whether task needs to send task notification email

CREATE TABLE [dbo].[TaskLibrary](
[TaskTypeId] [uniqueidentifier] NOT NULL,
[TaskName] [nvarchar](50) NULL,
[FormId] [uniqueidentifier] NULL,
[TaskDescription] [nvarchar](max) NULL,
[EmailNotification] [bit] NULL,
[Escalation] [bit] NULL,
[EscalationTimeId] [uniqueidentifier] NULL,
[EmailTemplateId] [uniqueidentifier] NULL,
[Slots] [int] NULL,
CONSTRAINT [PK_TaskLibrary] PRIMARY KEY CLUSTERED
(
[TaskTypeId] ASC
)WITH (PAD_INDEX = OFF, STATISTICS_NORECOMPUTE = OFF, IGNORE_DUP_KEY = OFF, ALLOW_ROW_LOCKS = ON, ALLOW_PAGE_LOCKS = ON) ON [PRIMARY]
) ON [PRIMARY] TEXTIMAGE_ON [PRIMARY]

Note if not using framework change, form id data type from unique identifier to Nvarchar(100).

Task Actions

Task Actions contains all the possible actions for that particular task type

CREATE TABLE [dbo].[TaskActions](
[TaskActionId] [uniqueidentifier] NOT NULL,
[TaskTypeId] [uniqueidentifier] NULL,
[TaskAction] [nvarchar](50) NULL,
[TaskValue] [int] NULL,
CONSTRAINT [PK_TaskActions] PRIMARY KEY CLUSTERED
(
[TaskActionId] ASC
)WITH (PAD_INDEX = OFF, STATISTICS_NORECOMPUTE = OFF, IGNORE_DUP_KEY = OFF, ALLOW_ROW_LOCKS = ON, ALLOW_PAGE_LOCKS = ON) ON [PRIMARY]
) ON [PRIMARY]

Tasks

Tasks contains the destination users for the task type, the task’s serial number against a particular task type and process instance Id

CREATE TABLE [dbo].[Tasks](
[TaskId] [uniqueidentifier] NOT NULL,
[WorkflowType] [uniqueidentifier] NULL,
[SN] [nvarchar](50) NULL,
[Username] [nvarchar](50) NULL,
[BusinesObjectId] [nvarchar](50) NULL,
[ProcessInstanceId] [int] NULL,
[TaskTypeId] [uniqueidentifier] NULL,
[TaskAction] [nvarchar](50) NULL,
[DestinationKey] [uniqueidentifier] NULL,
CONSTRAINT [PK_Tasks_1] PRIMARY KEY CLUSTERED
(
[TaskId] ASC
)WITH (PAD_INDEX = OFF, STATISTICS_NORECOMPUTE = OFF, IGNORE_DUP_KEY = OFF, ALLOW_ROW_LOCKS = ON, ALLOW_PAGE_LOCKS = ON) ON [PRIMARY]
) ON [PRIMARY]

All tables have basic CRUD methods to manage the data and there is also some additional store procedures to help with the tasking pattern


The tables and store procedures scripts can be accessed here 

SmartObject 

The tasking SmartObject is called K2C.CMN.SMO.Tasking, and it manages the creation of creating task types and its related task actions. It also manage the destination user’s task details

Properties

Name
Type
Description
TaskId GUID Destination User Task Id for an instance of the task
ProcessTypeId GUID Process Type Id
Username Text FQDN of the destination user
BusinessObjectId Text Primary Key of the main business data
ProcessInstanceId Number Id of the instance of the process
SN Text Serial Number for the task
TaskTypeId GUID Id for the type of task
TaskAction Text Action for the task
TaskActionId GUID Action Id for a particular task type action
TaskValue Number Task value that relates to actual action in the workflow either 1,2 or 3
TaskName Text Name of the task type
FormId GUID Form Id from the form library
TaskDescription Text Description of the task type
EmailNotification Yes/No Whether task needs to send an email

SmartObject Methods

Method Name
Store Procedure
Description
Create Task Action sp_TaskActionsCreate Creates a new action for the task type
Delete Task Action sp_TaskActionsDelete Deletes the action for the task type
Get All Task Actions sp_TaskActionsList Gets a complete list of the task actions
Get Task Action sp_TaskActionRead Gets a action for Task Type
Update Task Action sp_TaskActionUpdate Updates a action in the task type
Create Task Type sp_TaskLibraryCreate Creates a new task type
Delete Task Type sp_TaskLibraryDelete Deletes a task type
Get all Task Types sp_TaskLibraryList Gets all Task Types
Get Task Type sp_TaskLibraryRead Gets a particular task type
Update Task Type sp_TaskLibraryUpdate Updates a task type
Create Task sp_TasksCreate Creates a new task entry
Delete Task sp_TasksDelete Deletes the task
Get All Tasks sp_TaskList Gets a list of tasks
Get Task sp_TaskRead Gets a particular task
Update Task sp_TaskUpdate Updates the task
Get tasks by type sp_TaskActions Gets all actions by task type
Update Task Action sp_TasksUpDateAction Updates the destination user task’s action
Task Result sp_TaskResult Gets result of the task
Create Destination Key so_CreateDataFieldKey Creates a group key for destination users

Workflow

This version is very simple and only works for one slot, but it could be expanded to manage multiple slots.

Process Data Fields

The process data fields needed for this workflow are

Data Field Name
Data Field Type
Description
In or out
TaskId String So we know what task type In
ParentProcessInstanceId Number Parent Process Instance Id In
 DestinationKey  string
Expire Boolean stops start going to expire, set to false Int
ActionResponse String action value returned Out

Simple tasking pattern

task-workflow-v2

Activities

  1. Setup – Links workflow to framework
  2. Send Email, sends email based on a template
  3. Task, creates task based on the task type Id
  4. Action 1 ,2 , 3,  records the action returned
  5. Expire , responds to the task escalating
  6. End, tidies everything up based on framework


Setup

The setup activity does all the framework registration

Send Email

This activity will record the task with the notification service. It will also call the Email service and pass in the template id from the task type reference

Task

It will add the Serial Number to the destination user record in tasks and the activity will also have a client event. It will get task url from the form library and the destination user will come from task reference. It will have 3 actions (1,2,3)

Action 1, 2, 3

Will record the action  against the task by getting the action name from the ‘Get Task Action’ method and it will set the data field ‘Action Response’ with the action value

End

Will do the framework clean up, so deleting  external data fields etc…


Notes

Remember to audit logs (for the actual task workflow and also for the parent workflow so we can record the action e

Line Rules

Line Rule
Description
LR Email Notification Required If method ‘Is Email Required’ returns true
LR No Email Notification Required If method ‘Is Email Required’ returns false
Start to Expire Data field ‘Expire’ = ‘True’

References

The tasking pattern workflow requires two references

  1. Destination
  2. Task Type

references

Destination Reference

Gets a list of destination users for a particular task type

  1. In the  Data (3rd) tab of the context browser in K2 Studio / Visual Studio
  2. Right click on ‘References’ and click ‘Add’
  3. Give the reference a name ‘Destination’
  4. Select the method ‘K2C.CMN.SMO.Tasking.Get Destination Users’
  5. For the input property use the ‘DestinationId
  6. Click ‘Next and then ‘Finish’

reference


Task Type Reference

Gets information about the task type such as whether an email should be sent, which form to use as the task.

  1. In the  Data (3rd) tab of the context browser in K2 Studio / Visual Studio
  2. Right click on ‘References’ and click ‘Add’
  3. Give the reference a name ‘Task Type’
  4. Select the method ‘K2C.CMN.SMO.Tasking.Get Task Type’
  5. For the input property use the ‘Task Id’ data field
  6. Click ‘Next and then ‘Finish’

tasking

Building the tasking workflow

  1. Create an activity on the canvas and name it ‘Setup’
  2. If you are using framework then, add in the related framework events, else just put a  placeholder event in their for now.
  3.  Create another activities called ‘Send Email’ and ‘Task’
  4. Create a line between ‘Setup’ and ‘Send email’ and another line between ‘Setup’ and ‘Task’
  5. Right click on the line between ‘Setup’ and ‘Send Email’
  6. Select properties
  7. In General properties give it the label of ‘LR Email Notification required’
  8. Click on the ‘Line rule’ section greenarrow
  9. Click on ‘Add’
  10. In the rule editor now. In the ‘First Variable’ open the context browser expand the 3rd tab
  11. Expand references, expand ‘Task Type’
  12. Select ‘Email Notification’, either drag it into ‘first variable’ or click on ‘Add’
  13. Comparison operator should be ‘=’
  14. Second variable will be ‘True’
  15. Click ‘Ok’ and then ‘Finish’
  16. We have now added a rule that will check to see if an email notification is required.
  17. We now need to do the same for the other line we created, except call the line ‘LR No email notification required’
  18.  Second variable for this rule should be ‘False’

This slideshow requires JavaScript.

The email event

  1. Add an email event in the ‘Send Email’ activity
  2. Give it a name like ‘send email’
  3. Select ‘originator’ and unchecked ‘specify’ in ‘Recipient’

Task Activity

In the task activity we need to add a ‘SmartObject event’ that records the serial number of the task and we also need to add a client event

Recording the ‘Serial Number’

  1. Drag the ‘SmartObject Event’ into the task event
  2. Give the event a name ‘Add sn’
  3. Select the SmartObject method ‘Add task sn’ from the SmartObject ‘K2C.CMN.SMO.Tasking’
  4. Click ‘Next’
  5. Now in ‘Input Mapping’ for the ‘PSN’ click on ‘Assign’
  6. Expand Process Instance from and select ‘id’
  7. Type in ‘_’
  8. Expand ‘Activity Destination Instance’ and select ‘Id’
  9. Click on ‘pTaskId’ and ‘Assign’
  10. Expand the ‘Destination’ reference and  use Task Id
  11. This will now save the task serial number against the destination user.

This slideshow requires JavaScript.

Adding user task

  1. Drag a ‘Client Event’ in to the task activity
  2. Name it ‘User Task’
  3. Check ‘Task Item URL’
  4. If using framework follow this route
    1. dd
  5. If not using framework follow this route
    1. Click on eclipse
    2. Go to the 3rd tab expand ‘References’
    3. Expand ‘Task Type’
    4. Drag ‘FormId’ or select ‘Form Id’ and click on ‘Add
  6. Click on ‘Next’ and ‘Next’ again
  7. In Actions click on ‘Add’
  8. In the ‘Add Action’ window, enter 1 in name and click on ‘Ok’
  9. Repeat this adding 2 and 3 as a action
  10. Click ‘Next’ and ‘Next’ again
  11. In Destination users click on ‘Add’
  12. Click on eclipse,
  13. In the context browser
  14. Click on 3rd tab
  15. Expand References
  16. Expand ‘Destination’
  17. Click on ‘Username’ and click on ‘Add’
  18. Click ‘Next’ and then ‘Finish’
  19. We have now created a generic task

This slideshow requires JavaScript.

Recording the Action

  1. Create a ‘Default Activity’ and name it ‘1’
  2. Drag a SmartObject Event into the event
  3. Name it ‘Task Action’
  4. For ‘SmartObject  Method’ use ‘Update Task Action’ from ‘K2C.CMN.SMO.Tasking’
  5. Click ‘Next’
  6. In Input Mapping, click on ‘pTaskAction’ and then on ‘Assign’
  7. Click on eclipse, it opens the context browser
  8. Go the 1st tab, expand SmartObject Servers
  9. Expand the SmartObject ‘K2C.CMN.SMO.Tasking’
  10. Expand the method ‘Get Task Action’
  11. Select the ‘TaskAction’ property
  12. Click on ‘OK’
  13. This method requires some additional properties.
  14. ‘pTaskValue’ property needs to be 1
  15. ‘pTaskTypeId’ property needs to be the datafield called ‘TaskId’
  16. Click ‘Next’ and ‘Next’ again
  17. Select ‘Task Action’ and click ‘Next’
  18. Make sure ‘Return a single item’ is checked
  19. Click on ‘Finish’
  20. Click on ‘OK’
  21. What we have just done is get the text value of the action for the task type and of the action value of 1.
  22. pTaskId just needs to be Task Id from the destination reference
  23. Click on ‘Finish’
  24. Copy this Activity and rename it to ‘2’
  25. and change ‘PtaskValue’ to ‘2’
  26. Repeat steps 24 and 25 and change the ‘1’ to a ‘3’
  27. These activities will now record the action of the task against the destination user
  28. We also need to record the action in the data field ‘Action Response. So do to steps 9 to 23 in a data event for each of the 3 activities. This will allow the parent workflow to easily retrieve the action.
  29. Connect the out come lines to the activities we just created
  30. Create an activity called
  31. Last of all create a activity called ‘End’ with a placeholder called ‘End’ and join the 3 activities to the end activity.


Your tasking workflow should look something like this

taskingwkf.PNG


Download workflow, SmartObject from here


The workflow could be extended to allow multiple slots and multiple destinations. The great thing about a tasking pattern is that it just reduces development time and testing and allows actions to be dynamically added and removed, without the need to go into the actual workflow.

It also allows there to be generic task forms that just point to the tasking workflow and they just need the task type id to load up the correct actions for the task type.

Below is a brief explanation of how to use it, but I will go into more details on how to use it in a later article. For now it’s just about exploring the idea of a tasking pattern and how it would it work.

How to use the tasking workflow

To use the tasking workflow follow these simple steps

  1. Add the tasking workflow to the solution
  2. Create a new workflow
  3. Use the SmartObject event with ‘Create destination key’ method and bind the result to a data data field called ‘Destination key’ of type string
  4. Now we need to use the ‘Create Task’ method to add the destination user, task type id and destination key
  5. Add the IPC Event and point it to the tasking workflow
  6. Choose synchronous
  7. Map the following data fields ‘Task Id, Destination Key’
  8. For the return value map ‘Action response’ data field of the tasking workflow to the parent ‘Action response’ data field
  9. Then use a line rule to direct the workflow based on the ‘Action response’


How to: For Each Event

Over the last couple of weeks people have asked me how to use the for each loop event in K2. So I thought i would put this quick demo together.

The demo, that i am going to do is going to loop through a list of subscribers and update their status from ‘Not Sent’ to ‘Sent’.

Getting Started

I have created a simple Smart box  SmartObject for demo purposes that has the following properties

  1. 1. Name of type string
  2. Email of type string
  3. Id of type Auto number and Key
  4. Status of type string

smo

I have inserted 3 rows of data with the status of ‘Not Sent’. We will use this SmartObject to use the ‘For Each’ event to loop through the data.

Creating the workflow

for-each-simple

Adding the ‘For Each’ event

  1. Open K2 Studio or K2 for Visual Studio ( I am going to use K2 Studio)
  2.  Create a new workflow solution called ‘For Each Demo’
  3. Rename the workflow from process 1 to ‘ForEachWorkflow’
  4. Once the workflow canvas has loaded up
  5. Drag the ‘for each’ event on to the canvas
  6. In the event wizard, give the event the name ‘Loop demo’
  7. Click on Source ico icon, so the drop down list disappears  and open the context browser
  8. In the 1st tab (Environment) , expand ‘SmartObject Services’
  9. Go to the SmartObject you want to use and expand the list method you want to use
  10. Drag the property that you want to use, normally the primary key into the event box
  11. The SmartObject wizard loads up, click ‘Next’ and ‘Next’ again
  12. In ‘Select a return property’ make sure the ‘id’ value is selected.
  13. Click ‘Next’, make sure ‘Return all Results that match filter’ is selected.
  14. Click ‘Finish’
  15. For the reference name, enter in the name ‘Dummy Data Reference’
  16. For the index name, enter in the name ‘Dummy Index’
  17. Click on ‘Finish’

This slideshow requires JavaScript.

Interacting with the for each item

  1. Back in the canvas, you will notice there are now two line rules coming out of the activity
  2. Drag the placeholder event on the canvas and name both the event and activity with the name ‘End’
  3. Drag the ‘line’ named ‘No more items’ to the end activity
  4. Create a new activity on the canvas and name it ‘Status Change’
  5. Drag the SmartObject Event into the newly created activity
  6. In the event wizard for the SmartObject event, name it ‘Update Status’
  7. Select the update method for the SmartObject that you used with the ‘for each’ event
  8. Click ‘Next’
  9. For the ‘ID’ property, click assign
  10. In the context browser go to the 3rd tab (Data) and expand ‘Item references’ and then expand ‘ Loop demo reference’
  11. Click on ‘Id’ property and click on ‘Add’
  12. Click on ‘Status’ and click ‘Assign’ and enter in the text ‘Sent’
  13. Click on ‘Next’ and ‘Next’ again and then ‘Finish’
  14. Drag the remaining line named ‘Next item’ to this activity and then create a new line from this activity back to the ‘for each’ activity.

This slideshow requires JavaScript.

That is a simple example of using the ‘For each’ event. Anything that follows the ‘Next item’ line is in side the loop and has the context of the current row the loop is on. You can have multiple activities in this part and the workflow  will move on to the next item once it has completed everything in that section. You must always have a line going back to the activity with the ‘for each’ event in.

Other things to remember

  1. Choose 1 property to return in the for each event. Always best to use a primary or foreign key
  2. Remember to select ‘Return all Results that match filter’ as it will return the complete list back and it doesn’t matter if there is no filter applied.


Next step using references with the ‘For Each’ Event

So we have created a simple workflow with a simple for each loop. But what if we wanted to get more data from the for each event and then possibly use it in a line rule.

In the next example, the workflow is going to check the current status of the item it is looking at. If it’s status is already ‘Sent’ it will ignore it and move on to the next item in the list and if the status is ‘Not Sent’ it will then update the status as normal

I am going to use the same workflow as before

Creating the reference

  1. In the context browser, go to the 3rd tab (data)
  2. Right click on ‘References’ and click on ‘Add’
  3. In the ‘SmartObject Method Reference’ click on ‘Next’
  4. In name, give the reference a name , for my example i have used ‘Dummy data’
  5. In SmartObject Method, select a read type method that uses value you have selected in the for each as the input parameter. I am pointing my reference to the read method.
  6. Click ‘Next’
  7. In input mapping, click on Assign and select the id from the item reference for the for each loop.
  8. Click ‘Next’ and ‘Finish’
  9. We have now created a reference to get the related details based on the current row of the ‘for each’ event.

This slideshow requires JavaScript.


Editing the ‘for each’ line rule for ‘Next Item’

Now that we have the reference setup, we can edit the line rule for ‘Next Item’

  1. Right click on ‘Next item’
  2. Click on ‘Properties’
  3. ‘Line General Properties’ will load up. Click on  greenarrowthe green arrow for line rules
  4. Click on ‘Add’
  5.  In rule editor, select ‘And’ from ‘Boolean Operator’
  6. In ‘First Variable’ click on eclipse
  7. In the context browser,  go the references in the 3rd tab
  8. Expand References, expand your reference you created in the last section
  9. Drag ‘Status’ into the ‘First Variable’
  10. The ‘SmartObject Wizard ‘ pops up, click on ‘Status’
  11. Click ‘Finish’
  12. Select ‘<>’ from ‘Comparison Operator’
  13. In the ‘Second Variable’ enter ‘Sent’
  14. Click on ‘Ok’
  15. Click on ‘Finish’
  16. We now need to create another rule that is similar to the ‘Next Item’ rule but where the ‘Status’ is equal to ‘Sent’

This slideshow requires JavaScript.

Creating a new line rule for ‘Next Item’ and where status is equal to ‘Sent’

  1. Right click and drag a line from the ‘For Each’ activity to ‘Update Status’
  2. Then drag the line from ‘Update Status’ to ‘For Each’. (We have to do this as line can’t go back on it self without being connected to another activity first)
  3. Right click on the line and click on ‘properties’
  4. In ‘Label’ enter ‘New Item and status is sent’
  5. Click on greenarrow and then click on ‘Add’
  6. In the Rule editor in ‘First Variable’
  7. Click on eclipse and expand the process data fields
  8. Click on ‘Dummy index result’ and click ‘Ok’
  9. Select ‘=’ for the operator
  10. In Second variable enter in ‘True’
  11. Click ‘Ok’
  12. Click on ‘Add’
  13.  In rule editor, select ‘And’ from ‘Boolean Operator’
  14. In ‘First Variable’ click on eclipse
  15. In the context browser,  go the references in the 3rd tab
  16. Expand References, expand your reference you created in the last section
  17. Drag ‘Status’ into the ‘First Variable’
  18. The ‘SmartObject Wizard ‘ pops up, click on ‘Status’
  19. Click ‘Finish’
  20. Select ‘<>’ from ‘Comparison Operator’
  21. In the ‘Second Variable’ enter ‘Sent’
  22. Click on ‘Ok’
  23. Click on ‘Finish’


This slideshow requires JavaScript.


Download example here